Loading...
Loading...
Loading...
Loading...
Loading...
Loading...
Loading...
Loading...
Loading...
Loading...
Loading...
Loading...
Loading...
Loading...
Loading...
Loading...
Loading...
Loading...
Loading...
Loading...
Loading...
Loading...
Loading...
Loading...
Loading...
Loading...
Loading...
Loading...
Loading...
Loading...
Loading...
Loading...
Loading...
Loading...
Loading...
Loading...
Loading...
Loading...
Loading...
Loading...
Loading...
Loading...
Loading...
Loading...
Loading...
Loading...
Loading...
Loading...
Loading...
Loading...
Loading...
AG5’s skills management software helps you visualize skill gaps, track training requirements, and manage all your employee skills and certifications in one secure platform. At the heart of every product, service, and process are people – and specifically, their skills. By effectively managing and developing these skills, businesses can increase performance, streamline operations, and
Businesses use our software to manage the skills/qualifications of their workforce. Some common use cases are:
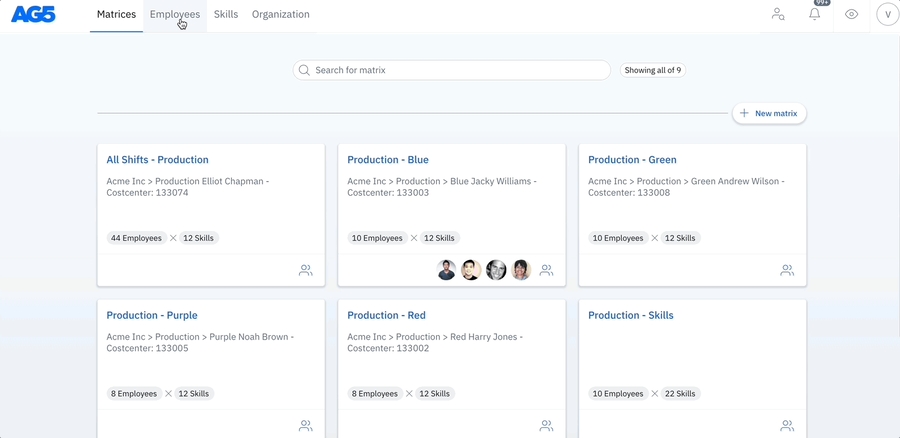
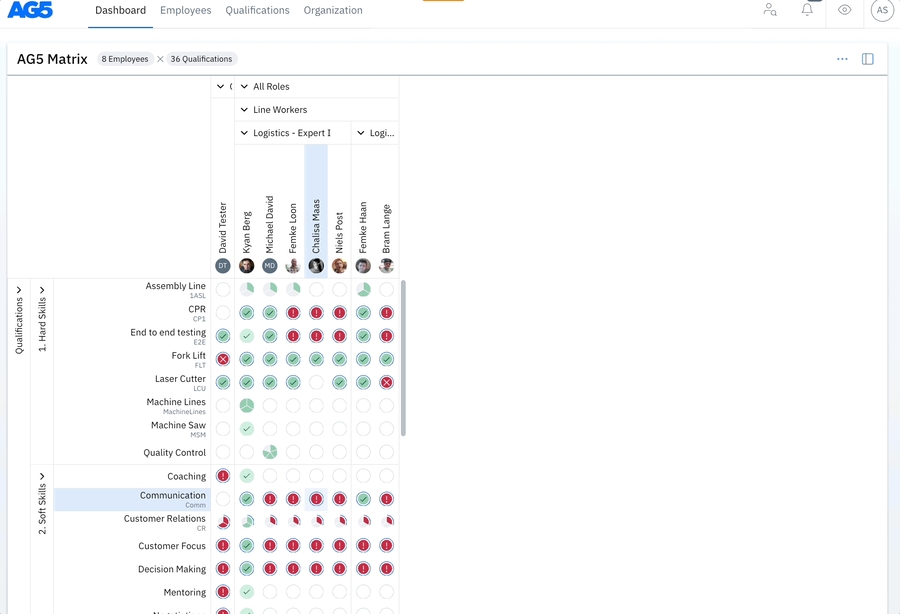
Creating skills matrices
Manage skills
Manage requirements
Preparing for audits
Become compliant
Skill assessment and allocation
Capability building
AG5 is purpose-built for complete workforce skills management.
Here’s how it helps:
Create skills matrices with zero programming knowledge
Say goodbye to broken or outdated templates
Easily slice and dice your data any way you need
Share matrices with coworkers or stakeholders instantly
Our help centre contains various articles about our software, which are designed to help you understand our features so that you'll be able to fulfill your skills management needs. If you are an existing user of AG5, then we advise you to search for the specific articles relevant to your questions.
But if you are a new user and need to set up your AG5 software for the first time, then we advise you to read through the following articles in order, instead of at random.
AG5 is designed to make skill management simpler, faster, and more transparent. Here are all the resources you need to get started, troubleshoot issues, and discover new ways to optimize your setup.
Simplify version management – no more tracking changes in multiple files
Reduce your search time for qualified employees by more than 50%
Identify suitable replacements at a moment’s notice
Save time and minimize errors – 83% less data entry compared to Excel
Access employee documentation and proof of achievement in one place
Spot areas where employees can improve
Receive automatic notifications when skills or certifications are about to expire
Rely on automatic timestamping and historical data tracking
Set up multi-person workflow approvals for confirming and updating production records
Respond instantly to auditors’ questions with clear data
Pinpoint emerging skill gaps and underperforming KPIs
Automatically retrieve results from your integrated e-learning systems
AG5 offers a range of features—like dynamic skills matrices, automated notifications, and intuitive reporting—to help you stay compliant and close skill gaps across your organization. Check out our feature-specific articles to learn more.
Use our search bar to find quick answers, or browse through categories for step-by-step instructions and best practices. If you still need assistance, reach out to our support team—we’re here to help.
We’re excited to see how AG5 can transform your skills management!
The following articles in this order will help you quickly setup AG5 to manage the skills (also known as Qualifications) of your employees:
Once you've finished with the above eight, feel free to peruse the rest of our articles, which are designed to help you understand the details of AG5 and manage your skills (also known as Qualifications) as effectively and efficiently as possible.
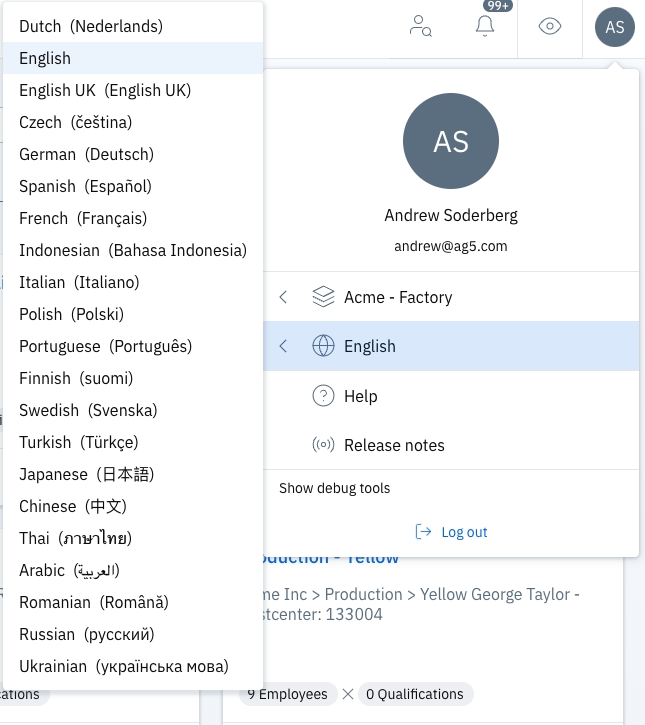
All of these are in English, so if you usually work with AG5 in another language, you might want to change over to English temporarily in order to follow along with the steps in the article.
To change the language of AG5, click on your initials in the top right corner and navigate to the language menu:
If you have any questions, please feel free to reach out to us at [email protected], or by calling +31 20 463 0942
A textual description of what each level means. (levels that are set as achieved result or minimum requirement)
To make sure every user has the same understanding of what exactly each level means. In the picture below, you can see the level descriptions that are specifically defined for the Skill (also known as a qualification) "Drilling".
This is especially important when different users can create new skill results (e.g. when you have many trainers or are using self-assessments). They need to have the same understanding of what each level means.
You can define general level descriptions within a rating scale, or specifically within a skill. And these level descriptions can be made visible while adding skill results.
Read in how you can define general level descriptions within a rating scale.
The Advanced Analytics API is an AG5 service that enables your data from AG5 to be used in Data Analytics or Data Visualization tools. The provided data comes from the AG5 DataLake, is derived from the data stored in the AG5 system, and selected with the purpose of delivering additional insights. The benefit of this solution is that it allows you to utilize the skills insights in your other analyses.
Please note that the Advanced Analytics API requires knowledge of tools used for data preparation and data visualization. The Advanced Analytics API exposes your data stored in AG5 and we offer guidelines, but we do not offer consultancy on using different external data tools.
The Advanced Analytics API can be used to acquire the following information:
Grouping Compliance - Analyze compliance on an aggregate level in your organization.
Latest update: March 31st, 2025
We are pleased to announce the release of the second version of our Insights Dashboard.
As our second release, we have implemented much of your feedback as possible at this time, although we are still interested in any further feedback you have. Your input will continue to help us refine and expand the Insights dashboard in future updates.
This new Insights application is currently available only in English.
Our first release focused on repository-wide skills compliance and the underlying data to calculate these compliance metrics.
There are some differences in the terminology used in the API and the AG5 User Interface. The table below provides the mapping.
A requirement exemption means that some specific person is excluded from / does not have to fulfill a certain skill (also known as a qualification) requirement. Even though according to his position (e.g. job role XX), it is a requirement, as long as the exemption is active, the requirement is muted for this employee. For all other employees with job role XX, this requirement still exists.
It's possible to freely export your data from AG5 in many places, which can be useful for building your own reports.
Data is exported in the .xlsx Excel format unless your report has over 100K items, in which case it will be in the .csv format.
Admin, super user or matrix access user accounts are required in order to be able to initiate exports.
Exports are possible from any page that has the 'Export' icon:
The 'Export' icon is dynamic, and will only appear in the top right corner of the following pages once data is present:
Employees, skills, skill results, skill plannings, skill revocations, skill exemptions, skill requirements, personal requirements, prerequisite rules, the alert list, self assessment requests, skill result approvals, positions, groupings.
The ability to add their own skills (also known as qualification)
The ability to manage expiring skills
The access to their own skills documentation
The ability to self-assess themselves on request
The insights in which areas they can improve their performance
Every AG5 user that is registered as an employee will have a skills portfolio. These are the users you can see on the employee page.
Employees need to be given an account with portfolio rights to be able to access their skills portfolio. When employees log into their account they will automatically land on the portfolio page.
Users that have more access rights, for example, to see the people of their team in a matrix, or to act as Admin users, can also access their portfolio page.
This page can be accessed by clicking on your name icon at the top right-hand side of the screen. There you can switch between the 'My Portfolio' view, where you only see your own employee detail page, and the 'Organization' view, where you can see the matrices, other employees etc.
With the following method, employees can add the results of their own self-assessments or the skill result of an assessment done by someone else.
Go to the "My Portfolio" page via the menu
Select the three dots on the right side of a skill row
Select "Add result"
Add an expiration date
Add a remark
Add an attachment
Select the blue "Save" button
Your skill results have been saved
AG5 provides employees with the ability to take control of their skills development and skills by enabling them to update their skills portfolio without requiring any approval. This can be done simply by creating an account in AG5 and granting the skills portfolio edit rights. By doing so, employees can quickly and easily update their information, ensuring that their profiles are always accurate and up-to-date.
This not only saves time for HR professionals and managers but also empowers employees to take ownership of their professional growth and development. With this access to their own skills data, employees can better identify areas for improvement and take steps toward achieving their career goals.
For example:
An employee can’t perform a specific skill (driving a forklift) anymore due to physical limitations (i.e. broken leg). Then the manager can revoke that specific skill for a certain time. During this period the skill will be invalid (/seen as not achieved). And when the revocation ends or is deleted then the skill will be become valid again.
Example reasons:
Temporarily use of medicine
Regulatory reasons (fines)
Too many incidents
Physical limitations
Pregnancy
You can revoke a skill of an employee via the matrix page, employee portfolio page, and employee list page.
Statistics - Daily stored basic statistics about your AG5 data.
Entities - Detailed information about Skills, Groupings, reference data and more.
Events - Entity Event data and SIEM Event data.
For more detailed information, see our dedicated section in this knowledge base about the Advanced Analytics API.
Compliance per Skill and Employee. Quickly assess compliance levels for each skill and individual employee
Problems per Skill and Employee. Identify and address potential skill gaps more effectively
Please note that skills compliance reflects how well your workforce meets the required skills. If your organization primarily tracks achieved skills without tracking skill requirements, these charts will not show any insights.
This article details all the current figures from our initial Insights release.
With upcoming releases, we aim to continue to expand the capabilities of the Insights Dashboard. Here’s what you can look forward to:
Even more charts with enhanced visualizations for insights into:
Which skill areas are experiencing growth or decline, and what factors contribute to these changes?
How much time and resources have been invested in skill / employee training.
Which skills / employees have a positive impact on business drivers/goals, helping you improve your operational continuity, safety, efficiency and quality.
Greater flexibility through additional filters and options to save your filter settings.
Comparison tools for analyzing performance across teams or locations (or any other way you group your employees)
These updates will make the Insights Dashboard into an even more powerful tool to support your decision-making and strategic goals.
We value your feedback and would love to hear your thoughts! You can share your input via email or, if you prefer, we’re happy to arrange individual online meetings to discuss your experience and suggestions in more detail.
Your feedback is essential to help us improve and shape the Insights Dashboard, so don’t hesitate to reach out!
QualificationGrouping
Category (in the Library)
allFine (compliance_status)
Valid
fineNotRequired (compliance_status)
Valid not required
Advanced Analytics
AG5 User Interface
Achievement
Result
Employment
Employee
Measurement System
Rating Scale
Measurement Value
Level in Rating scale
Qualification
Skill
In AG5 you are able to create multiple rating scales. But, you can only use one rating scale per skill (also known as qualification). So it is important to define what rating scale you want to use for your skill.
The important attributes of a rating scale level are:
Name: This is the name of the level/
Level description: Here you can describe the meaning of the level.
Code: Here you can use a unique code for this level.
The level descriptions can be made visible while adding results.
You can create/define a new rating scale on the rating scale page. For this, you go to Organization > Rating scales. See the below video on how to create a new rating scale.
Each skill has a certain rating scale. And this rating scale can be used for different skills. But, the meaning of each rating scale level can be different per skill. And to make sure every user has the same understanding of what exactly each level means you can describe each level within the skill detail page.
Read in this article all about defining skill-specific level descriptions.
The purpose is to provide managers actionable insights to improve the skills of employees so that requirements (goals) can be met.
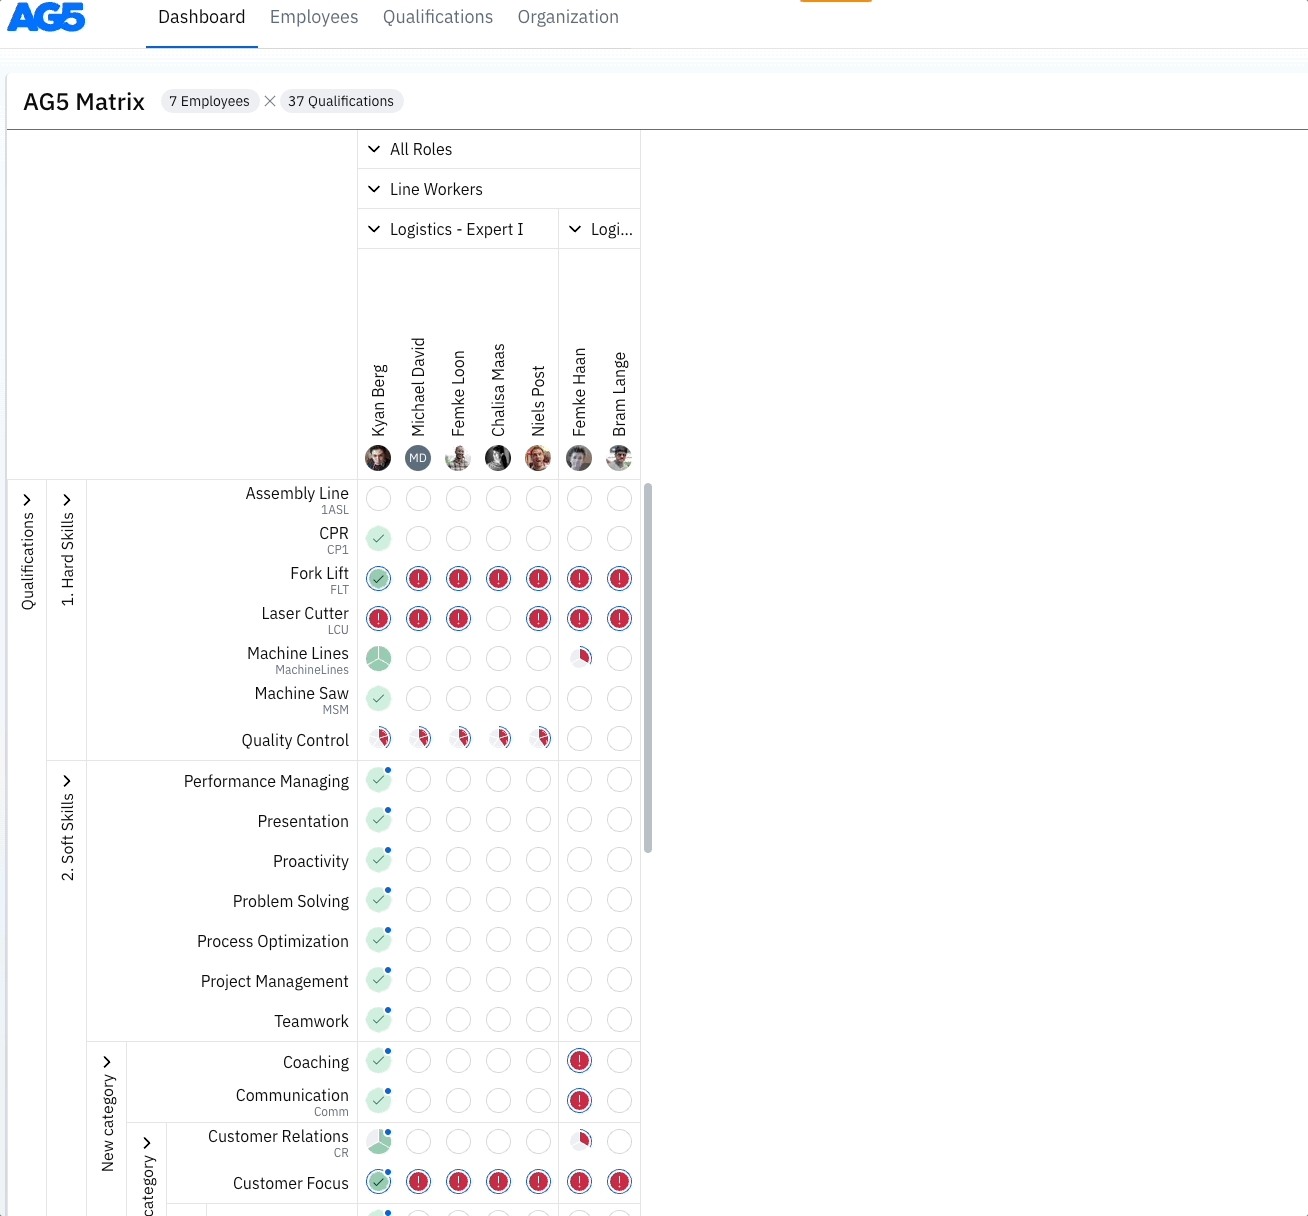
AG5 can measure the skills gaps of your employees. This measurement is based on the comparison of what skills the employees have against the skills that are required for those employees. For this AG5 needs to understand what the skills requirements are for each employee. This can be set with skill requirements in AG5. Read this article to understand how to set skill requirements as a basis to measure gaps.
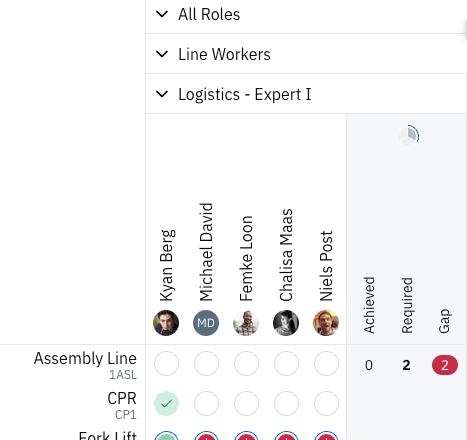
Analyze gaps by the matrix
After creating skill requirements you are able to see the gaps within the matrix itself. It depends on how you have set the view of your matrix to see the gaps. You can always see them at the bottom or right side of the matrix. The gaps would look like this:
Analyze gaps by the alert list
Read in this article how you can use the alert list
Analyze gaps by the alert list for only the matrix employees and skills
From the matrix you are viewing you can directly go to a filtered alert list where you only see the gaps for the skills and employees of your matrix.
Above the matrix, you can see a link called "Show in alert list":
When you click on this link then it will open the filtered alert list.
Understanding the system from another user’s perspective
Training other users
Troubleshooting for other users
Open the account dropdown menu
Click on your profile icon in the top-right corner of the screen.
In the dropdown menu, select Act as proxy user.
Choose the target user
A list of users will appear in a new popup window.
Use the search bar to find the user you want to act as.
Click on the user’s name from the list to select them.
Interact with the system as the selected user
Once you’ve selected a user, the system will switch to their perspective.
You can now view and interact with the platform as if you were logged in as this user.
Stop acting as a proxy user
To return to your own account, open the profile dropdown menu again.
Select Stop acting as a proxy user to end the session.
Important Notes
This feature is only available to admin users.
Any actions performed while acting as a proxy user are logged for accountability and assigned to the admin user who is acting as the proxy, not to the user being proxied.
You will retain your admin privileges while viewing another user’s account but must switch back to your account to make administrative changes.
The Proxy User feature is a powerful tool for assisting your team and ensuring a smooth user experience. If you encounter any issues, feel free to reach out to our support team!
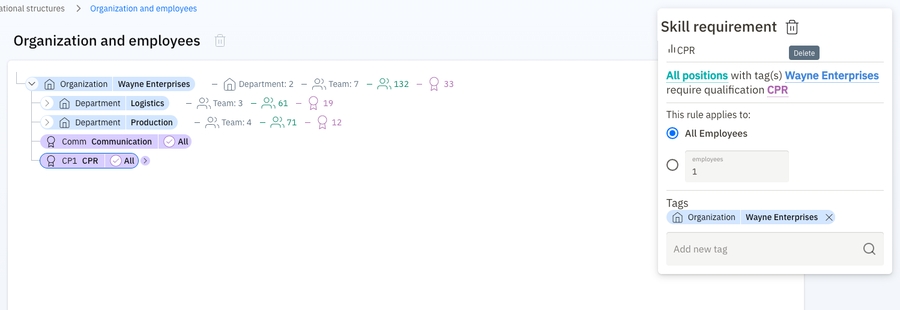
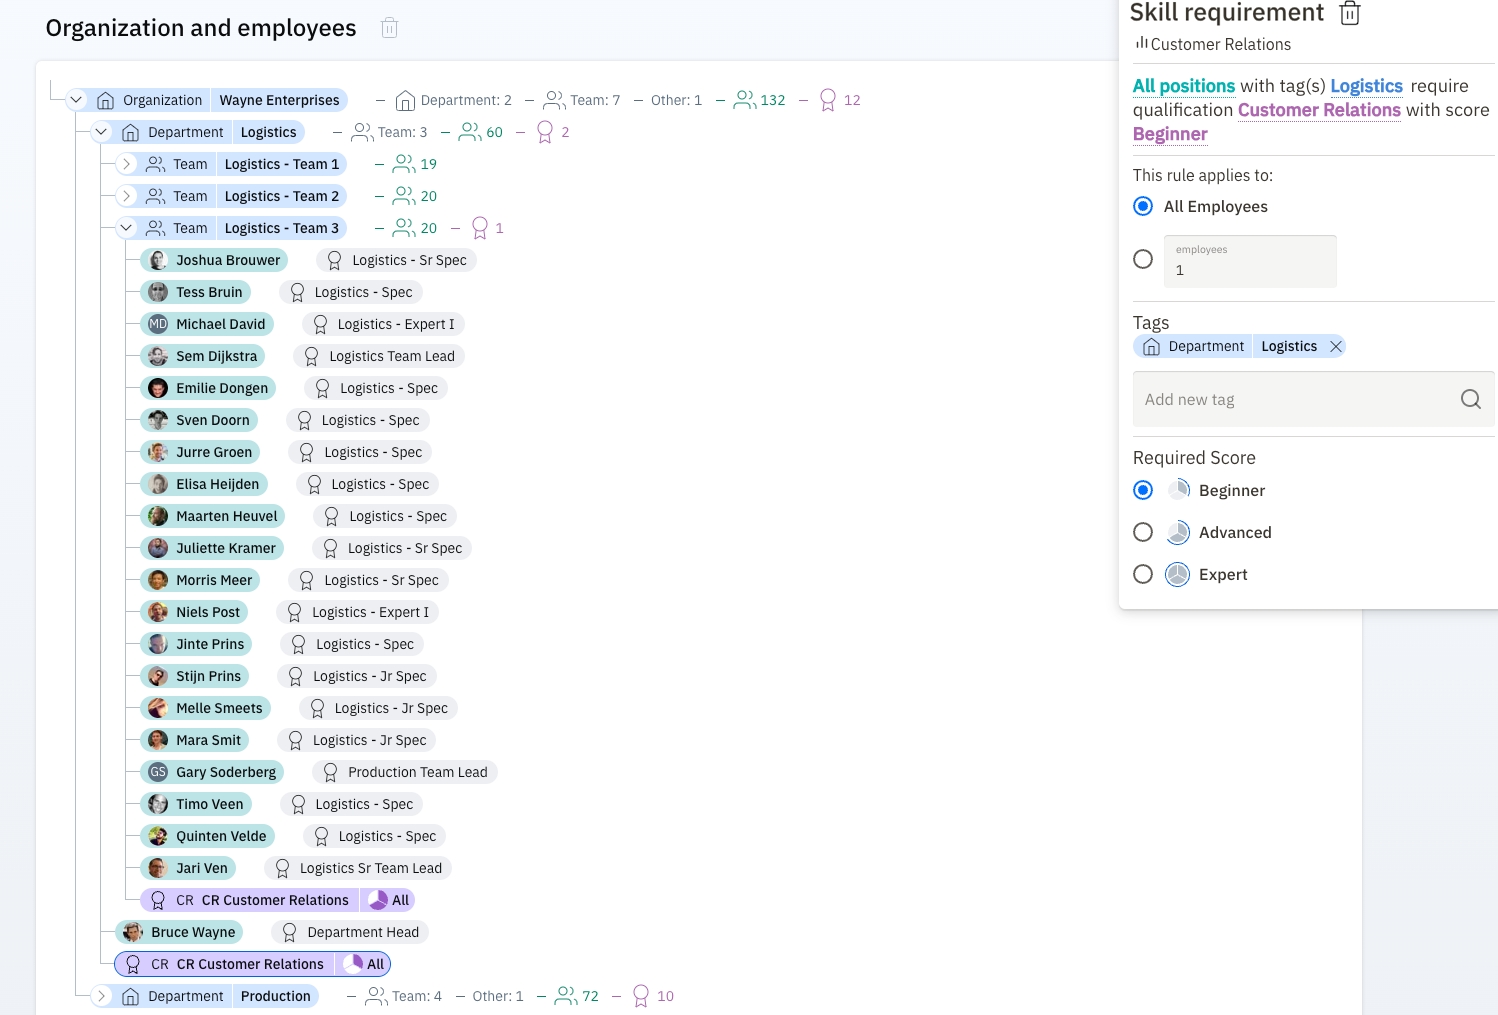
The purpose is to make exceptions possible but still be explicit about why someone is (temporarily) excluded from some requirement rule. With such an exemption, the skill will not be shown as a problem (red) in the skills matrix, alert list, or employee detail page.
You can create 'requirement exemptions' for employees via the matrix, or via the organization tab.
Via the matrix:
Via the organization tab:
Clicking 'Export' will export predefined fields.
You may also conduct a custom export by clicking the 3 dots next to 'Export'. This allows for the individual selection of data fields. Take this example from the Alert List:
Exports from the alert list will generally download immediately, but it may end up taking longer if there is a lot of data.
When this is the case, you can find your export in the "Export History" once it is complete (Organization > Account management & History > Export History). All exports from the alert list also live here for a time.
Did your export not contain all the fields you were looking for? Try it again with the custom export, and make sure to check the required fields.
Questions? Please contact your customer success manager or [email protected].
When a new employee enters your organization, of course you want to start monitoring his or her skills as soon as possible. Just a few small steps in AG5 and you will be able to do just that!
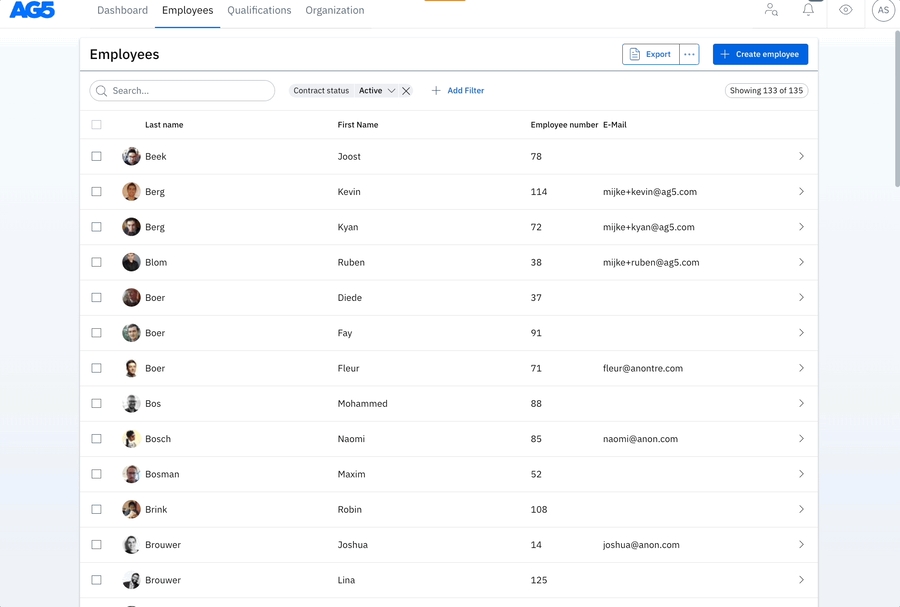
Go to the Employees tab
This is where all employees already in AG5 are listed, and where new employees can be created.
Click the Create employee button:
Enter employee data
Most fields are self-explanatory.
'Last name' is the only strictly mandatory field
That said, if an employee should have access to their own portfolio, then an email address is also required. This is because AG5 requires an email address for .
You've now created a new employee! Great job. The next step to managing this employee's skills is granting them a position. Positions can include various positional data, such as job roles, departments, locations, etc.
Read inhow to add positions and how to work with them.
Skill have versions! This allows for the creation of multiple dated versions of a single skill, without having to create a brand new skill.
This helps to control exactly when a new version goes into effect. It also automatically outdates existing results, prompting employees and managers to retrain.
Skill Versions let organizations easily manage evolving skills (like SOPs) by automatically expiring outdated results, and improving control, visibility, and auditability without the need to recreate skills from scratch.
The versions tab is on every skill page, and is located below skill levels, to the right of "History":
As can be seen above, when a skill is created, the version defaults to 1.0.
Each skill can have multiple versions, each with:
A version name (for example: "2.0 - 2026 Update")
A start date that determines when it becomes active
However - only one version can be active at a time.
To create a new version, click on the blue "+ Create new version" button. This will bring up the "Create new skill version" dialogue box:
Simply enter the desired version name, any relevant notes to the summary, and the date when you want the new version to begin. This can be today, or some day in the future.
All valid results pointing to the version will be automatically expired when a new version comes to life.
This includes all valid results - required and not. Note: Employee may have multiple valid results for a given skill. If not sure about the number visible in the yellow banner, best check the Skill result list
Number of expiring results may change compared to what users see in the dialog if the start date is at a later date.
Auto-achieved results for the target skill remain valid and unchanged unless a prerequisite (child) skill is revised.
Then finalize by clicking "Create new version". Once the start date comes, the old version will be deactivated, and will be listed as such under the "Versions" panel:
It is possible to roll back a new version to a previous one.
All plannings, requirements , personal requirements, revocations, exemptions, and prerequisite rules will continue to reference the skill itself. If the skill is included in any workflow, everything will continue to work exactly as before — the workflow will not be affected.
This means it does not matter which version is active or if a new version is starting — these objects will remain unchanged and continue pointing to the skill.
💬 Suggestion: If users want these objects to reference a specific version instead, they must archive the existing ones and create new objects with the correct active period.
In addition:
If any skill definition changes are needed for the new version — such as updating the description, adding a new attachment — they need to be done manually, preferably on the start date.
If some results already exist for a version, rollback isn’t possible until those results are deleted.
You cannot delete a skill version, you can only rollback to the previous one.
Admins, Super users and users with edit rights on skills can create and manage versions.
Other users with view access to the skill can view versions.
A global skills library is a valuable measure when you need to implement global, company wide standards.
It's particularly useful when you have different sites around the world which all have a degree of autonomy. It permits the creation and management of local skill requirements (skills for that site alone), while enabling global leaders to enforce global standards.
Customers use this feature when they recognize the need of managing the skills, requirements, and role definitions centrally. This need can exist if their organization uses multiple AG5 systems across their organization.
Example scenario of how this feature is currently used:
Manufacturing
A manufacturing company has multiple factories worldwide that utilize AG5. To ensure efficient operations and compliance with both local and global skills standards across all of its factories worldwide that utilize AG5, this manufacturing company has implemented our Global Library feature for AG5. This feature enables each factory across the globe to access and apply the specific skills required for its local operations while adhering to global standards, allowing the manufacturer to maintain a high level of skills compliance for all of its manufacturing operations.
The following can be shared from a Global AG5 system to the local AG5 system
Skill library (i.e. global library)
Including the skills (also known as qualifications )
Organizational structures (i.e. role structure)
Including the skill requirements
To turn on the Global Library feature for your AG5 system, please follow these steps:
Send an inquiry email to requesting assistance in configuring the feature for your system.
In your email, specify the skill library that you want to share from one AG5 system to the other(s).
Also, specify the organizational structure that you want to share from one AG5 system to the other(s).
Our support team will then work with you to configure the Global Library feature according to your requirements.
Example 1: Safety Certificate - Eligible to achieve - All completed
An employee must first complete the Safety Fundamentals and Safety Practice training courses to earn a Safety Certificate. By setting these courses as prerequisites, you ensure that individuals have a solid understanding of safety principles before attempting to earn their Safety Certificate.
Example 2: Security Certificate - Eligible to achieve - Amount completed
To earn a Security Certificate, an employee must complete at least four out of six available Security Training courses. This prerequisite rule allows flexibility for individuals to choose the courses most relevant to their role, while maintaining a high standard of security knowledge. After an employee completes any four of those courses, you will be able to add a result for the Security Certificate.
Example 3: Assembly Area Officer - Auto achieved - All completed
After earning both a Safety Certificate and a Security Certificate, this employee will automatically generate a result for the Assembly Area Officer skill. Creating this rule will allow you to easily understand who is qualified to act as an Assembly Area Officer during a specific shift, based on other acquired certificates.
The localization feature enables you to translate your skills/qualifications and groupings into different languages. Once enabled, AG5 users in your environment will be shown translated information based on their selected language preference.
To do so, email us at [email protected], specifying the languages you would like included in your AG5. When specifying your languages, it is necessary to also specify your base language. The base language serves as the foundation for the system's skill management.
The following information can be localized in languages already supported by AG5:
Skill name
Skill description
Grouping name
Grouping description
Rating scale level names
After the localization feature is enabled, you will see a new icon next to all translatable fields when editing skills, groupings and rating scales.
Clicking on the icon will open a dialogue you can use to specify translations per enabled language.
Skill translations can also be used for searching in the skill overview page.
Above you can see that English is the base language and French, Dutch, German the additional languages.
Important note: The system does not have the functionality to automatically translate your content. The content needs to be manually translated by the user.
In the Organization tab, under Account Management and History, AG5 users with admin permissions can find a full list of changes made in their AG5 environment.
The list offers the ability to look at all previous changes, helping you find a cause should your data appear incorrect or incomplete. We advise new users in AG5 to keep an eye on this list until all AG5 users are familiar and comfortable with our software.
The Overall History shows the time-stamped change that was made, along with the user who enacted the change. Hyperlinks will take you to the relevant page (e.g. clicking on David Beek - Type of proof: Security Certificate will take you to the David’s Security Certificate result details page).
You can also filter this list based on date, user that has created the change, and the action made to easily find the information you are looking for.
Throughout AG5, on pages such as skill (also known as qualification), employee, or grouping, you can find a tab that will show a list of related changes.
This makes it easy to find specific changes relating to one item, as they are always found in the same place within the aforementioned pages.
The semantics of the history pages are continuously improved. Through the course of time, you will see more accurate information about the system changes users made.
The Advanced Analytics API is an AG5 service that provides data to be used in Data Analytics or Data Visualization tools. The provided data comes from the AG5 DataLake, is derived from the data stored in the AG5 system, and selected with the purpose of delivering additional insights.
The key elements of AG5 Advanced Analytics are:
Data stored on Google Cloud Platform
Compliance Computations
Statistics
Entities
All these elements will be detailed in the following articles.
The Advanced Analytics data is calculated or refreshed at least daily.
The Advanced Analytics can be connected to Visualization tools like Power BI. However, these tools can be limited. In general the use of the Advanced Analytics API requires the data to be loaded into your own Data Warehouse or Data Lake via an ETL Pipeline, only small datasets with less than 1000 records (skills, employees, alerts) will probably not need an intermediate storage.
Data security is crucial for any organization, and the Advanced Analytics data is bound to the same strict data protection methods as all other AG5 data.
The data is securely stored in Google BigQuery (hosted in Europe). When providing a customer with access to Advanced Analytics data, AG5 will carefully inform about which data elements will be exposed.
It is the customer’s responsibility to to set up data governance around the use of the provided data within their organization.
This page is a list of scenarios with potential access requirements, and which settings are required in AG5 in order to achieve those requirements.
If you're interested in learning more about these types of user accounts, .
The screenshots displayed in this article come from the Organization > Account Management > User Accounts section.
Scenario 1: User should have access to everything
The Admin role should be selected:
Scenario 2: The employee should be able to see their own skills.
The following My Portfolio setting is required:
Workflow reminders automatically send follow-up emails when a trigger condition remains unresolved after a set time. This helps ensure timely action and reduces the need for manual follow-ups—especially when original workflow emails are missed or ignored.
This is especially useful when employees or managers haven't yet acted on the original workflow email.
Users of AG5 Advanced Analytics API are free to use any tool available to analyze the data.
Data preparation tools should provide the following functionalities:
Extract and Process JSON data (or for some cases: CSV format)
Create Parent-Child hierarchies (to aggregate data)
Detect and change data types
In AG5 you can centrally create, edit, and delete your organizational master data. Additionally, you can control the quality of your master data with an approval process. This approval process allows you to collaborate and centrally maintain the master data while controlling the quality of your master data.
Master data such as:
Skills (Also known as qualifications)
In this article, we will give a general explanation of the different data elements available through the Advanced Analytics API.
Compliance computations are the core of the Advanced Analytics data. They will allow you to analyze the compliance on an aggregate or detailed level in your organization. The compliance score is a percentage indicating how many of the required qualifications / skills are compliant. For example if 6 qualifications are required, but for only 2 of them people have actually demonstrated that they are skilled enough, the compliance score is 30%.
Advanced Analytics daily calculates and stores compliance on two levels :
You've just been told that you have an AG5 account. That's great! Welcome to the platform.
What now though? How do you sign in?
Signing in with SSO If your organization has]enabled, then the below steps are not necessary, as you'll be able to log into AG5 without creating a password. Instead, simply click on AG5 in your organization's app library or go to . There, after entering your email address, you'll see the option to sign in using SSO.
Signing in without SSO
If your organization does NOT have SSO enabled, follow these steps to create your password:
Navigate to your AG5:
Using custom fields enables you to expand AG5 data with data uniquely relevant to your business. Using custom fields enables you to only expand AG5 with data relevant to your business.
Creating custom fields is currently possible through our support team. For adding them, please contact [email protected]. Provide us with the name of the field and the type of the field and on what page you want this field to be visible. It will be possible to create custom fields yourself from AG5 in the future.
When sending a request to support@ag5, you can use the following table as an example:
Employee
Phone number
Text
Employee
Performance review date
Date
Skill
Training duration
Duration
Skill
Training cost €
Number
Currently, the custom fields are visible on the employee page or skill page. Also, you have the ability to export the data from the skill page or employee page. Soon we will launch the functionality to search and filter based on your custom fields on the skill and employee page.
The type "Number" cannot accept decimals at this moment. This will be available in the future.
Currently, you only have the ability to add 4 custom fields within the skill or employee page.


Employee
Someone who works for the organization and for whom we want to manage his/her skills or qualifications. This can also be an external person like a temporary worker, they can be identified by their contract type.
Grouping
The usage of groupings and grouping types, makes the AG5 system extremely flexible, but also a bit more complex. A grouping groups employees and/or Skill Requirements.
Example of 4 different groupings and 3 grouping types.
Job role: Team Leader - grouping with name: Team Leader with grouping type: Job role.
Job role: Operator - grouping with name: Operator with grouping type: Job role).
Department: Packing - grouping with name: Packing with grouping type: Department.
Production line: Paper4 - grouping with name: Paper4 with grouping type: Production line.
Common grouping types are: Job role, Location, Org Unit, Team, Production line, Department, Project, Activity, Task. But these can be added/changed by the admin users for specific customer needs.
Groupings are used as tags to define a position. A position can be tagged with one or more Groupings (see also under Position).
Position
A position explains what an employee does within the organization, what his/her job/responsibility is.
Via an employee's position(s) with the organization, AG5 can:
1) Determine what skill requirements are applicable for the employee that holds the position.
2) Determine in which skills matrices this person should be in.
For this we use a flexible system: “positions can be tagged with groupings, and a grouping is of some type”.
Example:
John's position is tagged with two groupings:
One grouping of the type 'Job role'. John's Job role is: 'Operator 1'
One grouping of the type 'Department'. John works in the Department: 'Packaging'.
Potential Position
A potential position is not an officially assigned position, but is a position you can track progress on and see what skills/qualifications the employee needs before he/she can fulfil that position.
The requirements for the potential position are only visible on the employee detail page and will not be visible in any other pages in AG5 (not in the Alert List, Matrix etc.).
Personal Requirement
A personal requirement is a requirement that only applies to one employee. As opposed to a Skill requirement, that applies to all employees with a certain tag in their position.
For example: only a handful of employees in your team/organization need to have a specific skill. They don't have a shared role, or team or department that we can link this requirement to. Therefore, the requirement will be created as a personal requirement.
Warning: it's always preferable to use a regular skill requirement where you link a requirement to a grouping (a tag in a position) instead of using a personal requirement where you link a skill to a specific employee. Personal requirements require a lot of maintenance and when the employee leaves the company, you will need to recreate the requirement.
Personal Requirement Dispensation
A Personal Requirement Dispensation is a way to create an exception to a skill requirement. For whatever reason, it may happen that a specific person doesn't have to fulfill a particular requirement even though it is required for him her because of their position.
For example: the requirement can be all Team leaders need to have skill Leadership 101. John is a Team leader, but for some reason, he's not required to have skill Leadership 101. In that case you will give John a personal requirement dispensation.
(Skill) Planning
A skill planning is a very lightweight 'planning object'. It consists of an employee, a skill and a deadline date. With a planning, the user of the system knows: this employee will probably achieve this skill before the deadline date.
This means they don't have to take any further action / the achievement of the skill is planned and will probably be achieved soon.
A planning is not always a scheduled training (with a specific time, classroom, trainer etc.), it can also be used when we are waiting for an official certification document. The planning shows that this particular skill for this employee is on its way/ work in progress / we can expect a positive result before deadline date.
Skill
A skill is anything an employee can qualify for / be qualified for. Anything you want to measure the current status of. Anything for which you want to analyze and close the gap between the required level and the achieved level.
'Skill' is an umbrella term and its usage can be very broad; training certifications, training on the jobs, access cards to particular parts of buildings/platforms, physical characteristics, workshops, courses, accreditations, statements of good behavior, soft skills, hard skills, etc.
Skills are linked to the employee as achievements/results and linked to groupings (job roles, departments etc.) as requirements
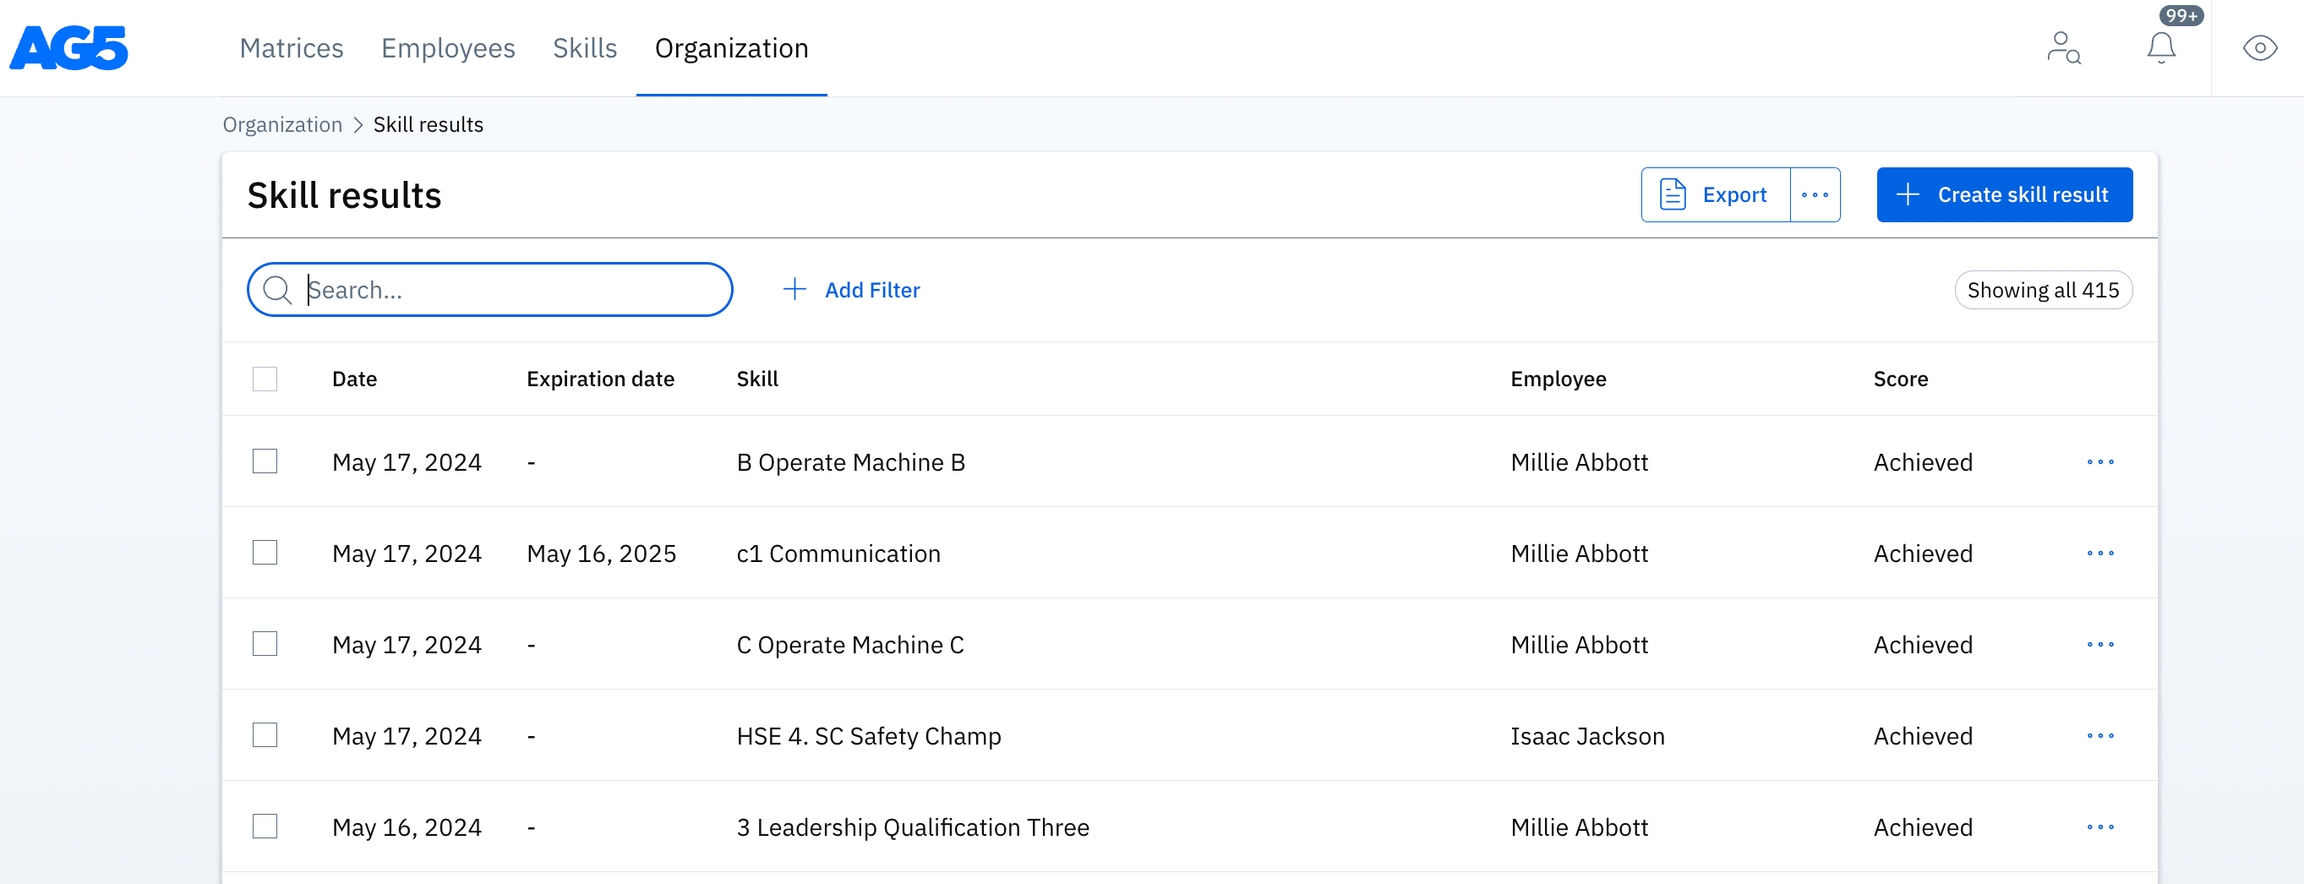
(Skill) Result
A skill result is set when an employee gets a score for a skill on a specific date: When an employee has been assessed / tested (via exam/assessment/training on the job etc.) a skill result is created.
(Skill) Requirement
A skill requirement describes which skill and minimal score an employee has to have to fulfill a certain position.
The skill requirement connects 3 elements: a skill, a minimum score for this skill and one or more Groupings (for example a Job role and/or a department).
Example:
All employees with a position tagged with grouping Jobrole: Team Leader need to have skill Leadership ABC with minimum score level 3 (Advanced).
Rating scale
Each skill has a specific rating scale that defines how the skill will be scored. For example: a certification is usually rated with a nominal scale (achieved, not achieved), but a training on the job can be rated with e.g. a 3 level scale (Basic, Advanced, Expert)
'Contract period' determines an employee's visibility in other areas of AG5, such as matrices, organizational structures, the alert list and expert finder. If an employee's 'Until' date is set to past date, then the employee is inactive and will not appear in matrices, organizational structures or the alert list.
Click Save:
Events
Access methods
REST API
Google Cloud Service account
Data preparation (not provided by AG5)
Visualization (not provided by AG5)
Scenario 3: The employee should be able to see and change their own skills.
The following My Portfolio setting is required:
Scenario 4: User should be able to view all employees, skills, requirements, matrices, plannings, revocations, etc. but not user accounts.
The following Super User setting is required:
Scenario 5: User should be able to edit all employees, skills, requirements, matrices, plannings, revocations, etc. but not user accounts.
The following Super User setting is required:
Scenario 6: The user should be able to set results on their own My Portfolio page and create skills and requirements.
The following settings are required for the user account:
Scenario 7: User should be able to see their own My Portfolio page, all other AG5 sections, AND be able to create skills and requirements.
The following settings are required for the user account:
Scenario 8: The user should be able to see their own My Portfolio page and manage a specific group of employees.
The following settings are required for the user account:
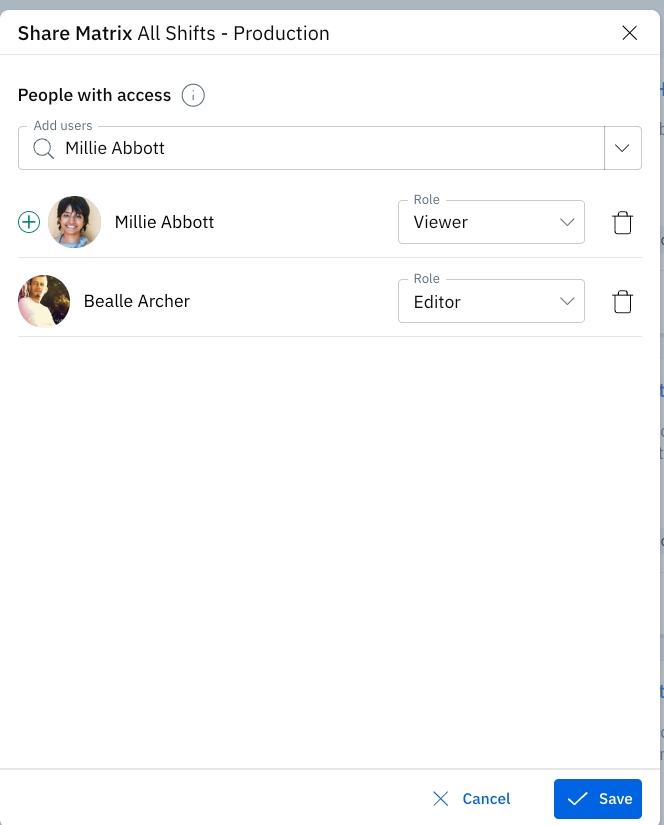
On the Matrices page, share as Editor the matrix that should be managed.
Now the user will have access to shared matrices, the alert list and all employees & skills (also known as qualifications) contained in the matrix.
Scenario 9: The user should be able to create matrices & share them but should not change groupings or skills.
The following settings are required for the user account:
Scenario 10: The user should be able to manage skills and groupings but should not change employee information.
The following settings are required for the user account:
Scenario 10: The user should be able to add new results, plannings, etc., and see their Portfolio but should not be able to change employee information and skills.
The following settings are required for the user account:
Scenario 11: Certain users should not be able to export data.
Reach out to [email protected] for activating a feature which allows you to restrict exports
If you have any questions about how best to configure a certain user account, or if you would like to activate the above feature for restricting exports, please reach out to [email protected] or your customer success manager.
For any one skill, find the most highly qualified employees.
For any collection of multiple skills, find the most qualified employees.
Identify suitable replacements for employees who are absent.
1. Finding a qualified employee who matches certain skills.
Open the Expert Finder.
Select the skill(s). More than one may be selected.
This returns a list of experts. If any skills are missing, an employee card can be opened in order to see exactly which gaps exist.
2. How to find a qualified employee who matches the skills of another employee?
Open the Expert Finder.
Search and select the employee for whom you need to find a suitable replacement.
Open an employee to understand how qualified they are and which skills they are missing.
A list of expert employees will appear, starting with the most qualified potential replacement to the least.
3. How to find a qualified employee who matches the skills of a specific job role?
Open the expert finder
Go to the browse section of the search
Select the role which has the skills you want to find in another employee
Open an employee to understand how qualified they are and which skills they are missing.
You will see in the list below the results which employees are most qualified for your searched skill criteria. The resulted employees are sorted by the number of achieved skills which is required for your criteria.
You can select skills via the search bar by typing your skills
You can select skills by choosing a group via the browser section of the search
You can select multiple skills in combination with skill groups
You can filter results per grouping type you have (job role/team/department etc)
You can only see the employee which you have access to
Reminders can currently be configured for the following workflow triggers:
Skill action approval waiting
Required / non-required skill is expiring soon
Required skill is missing
Required skill is missing or expiring soon
⚠️ Reminders will only work for trigger actions that are activated after the reminder is configured. Existing open tasks won’t receive reminders retroactively.
⚠️ If the workflow requires approval, every reminder email will also require approval.
Go to Organization > Workflow Configurations
Open or create a workflow
In Reminders section, click on Set reminder
A new modal will appear with the following options:
Let’s say you’ve configured a workflow for "Skill Action Waiting for Approval":
You set a reminder to send every 5 days
You leave the end condition set to "Never"
You select the action: Email notification to: Approver
The result? If a skill update isn’t approved, AG5 will send a reminder email to the approver every 5 days until the action is completed.
If you need to reset a reminder (e.g. to start a new schedule or update the configuration), follow these steps:
Click Edit reminder
Change the frequency to Never
Click Save
Reopen the reminder settings and configure it again with the new values
This ensures that the previous reminder settings are cleared and replaced with the updated configuration.
and the skillss that are fine (no gaps)
The purpose of the alert list is to provide insight into:
Problem skills that are:
Expired
Revoked and required
Failed
Level too low
Required (not achieved)
Warnings of skills that are:
Expiring soon
Expiring soon, but not required
Soon level too low
Required soon
Fine skills that are:
Valid
Revoked, not required
Failed, not required
Valid, not required
No score, not required
Click on the bell icon which is visible on the right side of the top menu
Filter by:
Problems
Warnings
Fine
Period
Or filter through the search bar by:
Individual skills (also known as qualifications)
Employees
Groupings with positions (Job role/ teams/ departments)
Suppress planned skills (See tips and tricks below)
Analyze the visible insights
On the top right side of the alert list, you can see a blue export button. With this button, you can export your (filtered) alert list to Excel. You can also customize the export by clicking on the "Custom export" via the three dots next to the blue button.
When you have planned assessments for specific skills of certain employees then you can ignore these in the alert list. Because the planned skills can be the solution for the problem the skills currently have.
On the rights side of the alert list, you can see a filter called "Suppress plannings". With this filter, you can filter the alert list to ignore the skills which are planned for an assessment in AG5.
And more...
Data visualization tools would usually provide the following functionality:
Create relationships between tables (the data is based on a relational database model)
Different visualizations and filters
Option to drill down into hierarchical data.
And more...
In this article we go into a bit more detail about the use of Microsoft Power BI (in combination with Power Query). We also list some other tools. AG5 Advanced analytics does not include consultancy on the use of these different tools. We do, of course, help you to understand the data structure.
Connecting to the Data source
REST API
Note: it is possible to connect the API to Power BI directly. However, because of the large number of records, and the inability of Power BI to deal with pagination (see below), we recommend to ingest the API data into your local data storage first.
The direct connection method can be useful for small volumes of data, or for exploration and is described below:
Choose the option 'Web' followed by 'Advanced'
Add the url with the correct parts (parameters) (see OpenAPI)
Add the following to the request header:
Authorization: Bearer <The provided token>
Accept: text/csv (optional).
The Entity requests work with pagination. The response header returns info for the pagination. Since Power BI does not give access to the response headers, we advise to use the ‘Accept: text/csv’ request header. The csv option gives the full data set, without pagination.
After adding the correct URL parts and Header parameters, in the next Window, select ‘Anonymous’ as authentication method to access the Web Content.
Data preparation with Power Query
Depending on the connection method, you will need to do some data preparation. Some common actions to take:
Fields that contain JSON data will need to be parsed and then expanded.
Date fields are usually records with day, month, year and will need to be expanded and then merged to create a valid date type field.
Fields that contain a time period will need to be expanded.
Some fields (like in the Grouping table: ui_name_json) contain localized data (a different name for each language). These are stored in JSON so they need to be parsed and expanded.
Create parent-child hierarchies (for example for grouping and parent grouping). The following details the creation of these hierarchies.
`Other tools
Other tools you can use for data preparation and or visualization are:
Tableau Prep and Tableau
Google Looker Studio: Visualizations only
Alteryx Trifacta
Microsoft Excel (with Power Query): Data preparation only
Skill requirements
Organization items such as Department & Job Roles
With the master data approvals feature activated for your organization, any change in the master data will go through the approval process. For any change first, a so-called ‘Change request’ will be created. Only after approving the change request, the data will become visible and active in the system.
The purpose is to ensure a higher quality of your organizational master data within your skills management across your whole organization.
For example, large organizations experience consistency problems within their skills master data. And inconsistencies can lead to differences within the skills management across an organization.
Who can change master data?
The master data can be changed by users who already have the right to these changes. The only difference is that with this feature activated the master data changes need to be approved.
Users with the following rights are able to change master data:
Admin users
Superuser edit rights
Skill edit rights
Grouping edit rights
When a change is made the user will see a message that the change needs approval.
As long as the Change request is waiting for approval, it will be listed in the specific ‘change requests list’. Below you can see an example list. The purpose of this list is to see and understand the open changes to avoid duplicated change requests.
In this list, you can not approve the change requests, for that you have to go to the control center (see below).
Who can approve change requests?
Approvals can be done by the admin or by the manager of the user who changed the master data. Additional policy settings can be added to allow admin users to make changes to the master data without an approval process.
As an admin, you can configure AG5 to the needs of the organization (the first setup). When any of the master data is changed in a later change then this needs to be approved by the admin or manager before it is visible and active.
There are 3 types of changes:
Newly created item (e.g. a skill)
Edited existing item
Deleted item
When master data is changed, this change will first be listed in the ‘Change requests’ with the status ‘waiting for approval’. After it is approved, it will become active and visible within the system.
Below you can see in the control centre that there are change requests waiting for approval.
Below you can see the approval list and when selecting a change request you can see the details of the requested change. Approve or reject the changes, and click 'save' to confirm your choices.
For each AG5 grouping (role, department etc).
For every Employee-Qualification combination
For more details on the different types of compliance calculations, please refer to the article about compliance calculations.
Note: the compliance calculations are stored in the DataLake as Events (see below)
Advanced Analytics stores some basic statistics about your AG5 data. For example the number of Results (Achievements) and number of Employees. These statistics are produced every day and therefore can show you trends over time.
Note: the statistics calculations are stored in the DataLake as Events (see below)
The Advanced Analytics Entity data contains detailed information about for example: Qualifications, Groupings, and reference data. This data serves mostly to support the analysis of the Compliance Calculations.
There are three types of Event data available: Computation Event data, Entity Event data and SIEM Event data
The Computation Event data are the Compliance Calculations and Statistics as mentioned above.
Entity Event data contains all the changes in the Entities (create, update, delete). If, for performance reasons, Advanced Analytics users do not want to load all the entities every day, they can use these events to update the entities in their local storage.
SIEM (Security Information and Event Management) Event data contains a multitude of security related events. Like Login, Token renewal, Password reset, SSO, Application Errors etc.. For more info about SIEM events, please contact AG5 ([email protected]).
The data has relationships which are modeled in the diagrams below.
Entity relationships:
GroupingCompliance (Event) and Grouping (Entity) relationship:
EmploymentQualificationCompliance (Event) and Employment, Position and Qualification (Entities) relationship.
For examples on how to use these relationships to create KPIs or Dashboards, see the article about Example KPIs and Dashboards.
After clicking on that link, you'll arrive at this screen. Enter your email address and click "Next":
Then, click on "Request new password".
And then click "Submit".
After this point, you'll recieve an automated email from AG5 allowing you to set up your new password (Check your spam folder if it doesn't appear in your inbox).
Finally, go back to AG5 and sign in with your email address and the password you just created.
You're all set! Write to us at [email protected] if you have questions.
Having trouble logging into your AG5 account? Don't worry, we're here to help you troubleshoot! Whether you're logging in with an email and password or using Single Sign-On (SSO), we've got you covered. Below are some common issues and solutions to get you back on track.
Check for typos: Double-check the email address you're using to log in. Typos happen more often than you think, so ensure there are no misspellings or extra characters.
Verify email domain: Make sure you're using the correct email domain (e.g., ".com" instead of ".de"). Sometimes a simple domain mistake can prevent you from logging in.
Confirm user account: Reach out to your organization's AG5 administrator to ensure that a user account has been created for the email address you're trying to log in with. If not, they can assist in setting up your account.
Reset password: If you're still having trouble, try resetting your password. You can do this by , entering your email address and selecting the "Request new password" option on the login page. Follow the instructions provided to receive an email from AG5 to reset your password and regain access to your account.
Sometimes the password reset email ends up in your spam folder. If you don't see it right away, give that a look.
Contact support: If none of the above solutions work, don't hesitate to reach out to our support team at . Be sure to include the error message you're receiving and the email address you're using for clarification.
What it means: The user tried to log in using their organization’s identity provider, but the login attempt was unsuccessful. The identity provider failed to authenticate the user and redirected them back to AG5.
Possible causes
Your login credentials may be incorrect
Your account may not be correctly set up in your organization’s identity provider
What to do next
Check your credentials and try logging in again
If the issue persists, please contact your organization’s AG5 admin for assistance
The most common issue with SSO login is not being added to the correct user group by your IT department. Ensure that your IT team has assigned you to the appropriate user group within your company's SSO settings.
Example screenshot:
We couldn't grant you access to AG5 because your email domain (ag5.io) is not authorized by your organization.
Possible causes
You may be using an email that is not linked to your organization’s AG5 account
Your organization may not have authorized your domain for access
What to do next
Check that you're using the correct email address associated with your organization’s AG5 account
If the issue persists, contact your organization’s AG5 administrator to verify your email domain and permissions
Example screenshot:
What it means: We couldn't find an AG5 account linked to your login details.
Possible causes
Your account has not been created in AG5 yet
You might be using the wrong login credentials
What to do next
Verify that you are using the correct email address associated with your organization
If you need access, contact your organization’s AG5 administrator to create an account for you
Example screenshot:
What it means: We encountered an issue while trying to log you in.
Possible causes
There may be a temporary issue with the login service
Your login request may not have been processed correctly
What to do next
Try logging in again after a few minutes
If the issue persists, please contact and include the reference details below to help us resolve the issue quickly
Examples screenshot:
Remember, regardless of the login method, we're happy to support you every step of the way. If you encounter any difficulties, don't hesitate to reach out to us at , or at +31 20 4630942.
The result approval process is the process in which skill results need approval before these results are definitively active and visible throughout the system.
The purpose of the result approval process is threefold:
To have more control over the data quality
So managers can easily track new results for their 'direct (/subordinate) employees' which were added by others. (because the direct manager will have to approve these new results).
And last but not least, managers can more easily monitor the quality of his/her employees' performance.
A new skill (also known as qualification) result for an employee, should by default be approved by the direct manager.
The direct manager of an employee is set on the employee's detail page. This manager becomes responsible to approve the skill results of his/her employees.
When an employee doesn't have a manager, then the result should be approved by an "admin user".
Important notes:
For requested self-assessments, the approver is currently set to the user who created the request, and so, not set to the direct manager. You can read more about this in the .
It is not mandatory, but we think it is good practice that every employee has a manager assigned, who becomes first responsible for approving the employee's result.
An Admin user can always approve the results of all employees, even when the direct manager is made first responsible to approve. In the approval list for admin users, they can easily filter approvals that have or have not assigned a specific manager to do the approval.
Another option in the result approval process is that results can be approved by subject matter experts. These are users in AG5 who have been defined as the owners of qualifications/skills.
When this feature is enabled then each new result needs to be approved by the user that has been selected as the owner of that qualification/skill.
When the approval by the subject matter expert feature has been enabled for your AG5 then you can define skill owners. When you create a new skill or on the skill detail page, you can select another AG5 user as the owner of the data.
Only users that have an account in AG5 can be selected as data owners.
With this feature the following results need to be approved:
Results submitted by employees themselves (Self-assessments)
These can be requested self-assessments or self-initiated self-assessments.
Results submitted by others, with 1 exception, see below.
There is 1 important exception:
The skill results added by a manager for his/her direct subordinate employees, do not need approval.
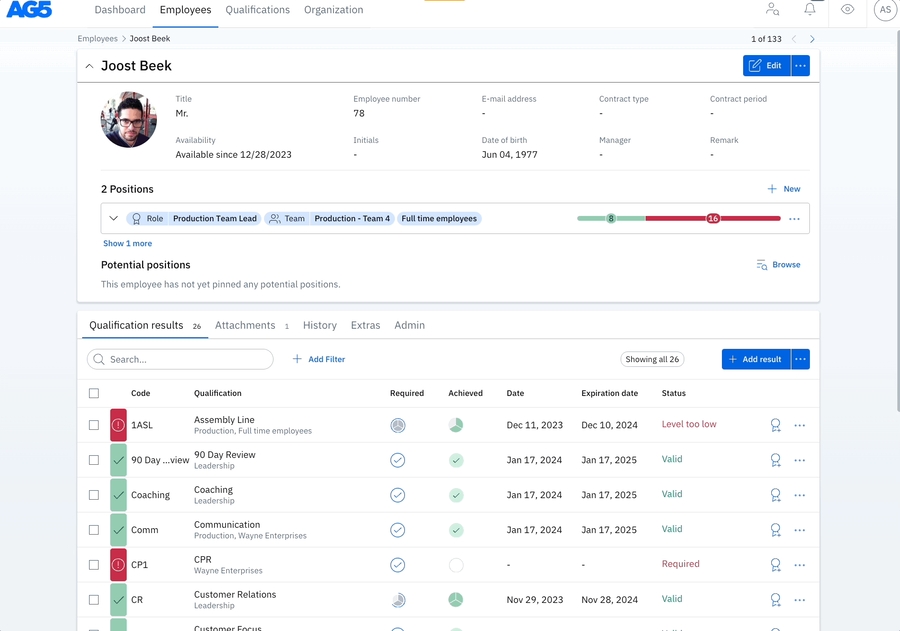
In the example below, the results added by Jacky Williams for Millie Abbott, do not need approval. Because Jacky is set as the direct manager of Millie.
In the top navigation bar, on the right, select the control center icon: This icon will have a number next to it if approvals are waiting.
Next, select the section "Skill results to approve". In addition to the number next to the control center icon, you'll see it listed here if there are approvals waiting.
Per skill result; approve, override or reject.
Click the blue "Save results" button to submit your approvals, overrides, or rejections.
Click on this image to enlarge
Important note: The requested self-assessments are approved differently. You can read more about this in the .
When a skill result is waiting for approval, it will be visually indicated at the top right corner with a blue dot. This blue dot is a general indicator that some action is taken and a new skill result is probably upcoming soon.
Examples of the blue dot:
A blue dot can indicate one of the following 'actions is taken':
The skill is planned (some training/e-learning is scheduled)
The skill result is waiting for approval
The skill has an open self-assessment request (is waiting for an employee to do the self-assessment).
The results approval process feature of AG5 is an advanced feature that isn't enabled by default. So if you want to use this in your organization please contact our support.
The term itself lends a hint! In AG5, an organizational structure is where you organize and establish the framework for managing skills/qualifications within your organization.
Organizational structures are made up of groupings, , and .
Groupings can encompass a wide range of criteria, including job roles, departments, geographical locations (such as countries or factories), or any other pertinent element that your organization requires for tracking skills."
AG5 comes with a set of commonly used grouping types (like team, department, etc). These can be customized for your organization, and brand new groupings can also be added.
The employees you assign to specific groupings in your organizational structure will be one axis of your . You can also create requirements based on those groupings.
Because employees will be tagged with your various groupings, they can be used throughout AG5 (in the expert finder, alert list, employee list, etc) as a filter option, and can also be used as the basis for reporting.
AG5 comes with several pre-created grouping types. You can create your own grouping types by going to Organization > Customization:
From this same menu, it's possible to delete or edit any existing grouping type by clicking on the 3 inline dots:
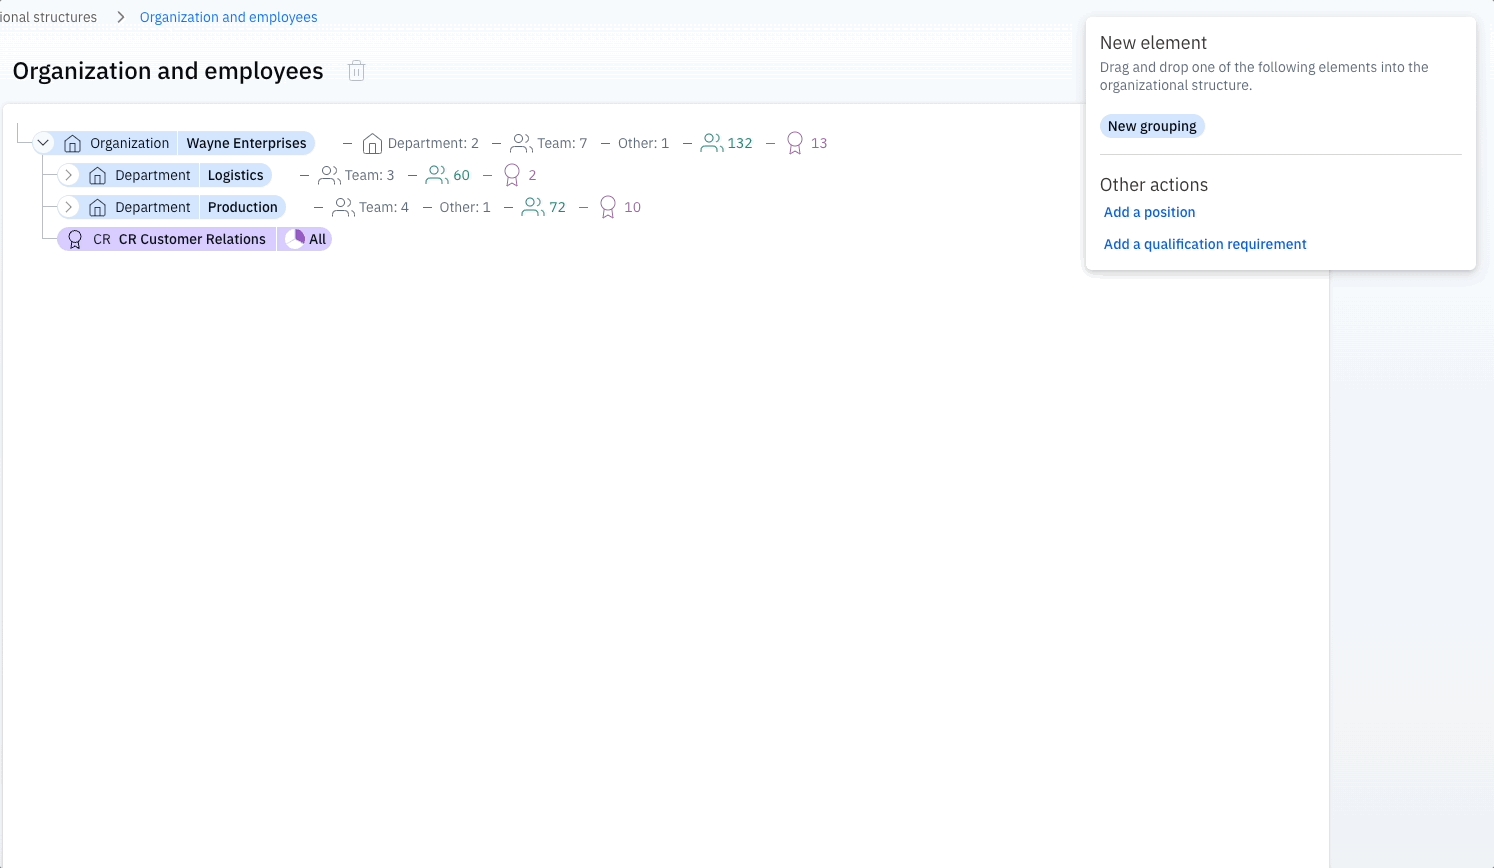
You can find the organisational structure section in the Organization tab. To get started, simply click on the Create organizational structure blue button:
You should now be looking at a blank organizational structure.
For this example, we will create a structure based on site locations.
Under 'New Element" on the right side, click and hold on New grouping to drag & drop it into our structure:
In this example, this top grouping is where we will attach our locations, so we will name it "Locations". Then, we will add our first location, because we might want to add requirements that are location specific, or may want to have a matrix in the future that shows us information based on these locations. To edit a grouping, click on it and then the 'Edit' button in the right hand details pane:
Below, we can see a more complete structure with different regions. We will add a language requirement to Germany and France. Simply click on the button to add a skill requirement and drag and drop it into the relevant grouping.
In the next clip we will add an employee to our location in France. We click on “Add a position” and then drag & drop the employee to France. This means now that he has a requirement of the skill French, because he is part of that specific org structure.
For more information about creating positions for employees, see working with employee positions.
We generally recommend keeping the org structure as flat as possible, so it doesn’t get too convoluted and keeps the matrices easy to read. However, it is possible to create a combination and add sub-groupings. For example “Departments & Job roles”, “Locations & Departments,” or whatever works best for you.
If you want to remove an employee from an org structure, you can simply drag & drop the employee to a different group (for example if they move departments) or click on the employee and remove that specific tag. Do not click on the trash bin, because that would remove all the tags. In our example picture you can click on the X next to France, to remove the employee from the location in France.
We strongly advise against any kind of duplication. For example, using a job title grouping like "Intern" across different departments. Instead, we advise making them different, such as "Marketing Intern", "Sales Intern", and "Logistics Intern", for example.
This article explains how to create and manage prerequisite rules in AG5, allowing skills to be automatically or manually achieved based on the completion of other required skills.
Prerequisites allow you to create skill requirements that depend upon other skills being achieved first.
For example, a 'Project Risk Management' certificate might have 3 training courses as real life requirements in order to achieve (image above). In AG5, you can create 3 separate skills for these trainings, and link these to the 'Project Risk Managment' certificate as prerequisites.
A prerequisite can be achieved automatically as soon as connected skills are achieved - or it can be manually achieved by adding a result. Prerequisite rules can be very specific, as you can indicate the exact level that must be achieved for each skill.
The compliance score is calculated by dividing the number of compliant qualifications by the number of required qualifications.
A qualification is compliant when an employee needs to achieve that qualification on a certain level and the employee has achieved the qualification on that level or higher.
AG5 Advanced Analytics (version April 2023) introduced the compliance per grouping.
A grouping can be a role, a department etc. All groupings in an AG5 repository (environment) can be found under Organization > Groupings.
Generally the Compliance grouping score is calculated by following these steps:
Skills planning lets you schedule when a skills gap will be closed, ensuring your team is fully qualified for the tasks ahead. This way, you don’t just see missing skills - you know exactly when employees will complete their training or certifications.
This page explains how to set up workflows in AG5.
A workflow is a function within AG5 which allows admins to automatically notify their users (like employees, managers, etc.) about some of the changes in the system, such as when:
Skills are missing or expiring soon
New plannings have been made
Master data changes have been made
This article explains how the self-assessment feature works; how employees can evaluate their own skills, how managers can request and approve these evaluations, and how to enable this feature.
A self-assessment is a process where employees evaluate their own competency levels for specific . Once completed, the assessment is submitted for approval and the are recorded in AG5.
Self-assessment is an advanced feature that isn't enabled by default, so if you want to use this in your organization, please or your customer success manager.
We propose a REST API connection to the Advanced Analytics Data.
The API is documented here: . Organizations will need an API token to get access to their data. This token can be requested via your Customer Success Manager. The API operations require bearer authentication (also called token authentication) which is an that involves security tokens called bearer tokens.
Some of the parameters used in the API are explained here:


Matrix

organization_name
Can be retrieved from the url of your AG5 environment.
https://matrix.ag5.com/myorganization/main
repository_name
Can be retrieved from the url of your AG5 environment.
https://matrix.ag5.com/myorganization/main
page_token
Used for pagination. Is returned in the response header (key = x-ag5-pagetoken)
page_size
Maximum number of records to return.
reference_time
For most events, this is treated as a ‘since’ and returns all records after this reference time. For EmploymentQualificationCompliance, only the events stored on the Day (Date) of the reference_time are returned.
The request header:
Key
Value
Authorization
Bearer <the provided token>
Accept
(optional) ‘text/csv’
Accept-Encoding
(optional) ‘gzip’
The responses can be retrieved in JSON or CSV format. JSON is default, CSV can be obtained by including the Accept header.
The API is again split up into Entities and Events. Note: the compliance calculations and the repository statistics can both be accessed via the Events endpoints.
For Entities, we advise you to start with the request to retrieve the entity-types:
These entity types are required as a parameter in many of the other requests. Don’t forget to use the full name in your request:
For Events, we advise you to start with the request to retrieve the event-types.
Each event has both a type and a subject. But only for SIEM events a type can have multiple subjects. To illustrate this, the Compliance event has only one type:
and one subject:
Therefore the events can be retrieved by only referring to the event_type.
The SIEM events have one type but can have different subjects. For Siem events it is therefore advised to use both the event_type and event_subject to retrieve the events.
reference_time
By default, the events that were created after 00:00 am today (European standard time) are returned. The parameter reference_time can be used to specify the time in milliseconds since Jan 1, 1970 (Epoch or Unix timestamp) of the oldest event returned.
GroupingCompliance calculations are performed during the night. This could be before or after midnight. This may mean that a request without reference_time will return no events (because the last compliance calculation was done before 00:00 am today). Therefore we advise to use the reference_time parameter and make sure you retrieve the events of the last 24 hours.
For almost all Events, the events after the reference_time are returned, except for EmploymentQualificationCompliance events, for which only the events of one day (the date of the reference_time) are returned.
page_token
The returned entities and events are usually split into different pages based on the page_size. The page_token, to request the next page is returned in the response header.
Note, this response header is not visible in the OpenAPI - try it out functionality. If you use
to call the endpoint in a terminal for example, the header will be visible.
Parameter
Description
CURL --verbose /organizations/{organization_name}/repositories/{repository_name}/ entity-types. seaspray.v<number>.<EntityType> /organizations/{organization_name}/repositories/{repository_name}/ event-types. seaspray.v1.GroupingCompliancecompliance_computationThe only exception is that admin users can't approve results that are added when other managers have sent self-assessment requests.
To add prerequisite rules, open the skill to which the rule should apply. Within the rating scale, you can set rules for each level of that skill by clicking on the '+ New' button on the right-hand side of the screen.
This will open the following dialogue:
Next, select the prerequisite skills and the required levels of each.
After that, select the scope of the prerequisite, which means should employees have to achieve all prerequisite skills, or is achieving (X / Total skills) sufficient?
Then, choose the type of dependency. This determines if the result should be automatically achieved, OR if manual achievement is always allowed. If the 'Allow with warning' option is selected, users can still add the result even if the prerequisite skills aren't fulfilled, but they will see a warning.
Try and stick with the "auto-achieves" type of dependency. This has the greatest time saving impact.
Note that the active period determines when the prerequisite rule is active. This affects all auto-achieved results.
When this feature is enabled, the following options in the Organization tab will appear:
Prerequisite rules. This will show all prerequisite rules – and their relevant details – in your environment. You can also filter and export from this list, as well as add new prerequisite rules from the “+ Create prerequisite rule” button on the top-right of the screen.
The dialogue is the same, except that it is necessary to first select the main skill and its level.
Skill results page will enable you to filter out auto-achieved results, allowing easy overview of generated results.
Important notes:
Creating a prerequisite rule will retroactively apply to all existing results. For example, if skills A and B have already been achieved, and afterwards you create a rule stating, “Skill Z is auto achieved when skill A and skill B have been achieved,” the result for skill Z will be automatically created.
Changing prerequisite rules will also automatically revoke auto achievements. For instance, if Skill Z was auto achieved because of Skill A and B, and you change the rule to include Skill C as a requirement, then Skill Z will immediately be un-auto achieved for employees, with no record of prior achievement saved.
If you want to maintain a record of previous auto achievements, you must archive the first prerequisite ruleset (A+B=Z) and create a new rule for the updated set (A+B+C=Z). This ensures prior achievements are preserved.
Archiving a prerequisite is done by editing the rule and entering any date prior to today in the 'To' field under the 'Active period' section.
You can create a prerequisite structure within a single skill so that each level requires the previous one to be achieved first.
You can also create prerequisite rules for each level on a rating scale. For example, in a five-level rating scale, a single skill can have five sets of prerequisite rules.
Creating a workflow with the trigger “Required skill is missing or expiring soon” for a skill with prerequisite rules will send emails for all prerequisites needed to achieve this skill. This only works for the “auto achieve all” prerequisite rule.
Example 1: Safety Certificate - Eligible to achieve - All completed An employee must first complete the Safety Fundamentals and Safety Practice training courses to earn a Safety Certificate. By setting these courses as prerequisites, you ensure that individuals have a solid understanding of safety principles before attempting to earn their Safety Certificate.
Example 2: Security Certificate - Eligible to achieve - Amount completed
To earn a Security Certificate, an employee must complete at least four out of six available Security Training courses. This prerequisite rule allows flexibility for individuals to choose the courses most relevant to their role, while maintaining a high standard of security knowledge. After an employee completes any four of those courses, you will be able to add a result for the Security Certificate.
Example 3: Assembly Area Officer - Auto achieved - All completed
After earning both a Safety Certificate and a Security Certificate, this employee will automatically generate a result for the Assembly Area Officer skill. Creating this rule will allow you to easily understand who is qualified to act as an Assembly Area Officer during a specific shift, based on other acquired certificates.
Attempting to add a result and override prerequisite rules will show the following prompt:
The auto achieved result from these examples will show as:
Please let us know if you have questions about how best to make prerequisite rules work for you. Write to your customer success manager or [email protected].
Determine the number of required calculations per position in that grouping
Do this for all the positions in that grouping: the sum is the total number of required qualifications.
Determine the number of compliant qualifications per position in the grouping (has the employee achieved the required qualification at the required level)
Do this for all the positions in that grouping: the sum is the total number of required qualifications.
Divide the number of compliant qualifications by the number of required qualifications.
Note: An employee can have one or more positions. Therefore, requirements apply to positions, not to employees. However, a result / achievement is recorded per employee.
Types of Grouping Compliance
For each grouping, in the GroupingCompliance event, 4 types of compliance scores are calculated. They differ in scope of the required qualifications.
Positional grouping compliance
Tracks the compliance of the positions in a grouping by taking ALL requirements attached to each position into account, including the personal requirements.
Example:
The positional compliance for a team is calculated based on all requirements for the people in that team. This will include the requirements specific for that team, but also the requirements for any other tag in their position (for example, their role or that they are part of another team as well).
For each position, all requirements (for all their position tags and the personal requirements) are counted.
Isolated and contextual grouping compliance
Only tracks the requirements specific to this grouping. It checks for each position in that grouping how they score on the requirements defined for that grouping.
The isolated compliance uses the requirements with one tag (qualification is required for positions with that tag) and the inherited requirements (requirements defined on a parent grouping). If the grouping is tagged with another grouping, the requirements for the tagged grouping are also counted in the isolated compliance. The contextual compliance looks, in addition to the aforementioned requirements, also at the requirements with multiple tags (the qualification is required for positions with all tags defined in the requirement rule) .
Example:
Four qualifications are required for positions with Role A. One other qualification is only required for positions with Role A and Role B. The Isolated compliance is calculated based on the four first qualifications. The contextual compliance is calculated for all five qualifications.
The isolated compliance will not take Machine lines know-how into account. The contextual compliance will. This requirement applies to David Jonker since he is both Production - Jr Spec and Logistics - Jr Spec
Count rule grouping compliance
Tracks the compliance defined by the ‘count rules’ which apply to this grouping. It checks for each rule whether the minimal required number of employees who satisfy the score is achieved.
Example:
The organization has defined for a Team that at least 4 positions should know Qualification X on level 2. The calculation counts how many employees in the team have achieved Qualification X on level 2. If it is more than 4, the team is compliant with that rule. The same calculation applies to all other count rules that are defined for the team.
Partial compliance
For each type of calculation described before, both the score and the partial score are available. The score looks at full compliance as described above. The partial score also takes into account if the required level is not fully achieved, but partially.
Example
When a qualification is required on level 4, but only achieved on level 3, the partial compliance score counts a 75% compliance for that qualification for that employee.
In December 2023, we introduced the Employee-Qualification compliance. This compliance is known as the Alert list within the AG5 product itself. Everyday the following information is stored in the DataLake (and retrievable through the Advanced Analytics API):
Field
Explanation
reference_date
date of export
employment_id
reference to the Employment entity table
qualification_id
reference to the Qualification entity table
required_level
level on which the qualification is required for this employee. If the required qualification does not have levels, the required level will be 1.
achieved_level
level on which the qualification is achieved for this employee (which level was recorded in the result). If the achieved qualification does not have levels, the achieved_level (if there is a valid result) will be 1
achieved_date
date of the last result
* compliance_status: expired, revokedRequired, failed, levelTooLow, required, expiresSoon, expiresSoonNotRequired, levelTooLowSoon, requiredSoon, allFine, revokedNotRequired, failedNotRequired, fineNotRequired. Please note that we have excluded the NoScoreNotRequired status. This status is present in the Alert list but has no meaning when looking at compliance. The events with a planning are included. (Suppress plannings = false)
** compliance_score: default, the compliance_score is the achieved_level divided by the required_level, with a maximum score of 1. If the qualification is not required but it is achieved, the compliance_score is 1. If the qualification is not required and it is not achieved, the compliance_score is 0.
Important Note: The compliance_status and the compliance_score can be used to calculate an average compliance_score. We have included examples in the following article . Remember that the events with ‘levelTooLow’ will have a score between 0 and 1. If you don’t want the calculated average score to include this ‘partial compliance’, you must count them as a 0 instead of their actual score.
Improved Forecasting: You’ll know when your team will be ready for future projects.
Better Resource Allocation: Managers can plan staffing based on upcoming qualifications.
Proactive Compliance: Never miss a certification renewal deadline.
Open the Skills Matrix: Navigate to the skills matrix for your team.
Find the skills gap: Look for skills with a gap (empty circle, alert, or a red icon) next to an employee’s name.
Open the planning dialogue: Click the skill you want to plan for. A pop-up will appear. Select the 3 dots next to "Add a result" and instead, select "Add planning".
Set a desired score
Set a deadline date: In the pop-up, choose the date when the employee will complete their training or certification. This could be a future course, on-the-job training, or a certification renewal.
Add remarks If needed, remarks can be left here.
Save the planning: Once the date is set, hit "Save" to record it. The matrix will now show that a plan is in place for that skill.
Edit plannings A planning can be edited by clicking on the result and then the 3 dots.
Instead of clicking on an individual skill gap, select the skill itself from the relevant skill matrix axis
Click on the 3 dots and then "Add multiple plannings"
Select the desired score.
Select the deadline date.
Add any necessary remarks for all employees.
Click "Next", and then "Save X skill plannings".
Go to the "Organization" page via the menu.
Scroll down to "Skill plannings".
Select the "Create a skill planning" button.
Follow the same steps as above.
Go to the "Employees" tab.
Select an employee to see their profile.
Select the three dots next to the skill which needs to be planned.
Select "Add planning".
Follow the same steps as above.
Go to the "Skills" page and select the skill in question.
Find the employee, and select the three dots next to their name.
Select "Add planning".
Follow the same steps as above.
Note: creating a planning on a skills page only works if there is a requirement or an expired result. Plannings for skills that aren't required or expired must be done from the matrix or the employee profile.
The blue dot at the right top corner of a skill result indicates that there is a work in progress for that skill.
Examples of the blue dot:
Or
Be aware, a blue dot can also indicate one of the following:
The skill is planned.
The skill result is waiting for approval.
The skill has an open self-assessment request.
You may need to click on the individual result to understand what the dot signifies. Under the details pane, plannings are shown along with the set deadlines.
"As an operations manager, I want to plan when my field engineers need to obtain their safety II skill to avoid statutorily fines."
"As a sales team manager, I know there is a new product knowledge requirement across the sales team for a new product. A training is planned and I want to ensure I can remove these planned trainings as skill gaps from my overview."
Skill actions resolved or waiting for approval
Self assessments unsubmitted
Essentially, workflows are email notifications with a condition - what should happen when (such as when there's a missing skill requirement, for example).
In order to create a workflow in AG5, navigate to "Organisation" and then down to "Workflows".
Click "Create workflow configuration".
Name your workflow and click "Create".
We recommend leaving 'AG5' and '[email protected]' as the sender name and sender email address respectively. Any email address entered here will receive reply emails. Of course, feel free to replace those if so desired.
The 'Required approval' box should be checked if you want to be able to grant approval before the workflow triggers. If you check this box, add the email address that should get this approval email in the 'email verification' field.
If you don't want to approve every workflow triggered, ignore these.
Add a trigger to the workflow.
A trigger is an instance where a workflow action (sending an email) is triggered. Basically, you're telling AG5 when you want an email sent, and in what context. Only one trigger can be added per workflow. Multiple workflows need to be created for multiple triggers.
Scroll down to "Triggers" and click on "Add trigger”. Possible options include:
Required skill is missing
Add an action to the workflow.
The action is the actual email alert. More than one action can be set up for a workflow. For example, you might set up one email alert for the employees themselves, as well as a second one for their direct manager, and a third for the training department.
Move down the page and click on "New action". For action type, select "Send email" (the "API action" option is only used for integrations).
At this point, you will want to consider who will get the email notification, and what kind of email you would like your users to receive. IMPORTANT: Employee user accounts must be attached to employee profiles containing email addresses in order to be recipients.
Save the workflow action
Activate the workflow
Scroll up, click on the 3 dots next to "Edit" and select "Activate workflow". The workflow is now fully functional and ready to be used after the message on top changes from Inactive to Active.
Deactivation of a workflow is done in the same way.
An email will be sent to designated recipients each time the workflow's trigger is activated.
It's important to note that this will be a separate email for each instance the trigger fires. For example, let's say that a manager (who is set as a recipient) has 10 folks whose results will expire. That manager will then get 10 separate emails instead of a summary email.
Please keep this in mind in order to avoid unintentionally spamming your recipients with notifications.
All sent emails can be seen in the Organization > Sent Emails menu.
Questions? Ask your customer success manager or AG5 customer support.
Self-assessments serve several purposes:
When an employee's skills (also known as qualification) status is known only to themselves.
To provide managers with insight into how employees perceive their own skills and competencies.
For collecting skill certificates and documentation; employees can also upload scanned documents alongside their self-assessment results (15 MB limit per file).
In the top navigation bar, go to "Employees".
Search & select for the employee(s) for whom you want to request self-assessments.
Click on the "Actions" button and select "Request self-assessment".
This opens the self-assessment window, which consists of 3 steps. The first is "Details". Here, you can name the request and select which skills to include for self-assessment.
If you choose the content type "Skills", you'll be able to individually choose each skill.
If you choose content type "Libraries", you can select entire libraries or categories for self-assessment.
A helpful time-saving feature is to select your entire library and then activating the "Filter skills that will be requested for the employee to self assess" toggle. This option allows you to request self-assessment only for skills in your library that:
In this step, you can preview the email which the employees will receive when a self-assessment request is created (the content of this email is currently fixed).
Click the "Next" button to go to the last step: "Overview".
In this step, you will see an overview of all the employees to whom you will send the self-assessment request.
In the "status" column of the visible rows, you can see whether or not the employee will receive the request. If the user account isn't created yet, no email will be sent and no self-assessment request will be made.
When all is as expected, you can click the "Send" button.
The request is now created and the email is sent.
After the self-assessment is sent, the chosen employees will receive an email asking them to complete the self-assessment. This email will include a link to AG5. Upon clicking the link and logging in, they will notice a pending request indicated by a numerical count over the "Self-assessments" top tab.
If the employee also has Organization view (able to see matrices), they'll see the number above their picture or their initials in the top right, and can switch to portfolio view to complete the self-assessment.
Once on the "My Portfolio" page, go to "Self-assessments".
Choose the self-assessment to complete.
Add scores per skill (achieved/failed, or a specific rating).
The default score is "Not applicable", so just leave it at that if a specific skill does not apply.
If needed, add a remark or upload a document (e.g. a pdf of scanned certificate).
To do this, first open the card, as seen in the below gif
Once the self-assessment is complete, click the "Send" button.
If you're not done yet and need to pick up your self-assessment later, click on: "Save & continue later", and AG5 will remember your scores for when you return.
Last but not least, the skill results what were just created via these self-assessments are not active immediately! They will have to be approved first by the user who requested them. This will be explained in the following section.
Select the Control Center in the top right corner.
Select self-assessments and the self-assessment request you want to approve.
Select the employee for whom you want to approve the results.
Approve, decline or overwrite with another score for each skill.
Click on the "Save" button to save the results.
The approved results are now active and visible throughout AG5.
What do I do if the self-assessment requester isn't available?
If the requester of a self-assessment is unable to approve it (e.g., they are on leave or no longer employed), an admin can step in to approve the results.
To do this, go to the Control Center and click "X Skill actions to approve," where X represents the number of pending skill actions. If the number shows 0, don’t worry—that number only reflects actions tied to your user account.
Once there, remove the automatic filter for your admin account. This will reveal all outstanding approvals or self-assessment results, which you can then approve or deny.
The following user account types can send a self-assessment request:
Admins
Super users
Matrix access users
In AG5, by default, the approver is always the the same person who requested the self-assessment. If the requestor is not available (for instance, they may be on leave or have left the company), admins can grant approval instead.


The text explains the concept of libraries within AG5, detailing their purpose in organizing skills, how to create them, structure skills within them, delete categories and libraries, and provides bes
Skill Libraries are where skills are organized, labeled and structured into category trees. Think of this as a virtual bookcase.
This tree structure of groups is used within many places in AG5. It allows the user to select or filter by a group of skills (also known as qualifications).
Your skills library is located within the Skills page:
Your library is located within the skills page:
In a library, can be categorized based on anything, such as content, type, or use.
The way your libraries are structured directly affects how your skills appear on a matrix. When you change something in a library, your matrices are automatically updated.
There is no limit to the number of library categories that can be created. Having separate library categories for skills can sometimes be useful.
Steps:
Go to the Skills page.
Select the library: .
Add a name for your new skills library.
Select thebutton.
Open your library.
Drag theelement from the right side and drop it into the white area of your library.
Select the newly created category.
Change the name of your category.
In this example, "90 Day Review" is missing from the library because no category is listed
Libraries must be completely empty before they can be deleted. This is to reduce the chances of accidental deletion.
Remove all skills by selecting them and then clicking on the trashcan icon that appears on the right.
Remove all categories by doing the same.
Finally, select the top category and delete.
If the below menu is missing from the library screen, this means you have selected an item in the tree and the details of that item are displayed. Simply click anywhere in the white area on your screen to deselect that item.
Each category creates a header on a matrix.
See how these categories are nested under "Skills"
And how that is mirrored here, on the matrix
When a new subcategory is added and 5 skills moved into it...
It is reflected on the matrix
Categories which contain only a small number of skills will often be too small to read on a matrix, unless clicked or collapsed.
After moving all but 2 skills out of "New category"
"New category" becomes unreadable unless it's clicked on or collapsed
This pattern continues when adding more subcategories underneath "Soft Skills"
As seen, these subcategories also show up on a matrix
Skills can live in more than one category.
It is possible to add skills to more than one category. As shown below, moving a skill (in this case, "Test") from one category to another does not add multiple instances of a skill (also known as qualification).
However, if dragged over from the right, a skill can be added to more than one category.
While beneficial in certain circumstances, skills living under more than one category will create duplication on a matrix, so bear this in mind.
Once you have finished building your first library with all of your , it's time to use them to add to AG5.
A (skills) matrix in AG5 is a table with employees on one axis and skills on the other.
Just below is a sample matrix with employees on the horizontal axis and skills on the vertical axis. The intersect shows the status of each skill as it pertains to the employee.
For example, we can see that Noah, Sabrina and Logan all have the "5S Standard" skill, while it's a problem area for Sally and Michelle.
Skills matrices provide actionable insights - a clear overview of each employee's skill status, and the ability to close any skill gaps with a few clicks.
Matrices can include as many or as few employees and skills as needed. For example, you might create one matrix for an entire department, and have separate matrices for teams and team leaders.
The skills matrix answers the following questions:
How qualified is my team?
How qualified are my individual employees?
Which skills are my employees lacking? (Gap analysis)
Which skills have a surplus of skilled employees?
If you are setting up AG5 for the very first time, we suggest you begin with first.
Matrices operate off the skills, employees and organisational structures you've already added to/built in AG5. If you have yet to do those things, please check out these pages first:
When you're ready, navigate to the Matrices tab.
Click on 'New Matrix' - This button lives to the right of the search bar:
1) Select employees - Employees are not selected individually. Instead, employees are added to a matrix by choosing employee groupings (or tags). All employees associated with the chosen groupings will appear on the matrix. The groupings an employee has depends on their positions. We have two different methods for finding groupings.
To edit a matrix after it's been created, click on 'Matrix options' (the icon with the 3 dots in the top right-hand corner of the matrix). This takes you back to the matrix creation menu.
Display Settings are accessed by clicking on the icon to the right of the three buttons. Here, users can invert columns and rows, adjust row and column and header sizes, change the matrix view (gap [default], required or achieved), and view the legend for the various symbols.
The text explains the concept and purpose of skills within AG5, detailing how to create them, their characteristics, tabs associated with them, and how to define skill-specific level descriptions.
In AG5, a skill (also known as a qualification) is our umbrella term for anything that can be achieved that you want to measure and record for employees. Skills can range from actual skills to courses, certifications, competencies, degrees, experience, training on the job, physical characteristics, skills, pieces of knowledge, etc.
Skills exist to understand and record employee capabilities, and to determine whether or not an employee is qualified to carry out a certain activity.
Skills can also be applied to positions as This means that anyone with a certain position would be required to complete the relevant skills in order to be considered compliant.
Extended to skills matrices, AG5 visualizes any gaps in compliance, making it easy to close those gaps and reach 100% compliance.
Go to the skills page from anywhere in AG5.
Click the blue button: .
Fill in the skills characteristics. The blue text fields with * are mandatory.
Select the blue button: .
Each skill has its own characteristics. Name: (mandatory)
The name of the skills.
Code: (mandatory)
If your company uses a coding structure for your qualifications/skills, you can enter the code here. If no coding structure is known or desired, just copy the name into the code field. Codes can help you organize your skills and make searching for them easier.
Also, skills (also known as qualifications) will be sorted on the matrix by code in alphanumerical order. Thus, altering the code is how to re-order your matrices.
Description: (optional)
Here you can enter the description of the skills but also add anything at all relevant, for example, a link to work instructions or to other documentation.
Rating scale: (mandatory)
The scale determines how the skill should be scored, for example, with a 'Passed/Failed' or with another self-defined rating scale. need to be set up before they can be used.
Skills type: (optional)
This field can help you to sort or recognize the skills in the skill list. Some typical skill types are 'training', 'certificate' or 'skill'. However, meaningful categorization of skills are best done in the library instead of by skill type (see the article on ).
Validity Period: (optional)
This period defines the default validity of this skill after a result has been added - in other words, when it expires. After a result has expired, the skill will be displayed as missing for the employee.
Warning period: (optional)
This period defines at what point in time a warning will be shown in AG5 that the result is about to expire.
Active period: (optional)
These fields govern when skills will be considered active in AG5. As long as a skill is active, it will appear throughout the rest of the system (matrix, alert list, employee detail page, etc.). If the "Until" field is prior to today's date, then the skills is inactive and will not appear throughout the system. This is useful when the need for specific skills has passed, but retaining records for auditing purposes is still of importance.
Custom field: (optional)
It is possible to have custom fields added to AG5.
Each skill has 4 relevant tabs:"Employee Status", "Required for", "Attachments", and "History".
Employee Status will show the current status of every employee who has a result, requirement or both.
Required for lists which groupings a specific skill is required for.
Attachments are where you can directly attach files (such as PDFs) to skills, as well as where these direct attachments are stored and accessed.
History will show you the history of a skill from creation to the current day.
Each skill uses one rating scale. And each rating scale can be used for different skills. But the contextual meaning of each rating scale level can be different per skills.
To make sure every user has the same understanding of what exactly each level means, you can describe each level within the skill detail page. To do so within a skill page, click on the button just above and on the right of the rating scale:
Level descriptions can be made visible while adding results in AG5. Example:
When there is no skill-specific description defined within the skill, the general description of the rating scale will be used.
Creating skill is in AG5 is one of the first steps in setting up your skills management in AG5, and is important in order for AG5 to understand how skills are organized in your company and for defining requirements for positions.
Therefore, the next articles which are important for completing your AG5 setup are:
Integrations allow you to connect your existing software applications to your AG5 system and exchange information. This streamlines your workflow, reduces workload, and minimizes the risk of manual errors.
AG5 often is and can be integrated with your Single sign-on identity provider (SSO), your Human Resource Management System (HRMS) and your Learning Management System (LMS). Integration with planning software is also possible.
Single Sign-On (SSO) is an authentication and authorization method that enables users to access AG5 using their own identity provider, eliminating the need for multiple usernames and passwords. This simplifies login for employees, reducing security risks. AG5's SSO Integrations adhere to the SAML2 standard.
Integrating your HRMS or Human Resource Management System (also known as a Human Resources Information System or HRIS) with AG5 automates the synchronization of employee data.
The primary purpose of doing so is to ensure the accuracy of HR data within AG5, thereby eliminating the need for manual management of such data. This integration offers the advantage that when defining your organization's training requirements in AG5, you no longer have to manually handle:
Employee turnover
Employee absences
Employee job and position changes
This provides managers and training experts with the reassurance that their HR data is always up to date.
Furthermore, AG5 offers the capability to maintain not only standard HR roles and structures but also operational roles and structures, ensuring the accuracy and completeness of your training requirements model.
This integration is typically configured through an API connection or sFTP upload.
What HRMS data can be synchronized with AG5?
Basic employee information (first name, last name)
Job information (HR role, contract type, contract dates, leave dates, manager)
Organizational structure (department, function, legal structure, etc.)
The primary purpose of integrating an Learning Management System, or LMS, with AG5 is to ensure seamless access to organizational training, courses, and e-learning materials while defining training requirements. By centralizing these needs in AG5, alongside other operational structures managed by departments like operations, it streamlines the organization's training process.
AG5 then serves as the central hub for all training requirements, enhancing assignment capabilities. When training requirements align with HR and operational structures in AG5, employees are automatically assigned relevant training in the LMS, ensuring accurate allocation.
Data synchronized from the LMS to AG5 includes the following skills data:
Training items
E-learning
Curricula
Competencies
You can also configure the LMS integration to assign required training in your LMS. The assignment data that will be exchanged is:
Employee info
Required training info
Additionally, the LMS integration can be configured to assign required training and exchange assignment data, including employee and training information.
Upon completion of training in the LMS, the following achieved training data can be synced back to AG5 through the same integration:
Training item results
E-learning completions
Curricula status
Competency achievements
LMS integrations with AG5 utilize an API or the LTI standard.
In addition to the common integrations mentioned above, AG5 can also integrate with other software, like planning organizations.
For example, for some organizations, incorporating employees' skills into work planning is crucial, especially as it concerns quality, health, environment, or regulatory requirements.
To streamline planning and minimize time and effort wastage, they integrate AG5 with their planning systems.
This ensures access to employees' up-to-date skills data in their planning software, reducing human error when assessing employee skill sets during the planning process.
What planning data can be synchronized with AG5?
Employee information
Skill information
Feel free to contact us to discuss your integration needs beyond SSO, HR, and LMS integrations.
Do you want to integrate your existing software applications with AG5? Contact your Customer Success Manager or reach out to our support department. We'll discuss your objectives and customize any integration to meet your needs.
This articles describes how to edit or change employee positions.
A Position is an important concept in AG5. Positions are how an employee's role in the company is defined within AG5, and importantly, how requirements are assigned to an employee.
Positions are made up of grouping tags which define everything about an employee that your organization wishes to track in AG5 (organization, location, job roles, departments, teams, shifts, etc.). There is no limit to the number of grouping tags that can be added to a position.
If the grouping tags in an employee's position have assigned requirements, then the position also has those requirements, and they automatically apply to the employee.
The position field is located underneath an employee's details. For example, the employee below is tagged with a job role and an org unit:
Positions can be expanded to show exactly where the requirements come from by clicking on the ^ in the position box:
Requirements for a position are represented by the bars with numbers. Green bars and associated numbers represent achieved requirements, and red for unachieved requirements.
In our example, Abbie has completed 2 of his requirements as a Process Lead, has 7 outstanding Process Lead requirements, and one requirement because he's part of the Logistics org unit in Acme Inc:
Reminder: these requirements can be found under Organization > Organizational structures, or under Organization > Skill requirements.
Abbie's requirements as they appear in the organisational structures:
By default, brand new employees don't have positions yet (unless you have an HR integration, which creates positions automatically using your HR data).
A position can be created in two different places:
By clicking "New" on the employee details page:
By clicking on "Create a new position" from an organizational structure:
When creating or editing positions, remarks can be added and the position's active period can be defined.
After they're created, a position can be edited (tags added or removed) in a few places.
From the employee details page - Click the 3 dots on the right-hand side of the position and go to "Edit position":
In an organizational structure - Drag the employee (in green) from one grouping to another. This will remove the tag from the initial grouping their position is in, and apply the tag from the destination grouping. This is useful for, as an example, moving an employee from one department to another:
Tags can also be added from within the position dialogue box on the right side, after clicking on a specific position (in green). This is useful when you do not want the initial grouping tag removed from a position. For example, here we will add Aaron Barnes to the Maintenance org unit without removing him from the Packing org unit:
Be careful! Clicking the trash can icon on a position will delete it entirely.
Because a position usually represents a person's entire function at work, in most cases it makes sense for employees to only have one position per person.
However, employees can have more than one position. Typical use cases include:
Overlapping periods of position
Example: Old position ends 31st of August - A new position (with new requirements) starts 1st of August
Archiving old positions for record keeping
Secondary positions outside of usual function
How do multiple positions work?
If two or more active positions are held concurrently, requirements from both positions will apply to the employee at the same time.
This is useful when an employee has a secondary position (E.G. First Aid), or a temporary assignment, and both position's requirements need to be measured together.
If the "Active period" settings are used to indicate start and end dates for a position, then requirements will only apply when the position is active. In other words, the "Active period" settings tell AG5 exactly when (From > To) an employee should have a position.
For example, using the "From" field, we can take the same second position from above and set it to only kick in at a future date:
When the "From" date is set for the future, the colored bars turn grey and the number of requirements become zero, until the position's "From" date arrives. Then those requirements will reappear.
We could do something similar using the "To" field and set a position to expire at a certain date in the future. Or we could archive the position, by setting the "To" date to some time in the past.
If a second position needs to be created, it's often best to do so from the employee details page:
Underneath positions, you'll see another area called "Potential positions":
Just like it sounds, this feature helps you or your employees find potential positions, based on the achieved skills of an employee and and the requirements for any existing position.
For example, take Abbie Ahmed here. He has 4 achieved skill results:
Based on these results, clicking on the "Browse" button in the Potential positions area shows us positions that Abbie might qualify for:
If a potential position shows a 100% match, then there you go! A fully qualified employee ready to move into that role. If there's less than a 100% match, expanding the potential position shows us the gaps we'd need to close to get to 100%:
If desired, potential positions can be pinned to employee's profile. This is useful for tracking progress, or for discussions with the employee about personal growth and development:
Combining this feature with the Expert Finder is a great way to plan for the future and put employees in the right positions for maximum impact.
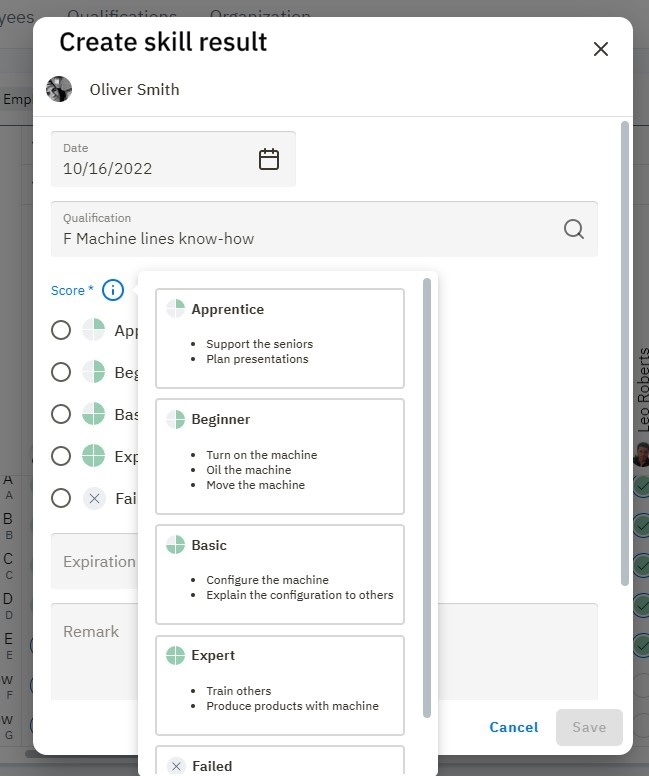
Required/non-required skill is expiring soon
Required skill is missing or expiring soon
New planning
Master data change request reviewed
Master data change request waiting for approval
Skill action resolved
Skill action waiting for approval
Self-assessment not submitted
After choosing the necessary trigger, you need to choose which skill(s) will be used for the email notifications - there can be one skill or many. Click save when you're done. It's also possible to come back later and edit the trigger to add more skills.
First, choose the recipient of the email, which can either be the employee, their manager, or a specified email address (e.g. a training coordinator).
Next, the subject and the body of the email must be created. When clicking in either field, both the subject and the body of the email can be personalised with the templates presented in this pop-up window, which auto populate text based the skill and employee:
Bear in mind, for those template fields to appear, the necessary information must be present in the system first.
Finally, choose when the email should be sent (availability of employees can be changed in the employee portfolio).
Always Run
If employee is available
If employee is not available


Are required,
Are required AND have a "warning" or "problem" status,
Have requirements for a minimum number of employees, and
Have not met minimum number of employee requirements.
Once done, click


Your library is created.
Change the code of the category.
.Click in the white area to deselect the category.
On the right-hand side, select "Add a skill:
Search for the skill you want to add to a category.
Drag and drop the skill into the correct category.
If you wish to delete a skill from a category, click on the skill and then the symbol.


Which skill results have expired?
Which skill results are about to expire?
Do employees meet the required skill level?
Does the team meet the required skill level?
And many more...
Tree list - This presents all groupings organized exactly how they're laid out in the organizational structures. Choosing a grouping with many sub-groupings will make those sub-groupings appear on the matrix. For more information about organizational structures, check out this article.
2) Select skills - Next, select the skills you want to see in the matrix. As above, you can use either the flat list or tree method for choosing categories or groupings. Similarly to how employees are selected, skills are not selected individually. Instead, skills are selected by either choosing a category from the Skills library, or by choosing a grouping from the Organizational structures.
Selection by category (Libraries): This is the most straightforward way of adding skills to a matrix. Simply pick a category (folder) from a library, and all skills from within that category will appear on your matrix. If the category you choose has subcategories, then those subcategories will appear on the matrix as sub-headers. For example, here we select the top category "Qualifications", which has "1. Hard Skills", "2. Soft Skills", "3. System", etc as subcategories: The matrix includes those as subheaders:
Selection by grouping (Organizational structures): You can also build out the skill axis by choosing groupings with skill requirements. In this case, requirements for that grouping (department, job role, team, etc) will be the skills that appear on the matrix. If built this way, the skill axis will be categorized by grouping, instead of by category. As above, you can use either the flat list or tree method for choosing categories or groupings.
3) View and save - The "View" section allows you to review the employees and skills that have been selected. This is where a matrix can be given a name and any relevant remarks can be added. Also, using the "Show only if" function, it's possible to make a matrix more compact by only showing skills or employees when the following criteria are satisfied: To modify any of these choices, click on "Back" to go back a step. Finally, click "Save".
The skill is created and saved.
Example: First Responder / CPR
Temporary assignments
1st Position for regular function
2nd Position for temporary assignment
Skills - list with all of your Skills and details.
Organization - access to all kinds of source data: Libraries, Organizational Structures, Skills data, Grouping data, User Accounts, Integrations etc.
Expert finder - search for employees that match criteria.
Alert list - query your data and get insight into the status of specific groups of employees and/or skills.
My Portfolio page - where employees can view their own data (see article).
You probably don’t want all AG5 users to access all your data. To manage this, you can create different types of user accounts under Organization > Account Management. You can also provide additional access rights by sharing specific matrices on the Matrices page.
First, we will describe the three basic account types.
An Admin has access to all sections and data in AG5. An Admin can edit all data.
Super Users have access to almost all features, sections and data in the system, except for:
Creating/editing user accounts
Configuring integrations
Sharing matrices
Issuing approvals for others.
Super Users can have either "Can view" access OR "Can edit" access.
A My Portfolio user needs to be an employee in the system, and they only have access to their own data via the My Portfolio page.
My Portfolio users can also have either "Can view" access OR "Can edit" access.
"Can edit" access means they can add results for themselves and change some basic data (like, first name, last name, etc).
My Portfolio "Can edit" users are not able to change their positions.
A Custom User can access up to 8 different areas in AG5:
Matrices
Employees
Skills (also known as qualifications)
Organisation
Libraries
Organisational structures
Skill actions
Results, plannings, revocations, exemptions and personal requirements
Groupings
My Portfolio (must be an employee in AG5)
Portfolios of employees one manages
In each of them, users may have "Can view" or "Can edit" access. Moreover, users may also gain access to creating, editing and sharing matrices (provided that the user already has "Can edit" access to Skill events).
Skill actions
When the Skill actions area is set on "Can-view", that means that the user can see skills results, plannings, revocations, exemptions and personal requirements. "Can edit" access allows users to add, edit or delete the above elements for other users.
In order to gain access to the Skill actions area, users must first be granted access (at least "Can view" access) to the following areas: Employees, Skills (also known as skills) and Groupings.
Portfolios you manage
The Portfolios You Manage setting defines what a user can see and do in the portfolios of employees they manage.
When set to Can view the user can:
Access all employees for whom they are listed as the manager.
View all related employee data, including basic information, positions, and skills.
See only the skills that are achieved or required by these employees in the general Skills overview list.
Access all skills in the repository when adding new skill results, performing other skill actions, or creating self-assessment requests.
When set to Can edit in addition to the viewing permissions:
The user can edit the employee’s position and skills data.
Basic employee data such as name, birthdate, or contract details cannot be edited.
In order to create or share matrices, users must have can-edit access to Skill Events.
Users will automatically gain access to Organizational Structures if they have access to the Skills, Grouping and Employees areas.
Users will have access to all matrices if they have access to the Skills, Grouping, Employees and Skill Event areas.
The "Creating matrices" option allows the user to create matrices and also to edit ones that were created by someone else.
If you do NOT have SSO enabled and need to create user accounts manually, head to Organization > Account management & History > User accounts.
Click:, choose the employee for whom you want to create a user account, and choose their account type.
It is not required that there be an employee profile possible to create a user account. This is often the case for administrators. In these instances, enter the email address manually.
After granting users initial access rights as described above, you can extend their rights by granting them matrix access.
Matrix access (Initial rights + matrices granted)
By sharing a matrix on the Matrixes page with a user, this user will gain access to the employees and skills that are shown in that matrix.
This is particularly useful when a user hasn't already been granted access to all employees and skills.
To share a matrix click on the 'people' icon on a matrix tile:
For example, by sharing this matrix with a user, they will gain access to the 48 employees and the 12 skills contained within
Then, select the user's role as Viewer or Editor and click save. Users can have matrix access removed by clicking on the trashcan icon:
Users with matrix access will see:
Matrices - with only shared matrices visible.
Employees - list with only the employees in the matrix and the option to see their detailed data.
Skills - limited to the skills in the matrix.
Expert finder - tool for quickly finding qualified employees; limited to employees in shared matrix.
Alert list - for querying data and getting insight into any skill gaps for the employees and the skils in the matrix.
Note: this is an extended right. It's a right that is added to one of the basic account types. If the user already has "Can view"/"Can edit" access employees because of their Super User or Admin access, sharing the matrix does not accomplish anything.
As mentioned above, this right is usually combined with the My Portfolio access.
Curious about why certain types of employees would be granted certain types of user accounts?
The next article has several examples of user accounts. Check it out!
Compliance Percentage = Compliant Skills / Total Required Skills
Only required skills are included: Achieved skills that are not required are excluded from the calculation.
Partial achievements are not counted: For example, if a skill requires Level 4 but only Level 2 is achieved, it is considered unmet.
Soon-to-expire skills are included: Skills that are valid at the moment of calculation, even if they are close to expiration, are still counted as achieved.
Results are counted based on their issue date: If a result is added later but has an earlier issue date (e.g., added on July 1st with an issue date of June 15th), it will count toward June compliance. This ensures the metric reflects when the qualification became valid, not when it was entered.
John:
Required skills: 6
Compliant skills: 3
Compliance percentage: 3/6 = 50%
Millie:
Required skills: 40
Compliant skills: 36
Achieved skills, but not required for Millie’s position: 21 (excluded)
Achieved skills, but lower than the required skill level: 5 (excluded)
Compliance percentage: 36 / 40 = 90%
Just like individual compliance, the compliance of the entire workforce (within a repository) is calculated by first summing up all compliant skills for all individuals, and then dividing it by the total required skills of all individuals:
Compliance Percentage = Compliant Skills / Total Required Skills
Total compliant skills: 3+36 = 39
Total required skills: 6+40 = 46
Workforce Compliance: 39 / 46 = 85%
Note 1: We do not calculate the workforce compliance as the average of individual percentages e.g. (50+90) / 2 = 70%. Instead, we use the actual totals for accuracy. In this example case, this approach makes the compliance 85% instead of 70%.
Note 2: These “minimum amount of employee required” are not yet included in these compliance calculations. (To be done in a future release, probably in a specific Insights section).
Note 3: If an employee needs the same skill for multiple reasons (e.g. for having job role "Operator" and for being in shift "Blue"), we count this skill only once in our compliance calculations.
The problems (gaps) in skills compliance represents the total number of required skills that remain unmet. In the example above, the workforce has a total of 46 required skills, while 39 of those have been achieved, leaving a gap of 7.
Note: For instance, if 10 employees are missing the same required skill, the problem counts all 10 unmet skill requirements, not just the single skill itself.
Compliant results are achieved skills which are required for the employee’s position.
Expired skill results or skills results not completely meeting the required level (e.g. only level 3 achieved but level 4 is required) are excluded from this count.
In the Insights dashboard, key metrics such as Compliance, Problems, and Compliant Results display trend indicators in green or red, with upward (▲) or downward (▼) arrows. These values represent changes over the selected time period, comparing data from the first to the last day of the selected period.
Green values indicate a positive trend:
A green upward arrow (▲) means an increase in a beneficial metric, such as higher compliance or more compliant results.
A green downward arrow (▼) means a decrease in problems, which is also a positive trend.
Red values indicate a negative trend:
A red upward arrow (▲) shows an increase in problems, signaling a potential issue.
A red downward arrow (▼) would indicate a decrease in compliance or compliant results, which may require attention.
By tracking these indicators, you can quickly assess performance and take necessary actions to improve compliance and reduce problems.
By default, the time period is set for the last year, although that can be changed by clicking on the time period filter:
This chart shows the absolute numbers of problems (red), and compliant results (in green), over time (in this case over the last 12 months). Skill results that are expiring soon will be shown in green here as well, because from a compliance perspective they are valid (green). In other areas of our product, we show these as orange. We will add charts with special focus on these kinds of warnings in future releases.
This chart shows the compliance %, over time (in this case over the last 12 months).
The way this percentage is calculated is explained in the Compliance-card section above. The only difference is that in this chart, this calculation is done for each 12 months individually, so you can see a trend over time.
This chart displays the 10 skills with the highest or lowest number of compliant results in a given dataset.
This chart displays the highest or lowest 10 skills based on the number of problems within a given dataset. This highlights where skills shortages are most critical.
This chart displays the 10 employees with the highest or lowest number of compliant results within a given dataset.
Finally, this chart shows the top 10 employees with the highest and lowest number of problems. This highlights which employees require the most attention, as well as which require the least.

expiration_date
expiration date of the last result
compliance_status
a string with the status (see list below)*
compliance_score
a number between 0 and 1 to show the compliance percentage** 0 meaning: not compliant and 1 meaning: compliant.
Great for allowing managers and employees to add results and electronic signatures from the floor, our Skills app provides an intuitive interface for managing and viewing skill development and results.
It is available for iOS phones in the App Store, and for Android phones in the Google Play Store.
Adding of results
Can add attachments to results
Can add eSignatures to results
Viewing of results
Can view all results added by yourself for other users if your user account has the right permissions (E.G: admin, super user, custom user, my portfolio user with edit rights)
Can view all results added to your employee profile
Can view and download attachments and e-signatures
This article's screenshots are built using the iOS app. The Android app has the same functionality.
The AG5 Skills app has 4 separate tabs:
Home
Add result
My portfolio
Settings
When you first open the app, you'll be taken to the home screen. Here (if you have an employee profile of your own), you'll see your Skills overview, a visual overview of the number of your achievements, as well as the number of skills still required for your position.
Next, you'll see a shortcut for adding results. Pressing this blue button will take you to the "Add result" tab.
Below here you'll find your "My results" section, which contains all results against your employee profile that have been added over the last 3 months.
This section is only present if your user account is linked to an employee profile.
Finally, as you scroll down, you'll find the "Results added by me" section. Just like it sounds, this is where all results added by your user account over the last 3 months are displayed.
Be default, the app shows the 3 most recent results added. Tapping on "See more results" will show you all results from the last 3 months.
After tapping "See all results"
In either the "My results" or the "Recently added results" sections, tapping on an individual result will take you to the details of the result. From here, it's possible to view and download attachments and eSignatures.
This tab is where you add results (surprise, surprise). Assuming your user account has the correct edit rights, it's possible to add results for yourself, as well as for others.
First, a date is chosen for the beginning of the result validity.
After "Next" is pressed, you'll be able to choose the employee for the result by tapping on their name. Only one employee can be chosen at a time (we advise using the matrix on the web application if you wish to add multiple results in one go).
Then, a score is chosen. This page is also where you can add remarks or take a picture of any relevant documentation or certification. There are no limits to the number of pictures that can be uploaded.
By tapping the symbol, you'll be able to see the rating level descriptions (if they have been filled out by your organization).
Go back to the score selection page by tapping the < symbol in the top right.
Finally, you'll reach the Summary page. Before submitting, this is where it's possible to add an eSignature with a watermark. There is a limit of one eSignature per result.
Once the eSignature is saved, you're returned to the summary page where the presence of the eSignature is shown below the "Employee eSignature" button. To proceed, simply tab "Submit" and your result is saved.
This tab allows users who have an employee profile to all of their valid and required skills. Tapping on each skill provides details, as above.
For employees with many requirements, the search, sort and filter functions make it easy to find any skill.
Viewing plannings
A blue dot next to a skill indicates that a planning has been created for a skill gap.
Tapping the skill with the dot (in our example here, "Customer Relations") takes users to the details page, where the planning deadline is visible:
Last but not least, the settings tab allows users to:
Choose active repository (if more than one are available for your user account)
Choose language
Contact support
Log out
Questions or feedback? Please let us know at .
This article gives some example KPIs and dashboards that can be calculated /created with the Advanced Analytics API.
Number of results
Meaning: How many results are added into the system in total (is also used to calculate the AG5 subscription fee)
Method: Sum the total amount of records in the Achievement table
Application: As a Scorecard (one number) or as aTime series chart (evolution over time)
Repository compliance
Meaning: How compliant is the whole workforce in the repository.
Method: There are many different ways to calculate this average, but we suggest to use EmploymentQualificationCompliance where you calculate the Average compliance_score for the records with one of the following values in compliance_status:
Please note that we do not include the statuses where the Qualification is not required. Also see the important note about ‘partial compliance’ at the end of the about compliance calculations. And finally, be aware that this calculation does not include the count-rules.
Application: As a Scorecard (one number) or as a Time series chart (evolution over time)
Number of accounts
Meaning: How many people have access to AG5? Which could be an indicator for the progress in the roll-out of the AG5 application.
Method: The RepositoryStatistics Event stores the field accounts_count every day
Application: As a Scorecard (one number) or as a Time series chart (evolution over time)
Alert list as chart(s)
Meaning: The Alert list in the AG5 product shows the status of the Employee-Qualification Compliance in three colors: Green (Fine), Orange (Warning), Red (Problem). These statuses and their colors can be represented as a chart which will give a visual representation of the compliance status of the repository.
Method:
The EmploymentQualificationCompliance Events table stores the Alert list data for each date.
Group the Compliance events of a date by their ‘Color’
Display the count per color
Note: you can decide to exclude the scores for the qualifications that are ‘NotRequired’, but this depends on your Skills Management Strategy.
Application:
As a Pie chart (for a specific date) or as a Time series chart (evolution over time)
Compare compliance between departments
Meaning: See how departments compare in their compliance score and which departments can learn from each other.
Method:
The GroupingCompliance Event has different compliance score calculations (see the about compliance calculations).
To compare some specific departments:
First find their id in the Grouping Entity table.
Then filter the GroupingCompliance Events on those grouping_ids
Display the preferred compliance_score (Isolated compliance, Contextual compliance, Positional compliance or Count rule compliance)
To compare all departments:
First find the id for ‘Department’ in the GroupingType Entity table.
Then filter the GroupingCompliance Events on the grouping_ids with that grouping_type_id
Display the preferred compliance_score (Isolated compliance, Contextual compliance, Positional compliance or Count rule compliance)
Note: you will need to filter out the GroupingCompliance Events where the num_required is zero in order to keep the groupings with no requirements from influencing the average.
Application:
As a Pie chart or Bar chart (both for a specific date) or as a Time series chart (evolution over time)
Compare compliance between locations
Meaning:
Compare locations on their compliance scores and identify which locations can learn from each other.
Method:
The GroupingCompliance Event has different compliance score calculations (see the about Compliance Calculations). In this example, we assume that every location consists of multiple sub-groupings (departments, teams etc).
To compare some specific locations:
First find their id in the Grouping Entity table.
Create a hierarchy by using the parent_id in the Grouping Entity table.
Collect the ids of the subgroupings for each location from the Grouping Entity table.
Compute the average of the preferred compliance_score in the GroupingCompliance Events table for the subgrouping’s grouping_ids
Note: you will need to filter out the GroupingCompliance Events where the num_required is zero to keep the groupings with no requirements from influencing the average.
Alternative way Use the EmploymentQualificationCompliance Events
If necessary, transform the Position Entity table, so that the grouping_ids column is unpivoted. This means that if a position has multiple tagged groupings, a row is created for each grouping_id with the general Position fields (like employment_id).
Join the EmployeeQualificationCompliance Events table with the Employment Entity table which in its turn is joined with the Position Entity table.
Filter the EmployeeQualificationCompliance Events with the Position grouping_ids that correspond with the needed Locations (a hierarchy like in the previous example might be needed) and aggregate (average) the complance_score
Note: you will need to filter out the EmploymentQualificationCompliance events where the required_score is zero in order to keep the situations where a qualification is not required for the employee from influencing the average.
Application:
As a Pie chart or Bar chart (both for a specific date) or as a Time series chart (evolution over time). (for pictures, see previous example)
Show the qualifications with the biggest gap
Meaning:
Get the top 10 qualifications with the biggest gap (lowest compliance). For this the Qualification Compliance needs to be calculated
Method:
Join the EmployeeQualificationCompliance Events table with the Qualifications Entity table.
Calculate the average compliance_score for all Events on a certain date for each Qualification : The Qualification Compliance.
Make sure you filter out the events where the required_level is zero before calculating the average
Sort the average compliance_scores from lowest to highest. Or calculate the Gap as (1 - compliance_score) and sort from highest to lowest. Display the top 10.
Application:
As a Bar chart or table.
Show the best performing Employees
Meaning:
Get a top 10 of Employees with the biggest gap (highest compliance). For this the Employee Compliance needs to be calculated
Method:
Join the EmployeeQualificationCompliance Events table with the Qualifications Entity table.
Calculate the average compliance_score for all Events on a certain date for each Employment: The Employee Compliance.
Make sure you filter out the events where the required_level is zero before calculating the average
Sort the average compliance_scores from highest to lowest. Display the top 10.
Application:
As a Bar chart or table. (for pictures, see previous example)
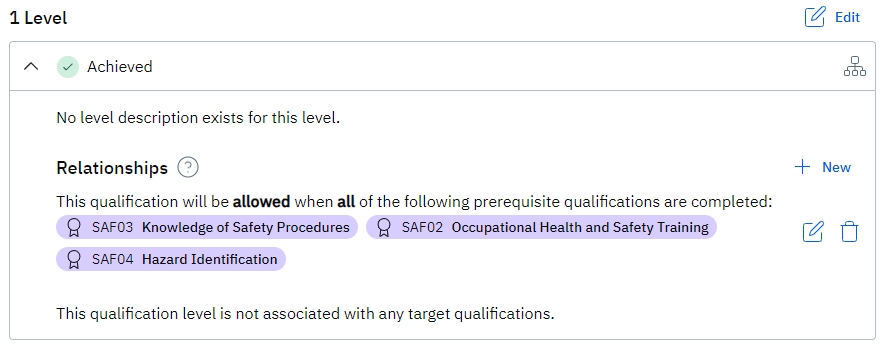
This explains skill requirements in AG5, covering their creation via organizational structures, setting required levels, and applying them to employees. It also discusses creating requirements dir
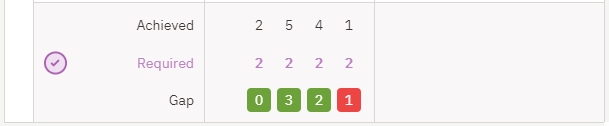

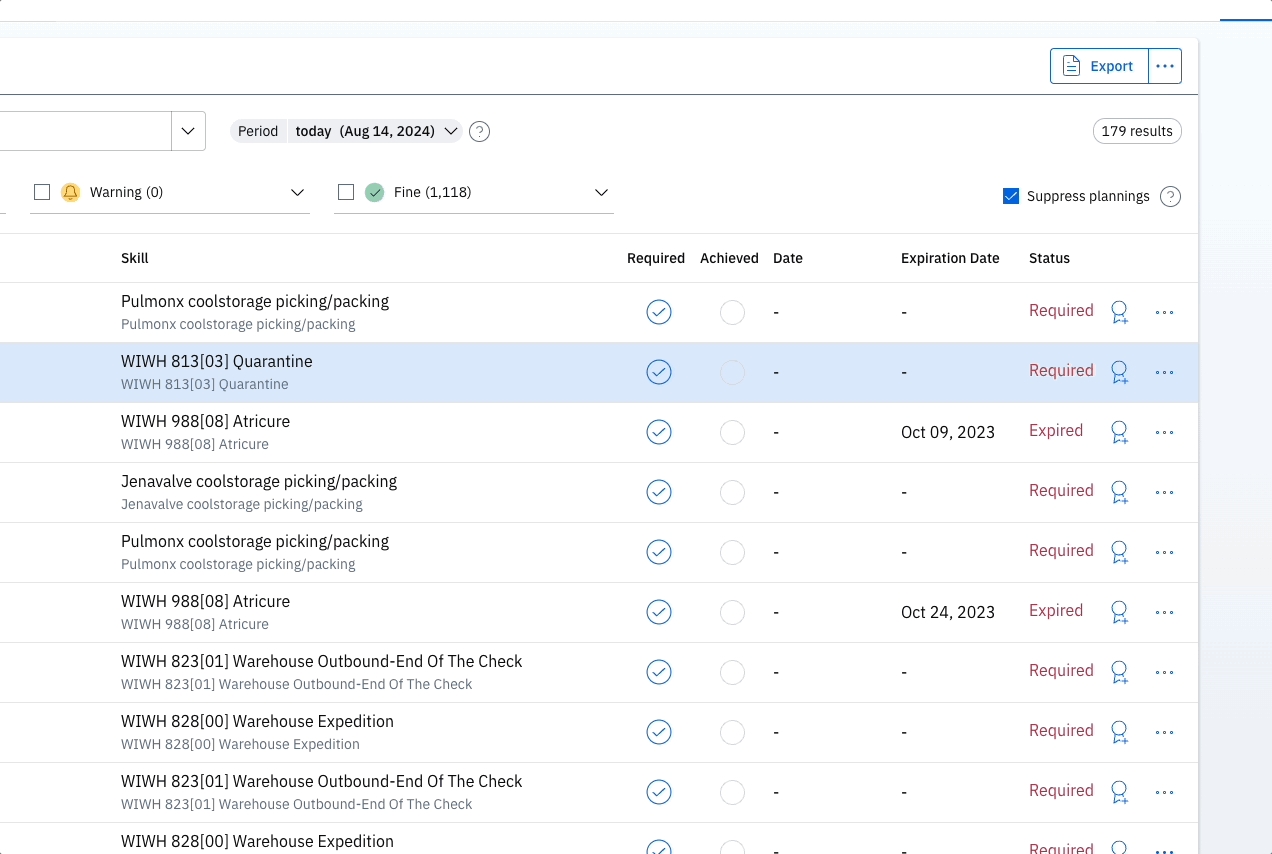
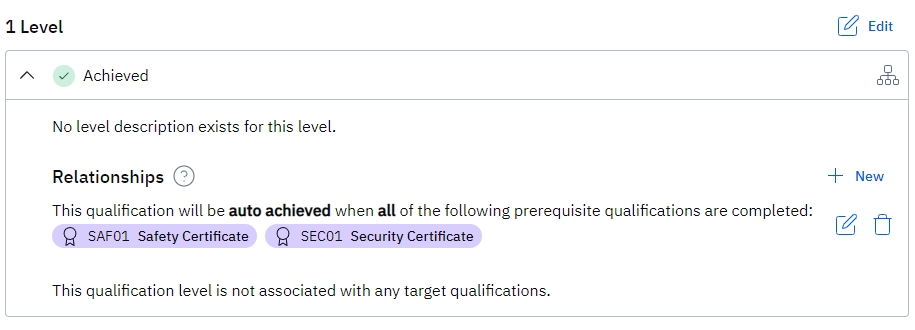

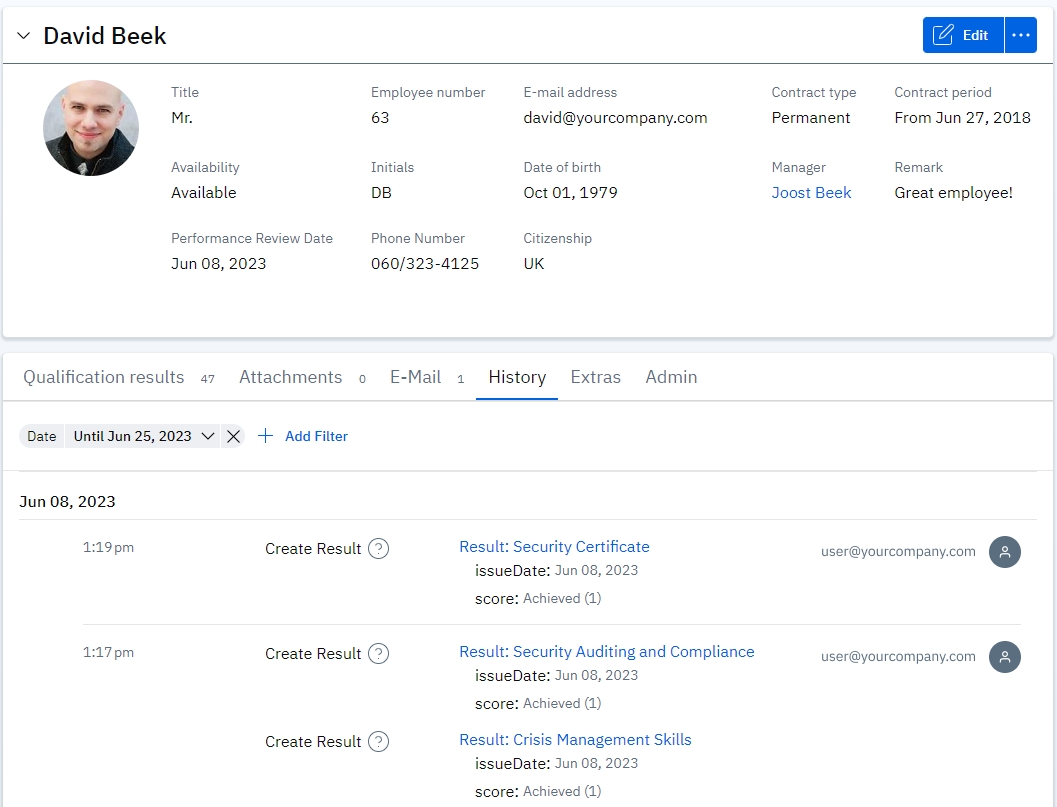
Expanding the planning by tapping on it provides further details:
Viewing prerequisite rules
After tapping into a skill detail page, it's also possible to see when a skill has prerequisite assignments:
Expanding the "Skill prerequisites" section shows the rules in full:
Display the aggregated compliance_score (Isolated compliance, Contextual compliance, Positional compliance or Count rule compliance).
compliance_status
color
'allFine', 'revokedNotRequired',
'failedNotRequired', 'validNotRequired'
Green
'expired', 'revokedRequired',
'failed', 'levelTooLow', 'required'
Red
'expiresSoon', ‘expiresSoonNotRequired’,
'levelTooLowSoon', 'requiredSoon'
Orange
Also, in order for the Alert List, Expert Finder and Potential Positions to work, AG5 must have defined requirements for positions.
Find the correct Organizational structure
In the Organization menu, under Organizational structures, you will find the structures that hold Groupings like departments, job roles, teams, etc (depending on the setup of your company).
Find the Position
Determine for which Position you want to set a requirement (for example, everyone with a "Production - Jr Spec" job role), and look for that Grouping (blue block) in the Organizational structure.
Add a skill Requirement
Click on the Add a skill requirement link in the top right of your screen. Search for the skill (also known as qualifications) and drag it into the correct grouping in the tree (for example, "Production - Jr Spec").
Set the correct level
Click on the newly added skill requirement in the skill tree.
A menu will appear on the right side of your screen.
In this menu, locate the description field that contains the details of the skill requirement you've created.
Scroll down to find the "Required Score" section.
Select the appropriate required level for the skill.
If the above requirement menu is not visible, this means that you have selected something other than a requirement (in purple).
When looking at the skill requirement menu, you'll see a section where you can choose for this requirement to apply to all employees with the position, or to only a specified number.
AG5 defaults to 'All Employees,' and as described, this means that all positions with the tag require the chosen skill. Using "All Employees" has some benefits:
If a requirement is not met, a skill gap will appear on a matrix
The gap will also appear on the Alert List
If you choose to specify a number of employees instead, this will manifest on the matrix as a column showing total achieved, total required and total gaps for the specified grouping:
This feature can also be activated directly from a matrix, by clicking on a grouping header (not the qualification header) and clicking on 'Set minimum number of employees':
This can be extremely useful. A common use case for using this feature is to avoid overtraining your workforce. However, this feature must be monitored visually, and there are some trade-offs:
If a requirement is not met, a skill gap will NOT appear on a matrix
The gap will also NOT appear on the Alert List
You can also create skill requirements via the Skill requirements page. With this method, it's possible to set a single requirement for a single grouping (tags) or a single requirement for a combination of groupings (tags).
When building for a combination of groupings, they use an AND function, meaning that an employee would need to have all groupings for the requirement to apply.
For this, go to Organization > Skill > Requirements:
Option 1: Requirement for a Single Structure
Example: Add "First Aid" requirement for "Shift -Blue."
1. Open the Skill Requirements page
2. Click the Create Skill Requirement button
3. Select the relevant Organizational Structure in the Tags field
4. Select the required Skill
5. Save your changes
This requirement will now apply to employees with the "Blue" shift:
Option 2: Requirement for a Combination of Multiple Structures
Example: Add "First Aid" requirement for the "Logistics - Expert I" and the "Blue" shift.
1. Open the Skill requirements Page
2. Click the Create skill requirement button
3. Select the relevant Organizational structures in the Tags field (1+)
4. Select the required Skill
5. Save your changes
This requirement will now apply only to employees who are both "Logistics - Expert I" and who work at the Shift "Blue" .
AG5 allows you to use a skill as a requirement for different groupings at the same time.
For example, this means you could add a level 1 requirement for everyone in a department, and the same requirement but level 2 for a team of specialists within that department:
It is also possible to add tags to requirements to make them more specific.
For example, here we have made "Customer Relations" a requirement for everyone at the Wayne Enterprises organization:
On the right and above "Required Score", there is a grey field for adding new tags. Other groupings can be added as tags here to make this requirement more specific.
In this example, we're further specifying that everyone at Wayne Enterprises who also has the Logistics - Expert 1 role, must be level 1 at "Customer Relations".
Combined tags always use an AND function, meaning in order for the requirement to kick in, an employee must have all listed tags.
Now it's time to create results! Results can be created for skills with defined requirements, as well as for those without. You can read more about creating results here.
There are two ways to delete requirements.
Via Organizational structures
Find where the requirements you want to delete are on the organizational structure.
Select the requirement and remove by clicking on the the trashcan icon:
Via Skill requirements
Navigate to the Skill requirements page (Organization > Skills > Skill requirements)
Filter for the grouping you want to remove the requirements from. In the below example, we filter for the Production Department.
Select the requirements you want to remove and Delete Rule by clicking on 'Actions':


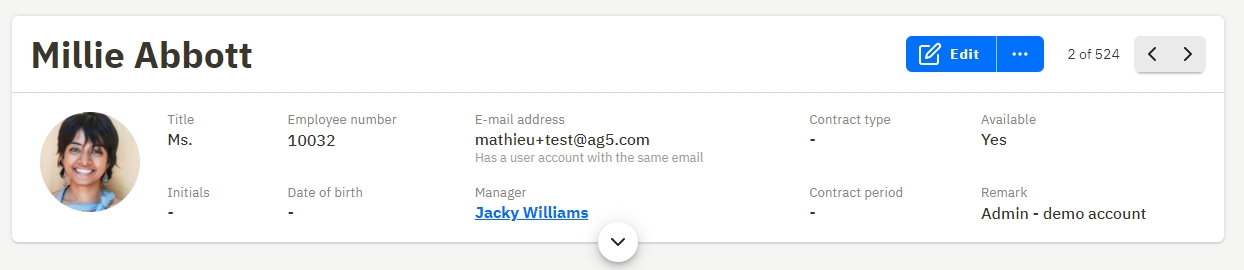

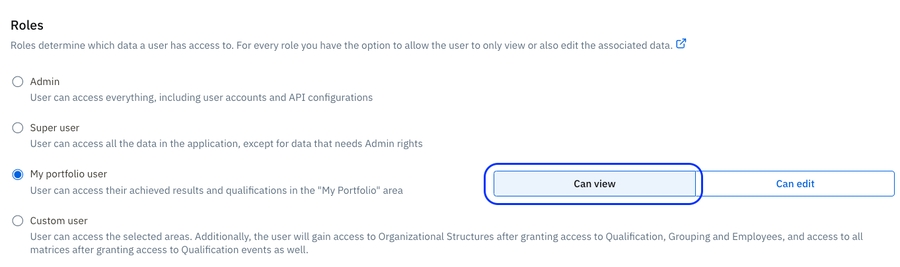

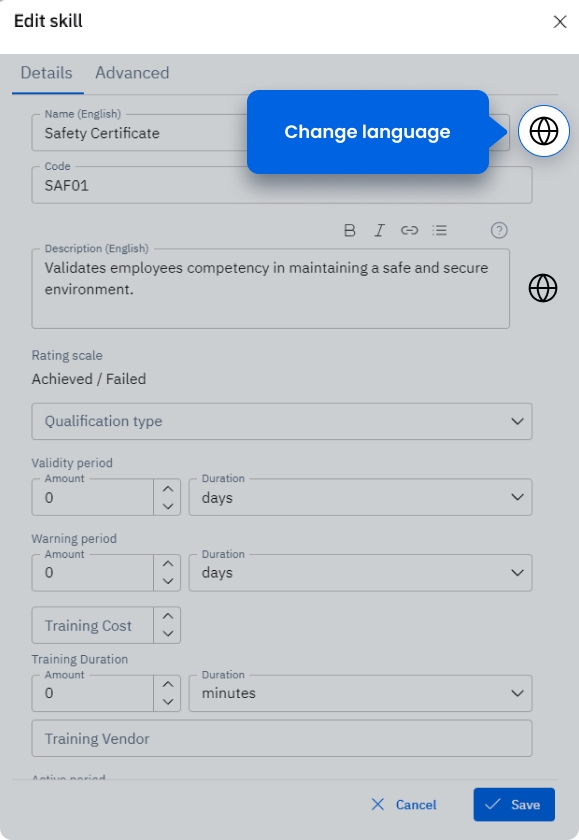
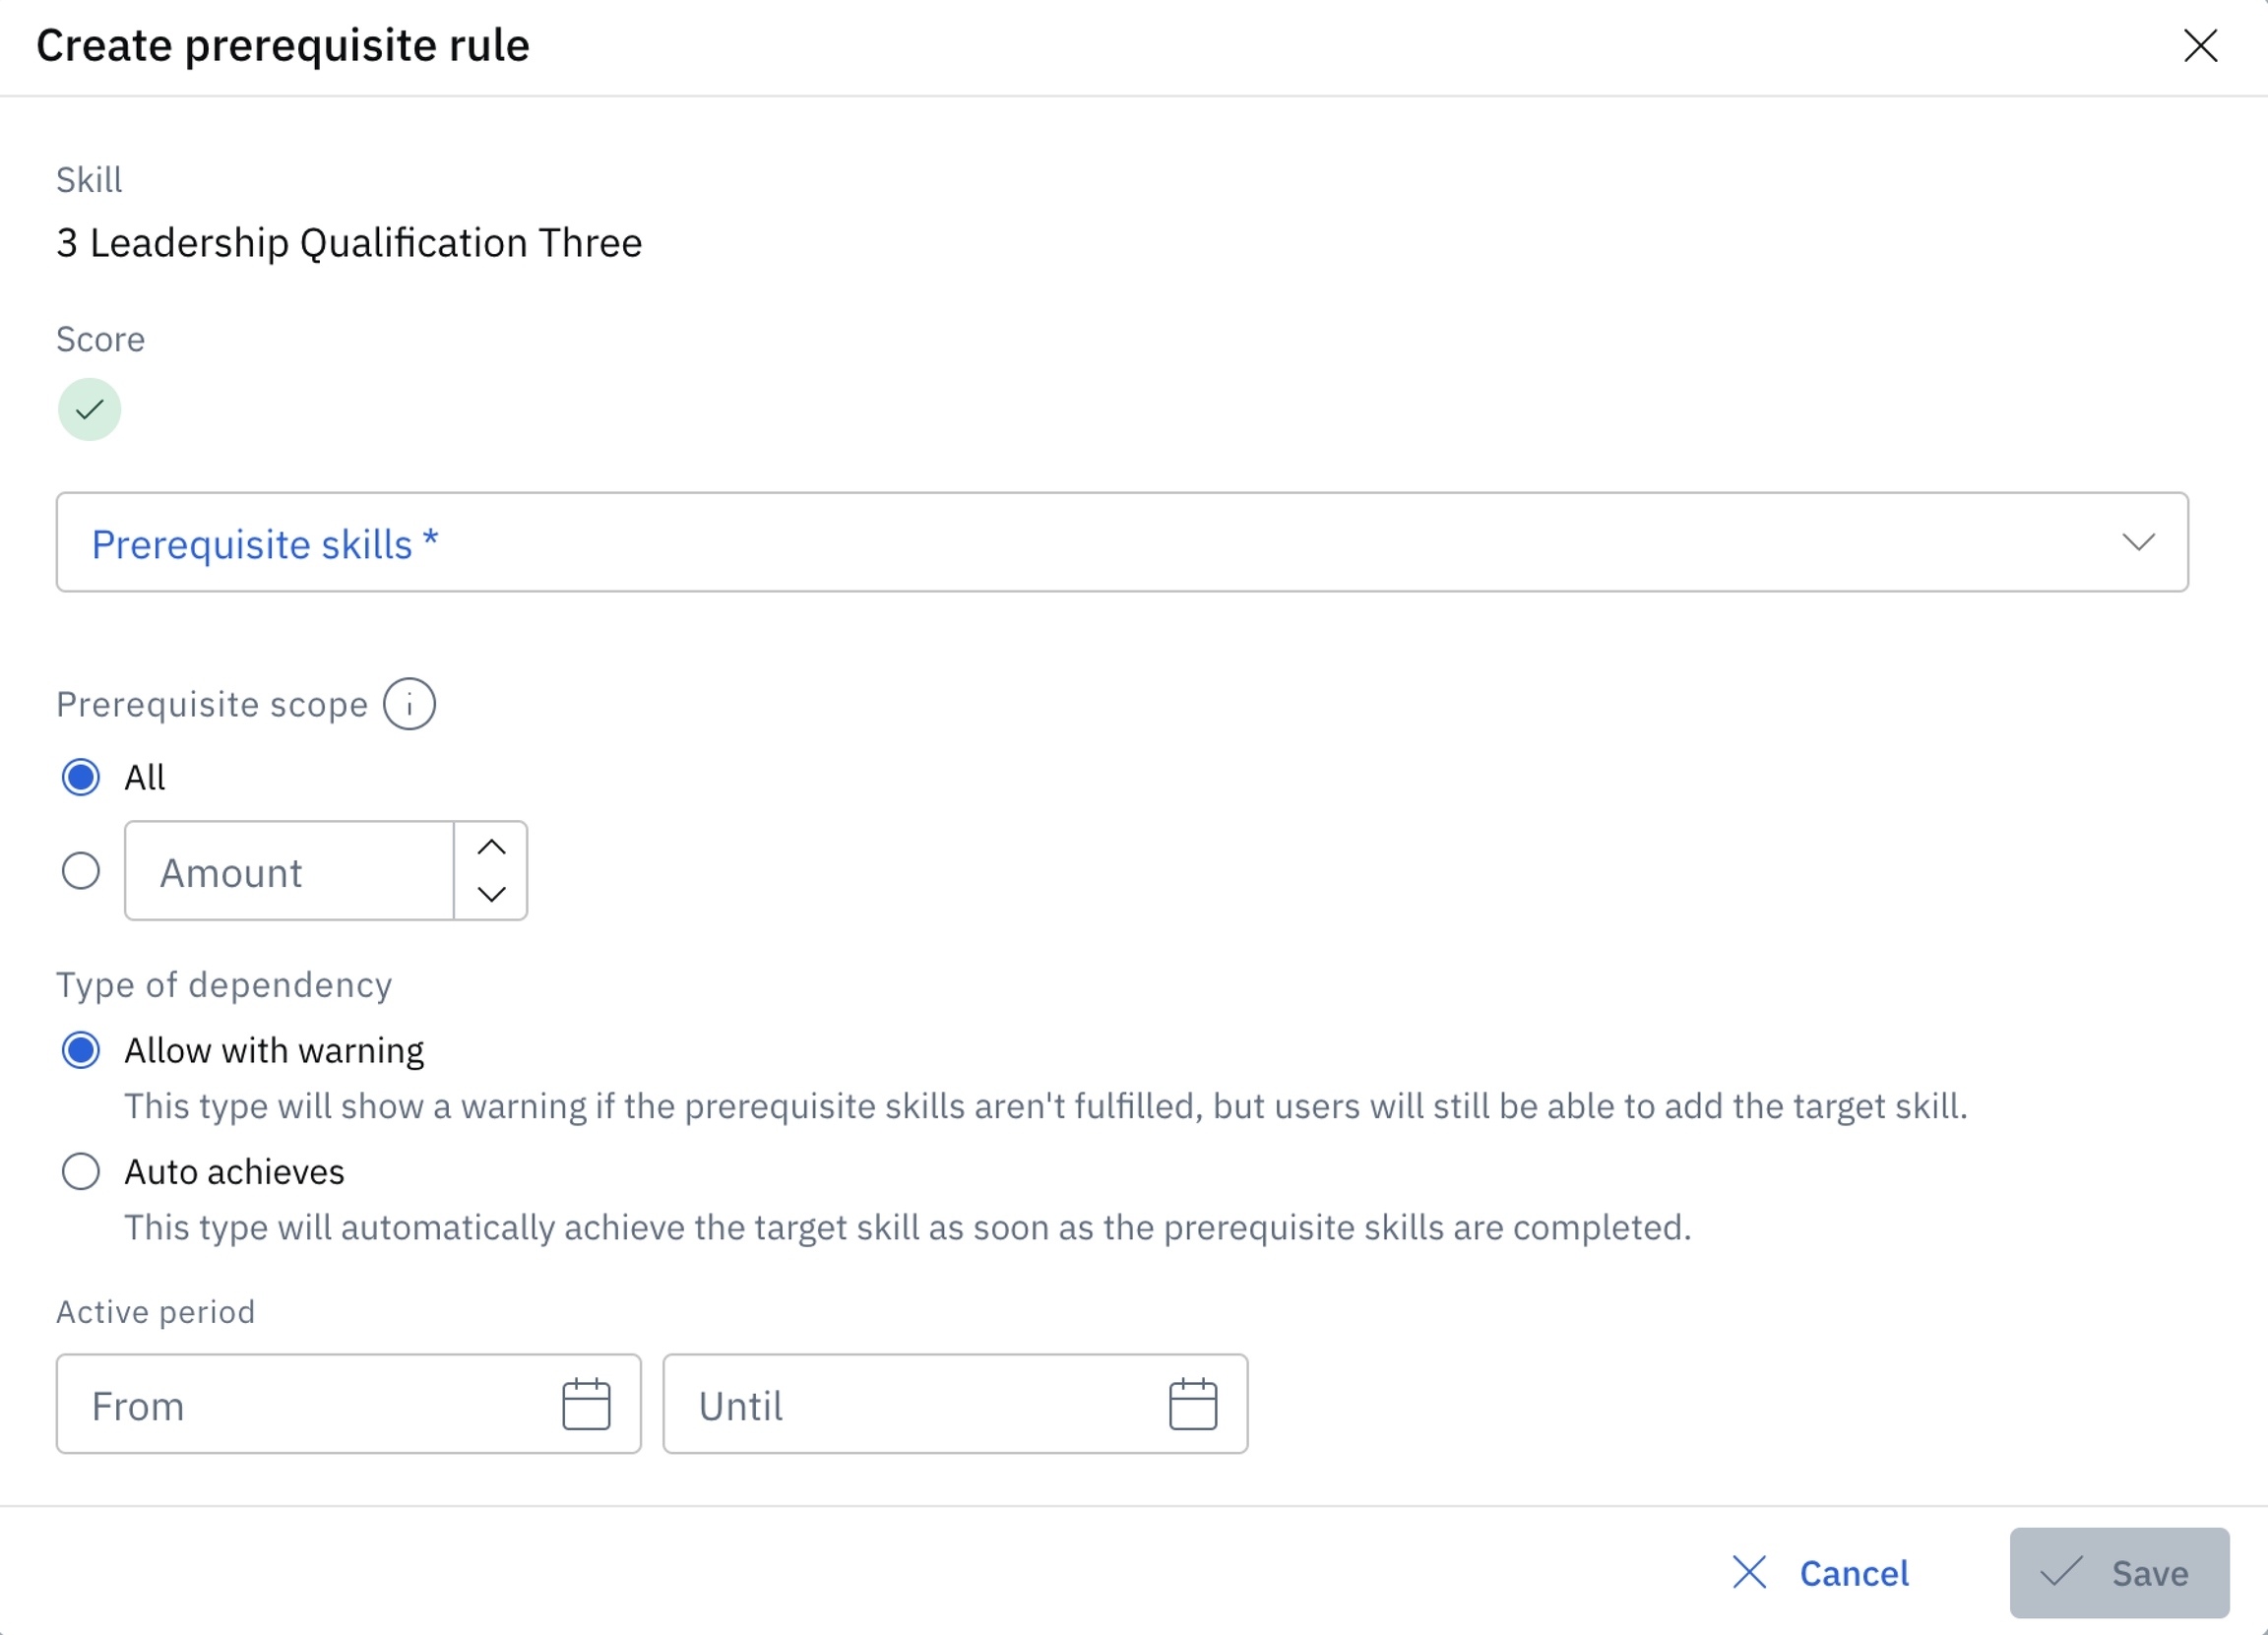
'allFine', 'expiresSoon', 'levelTooLowSoon', 'expired', 'revokedRequired', 'failed', 'levelTooLow', 'required'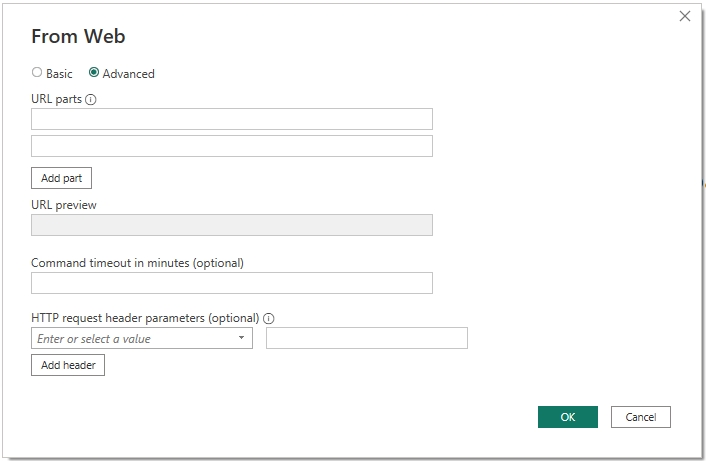
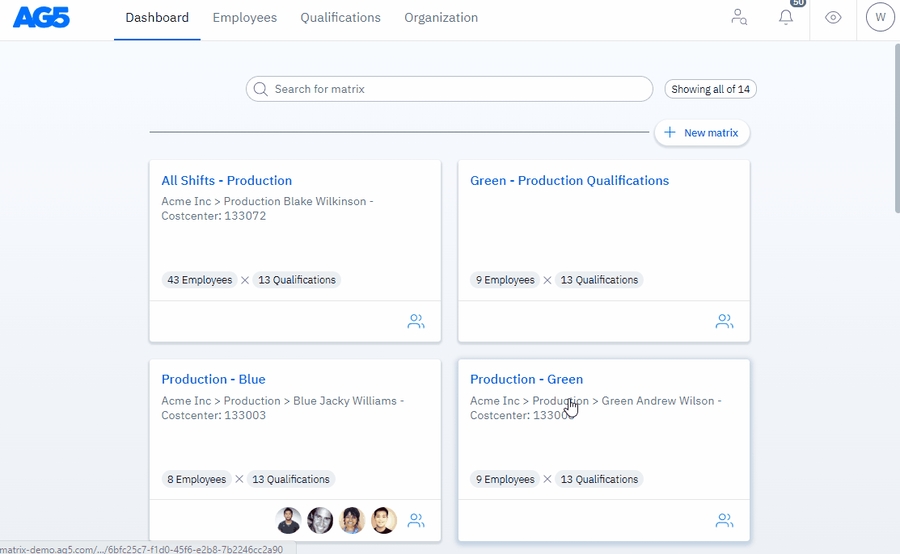
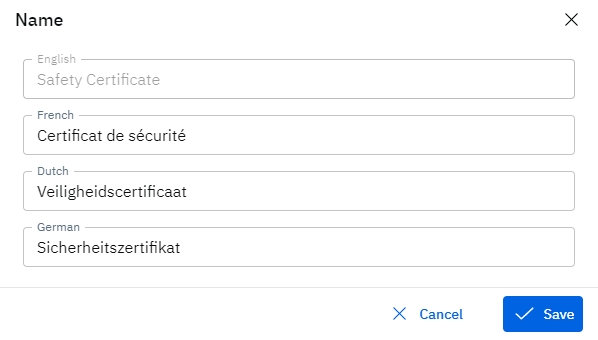
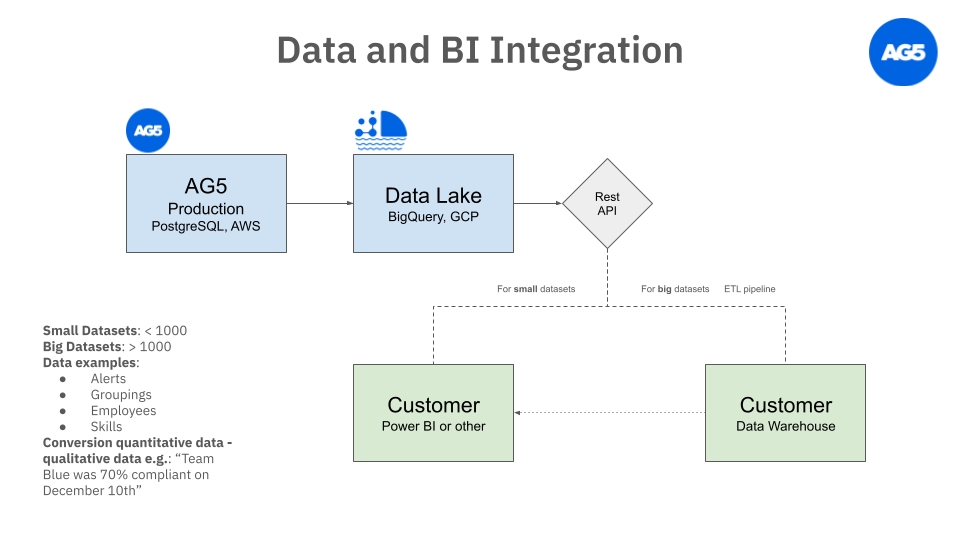
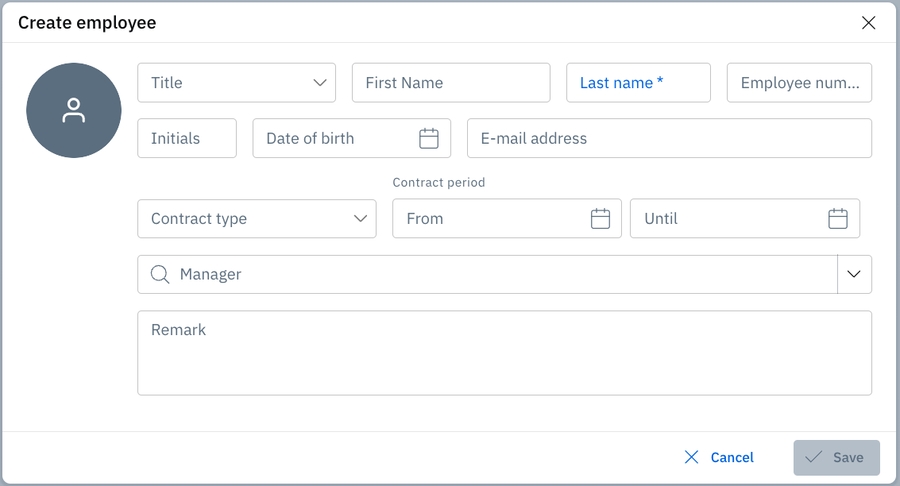
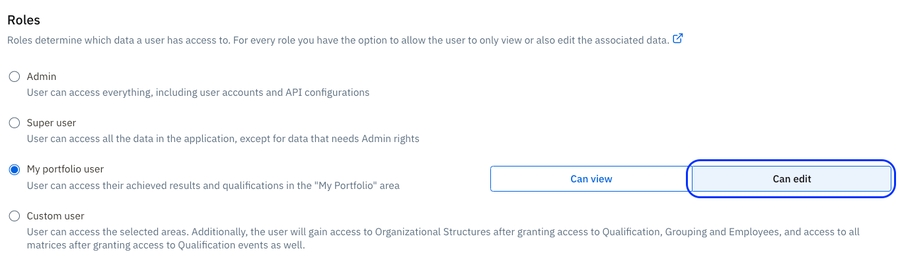
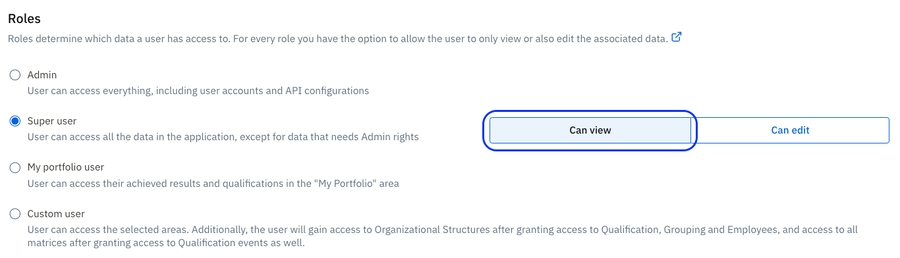
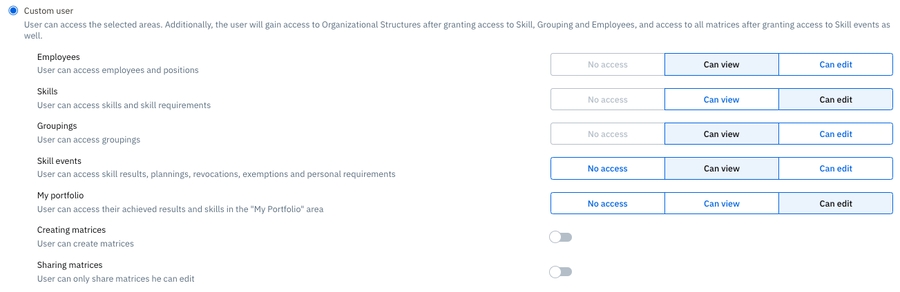
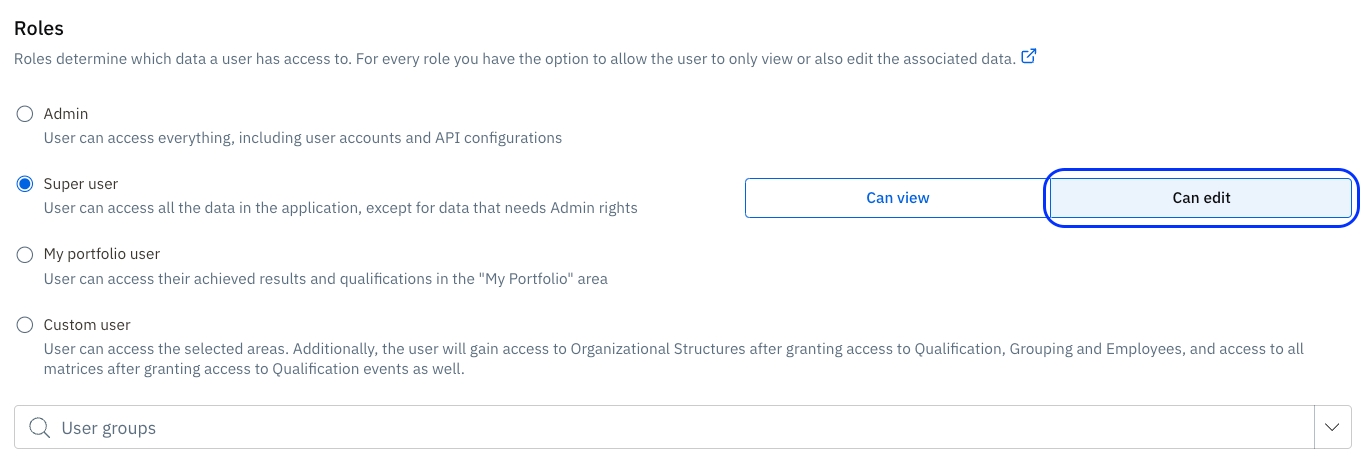
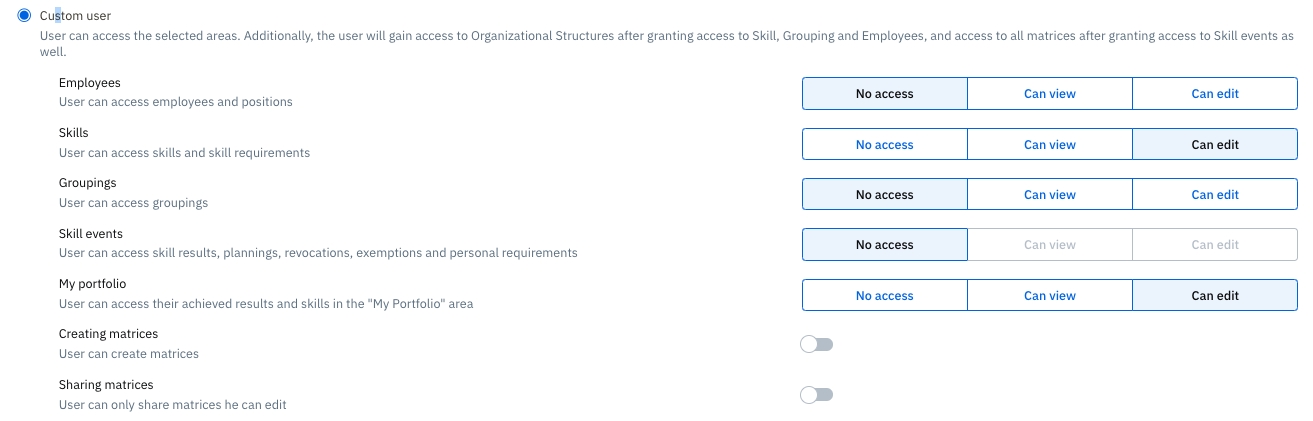
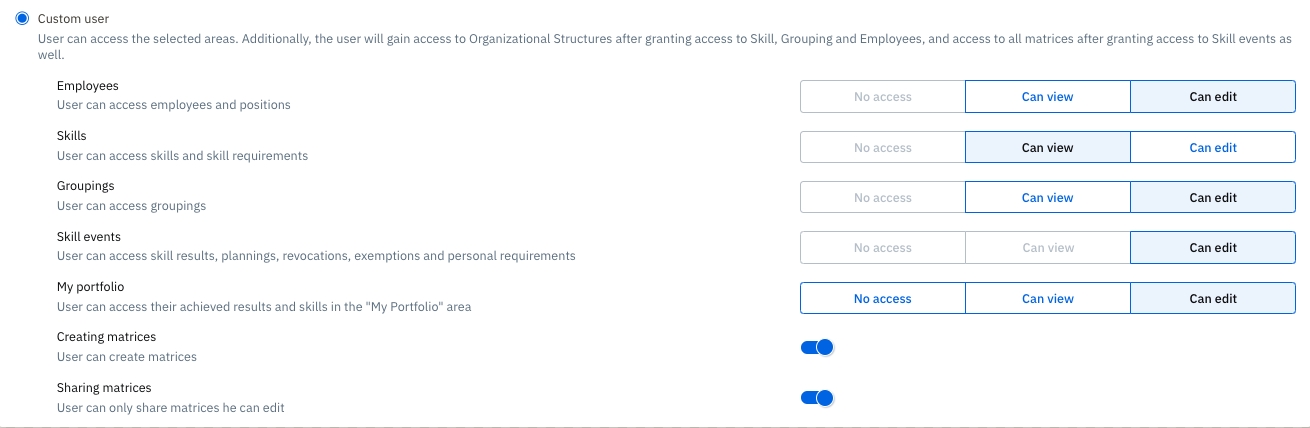
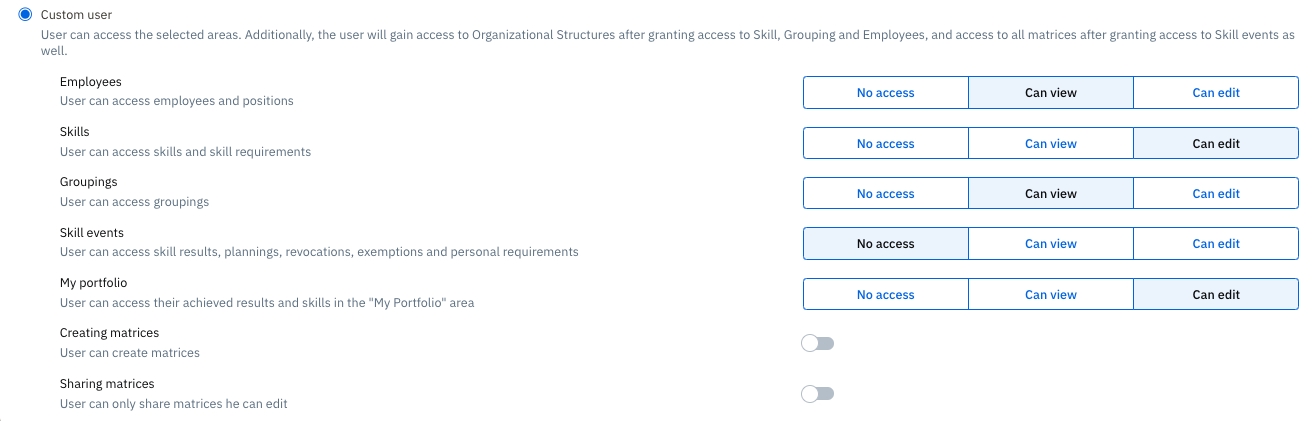
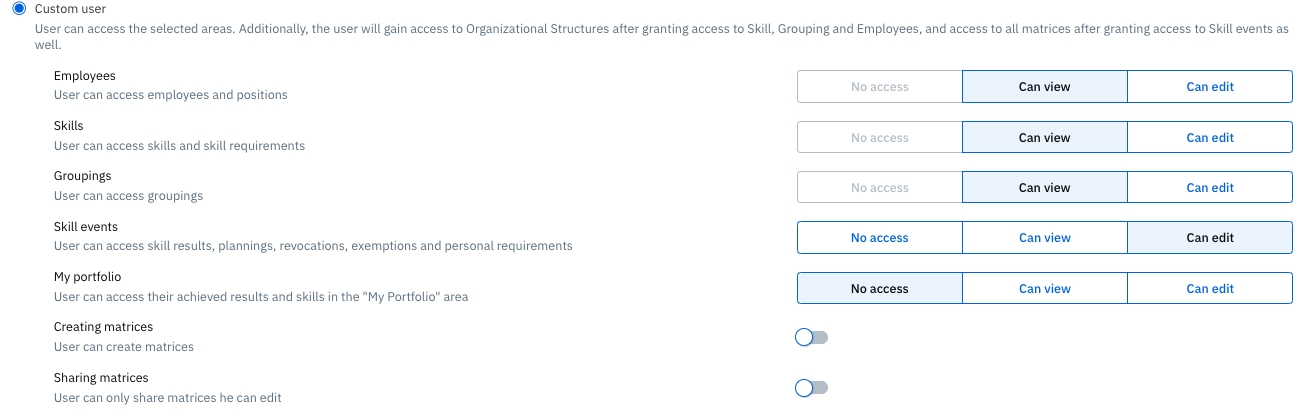


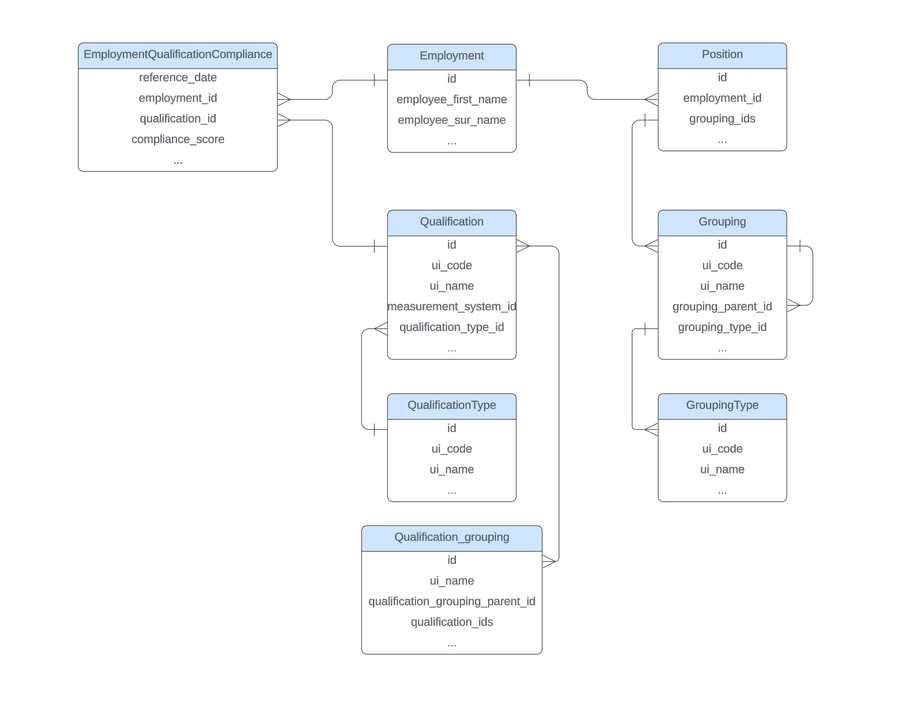
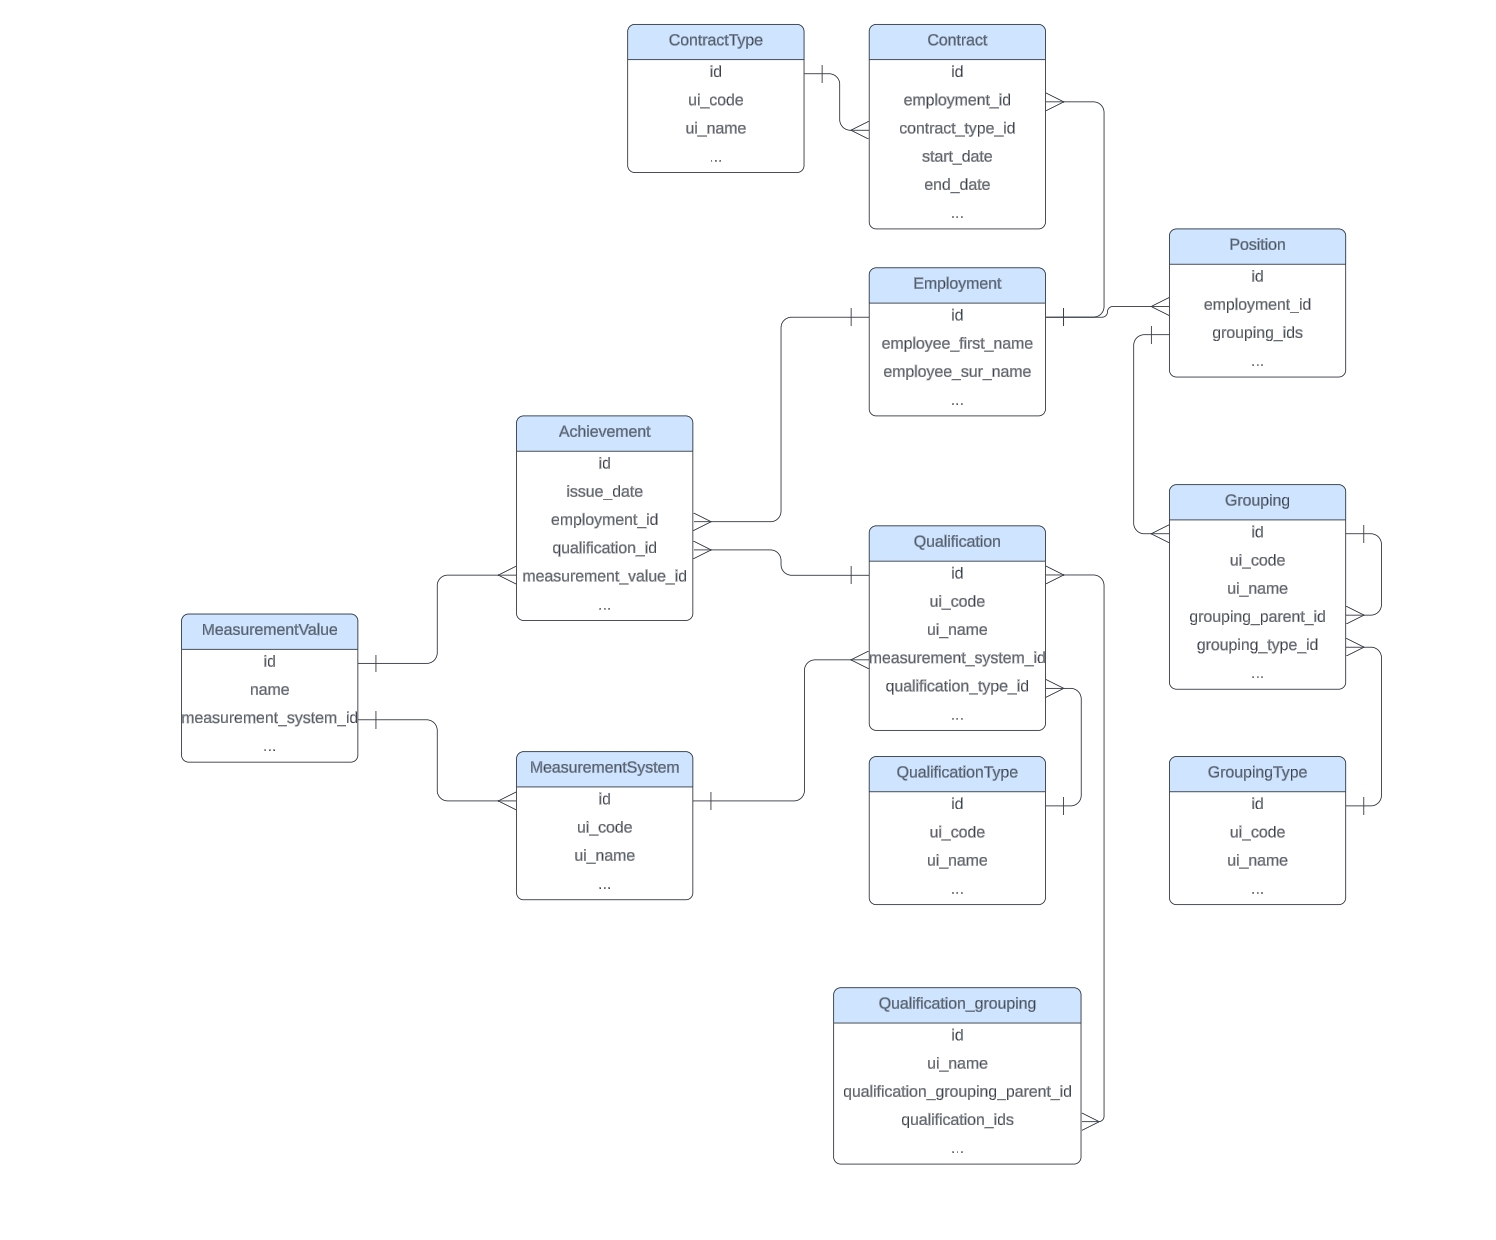
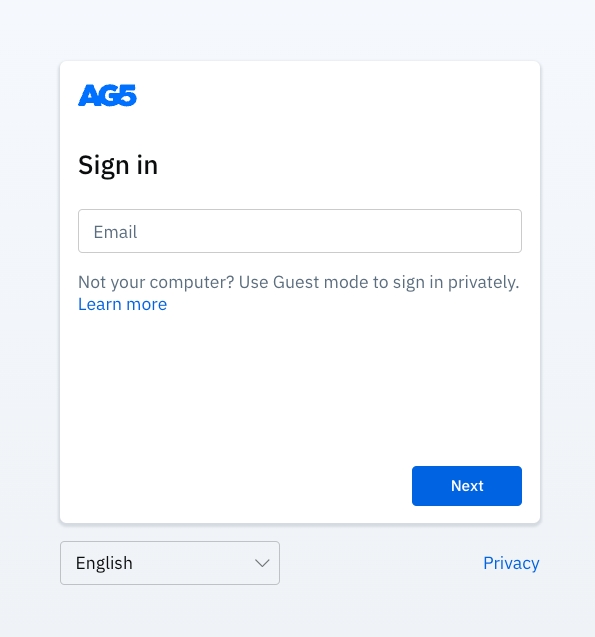
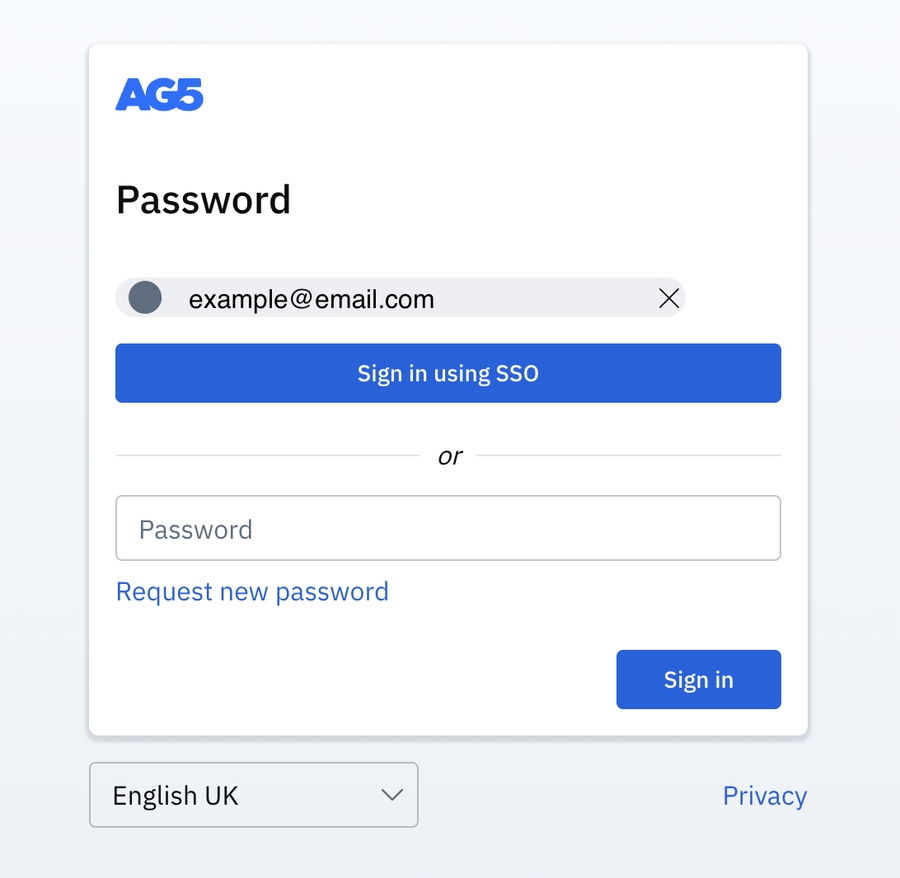
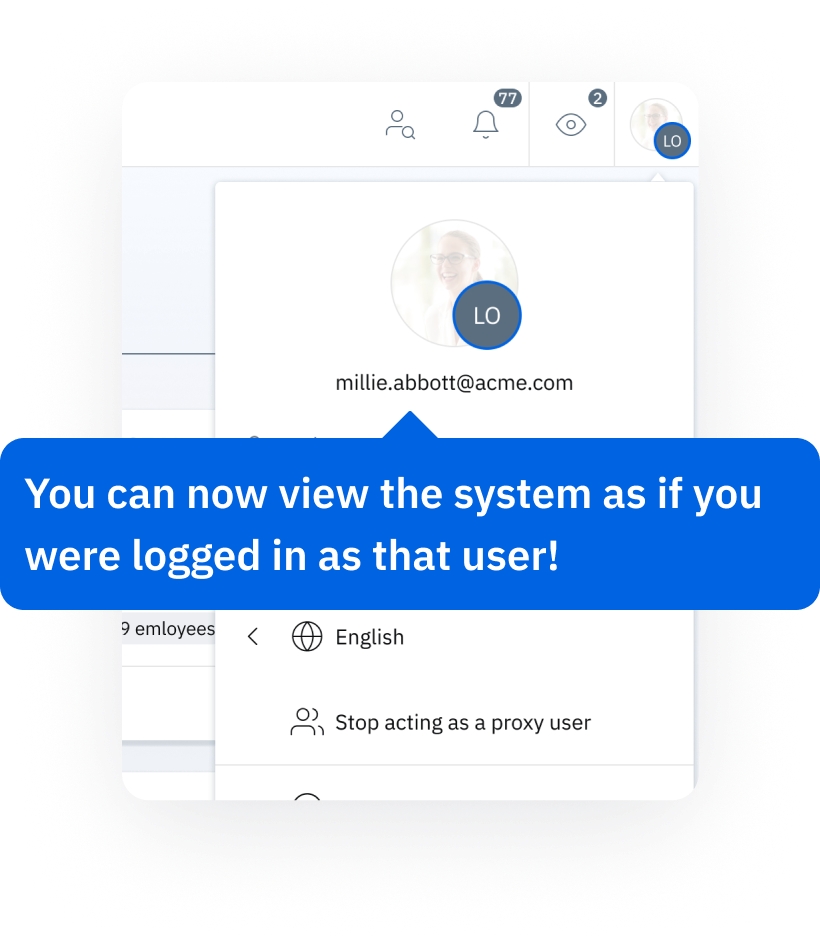


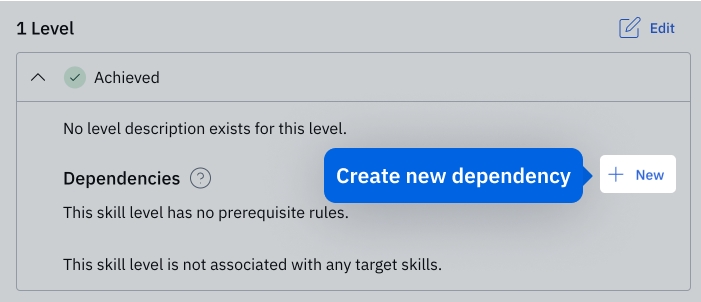

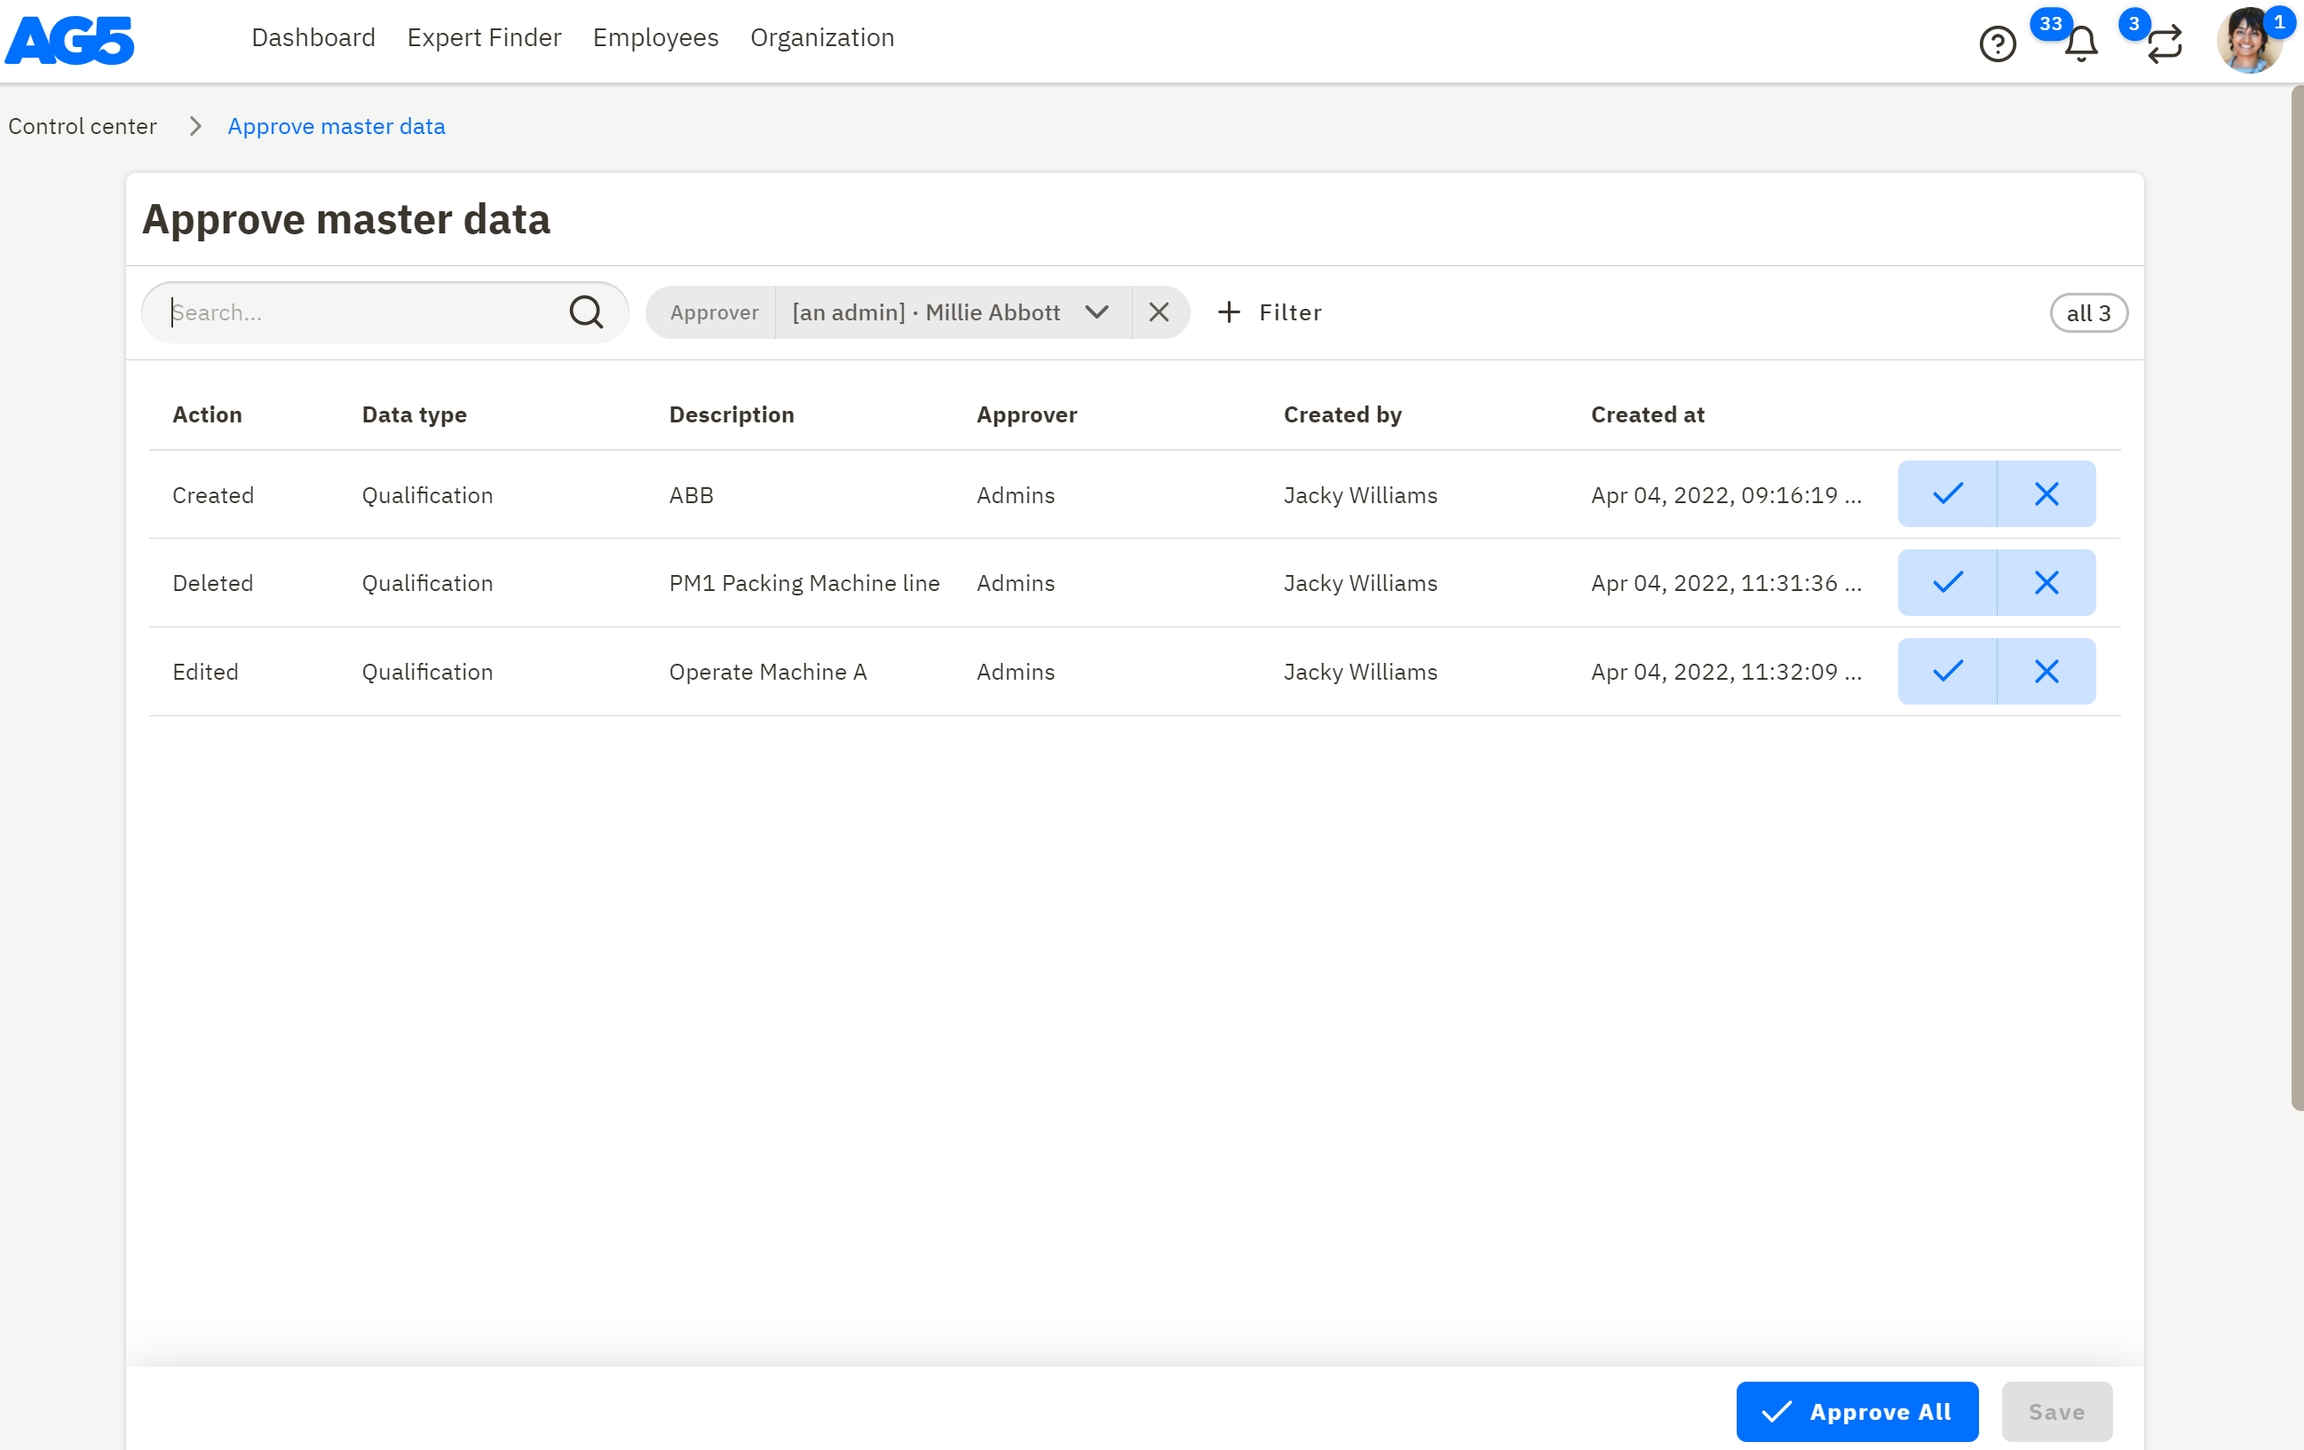
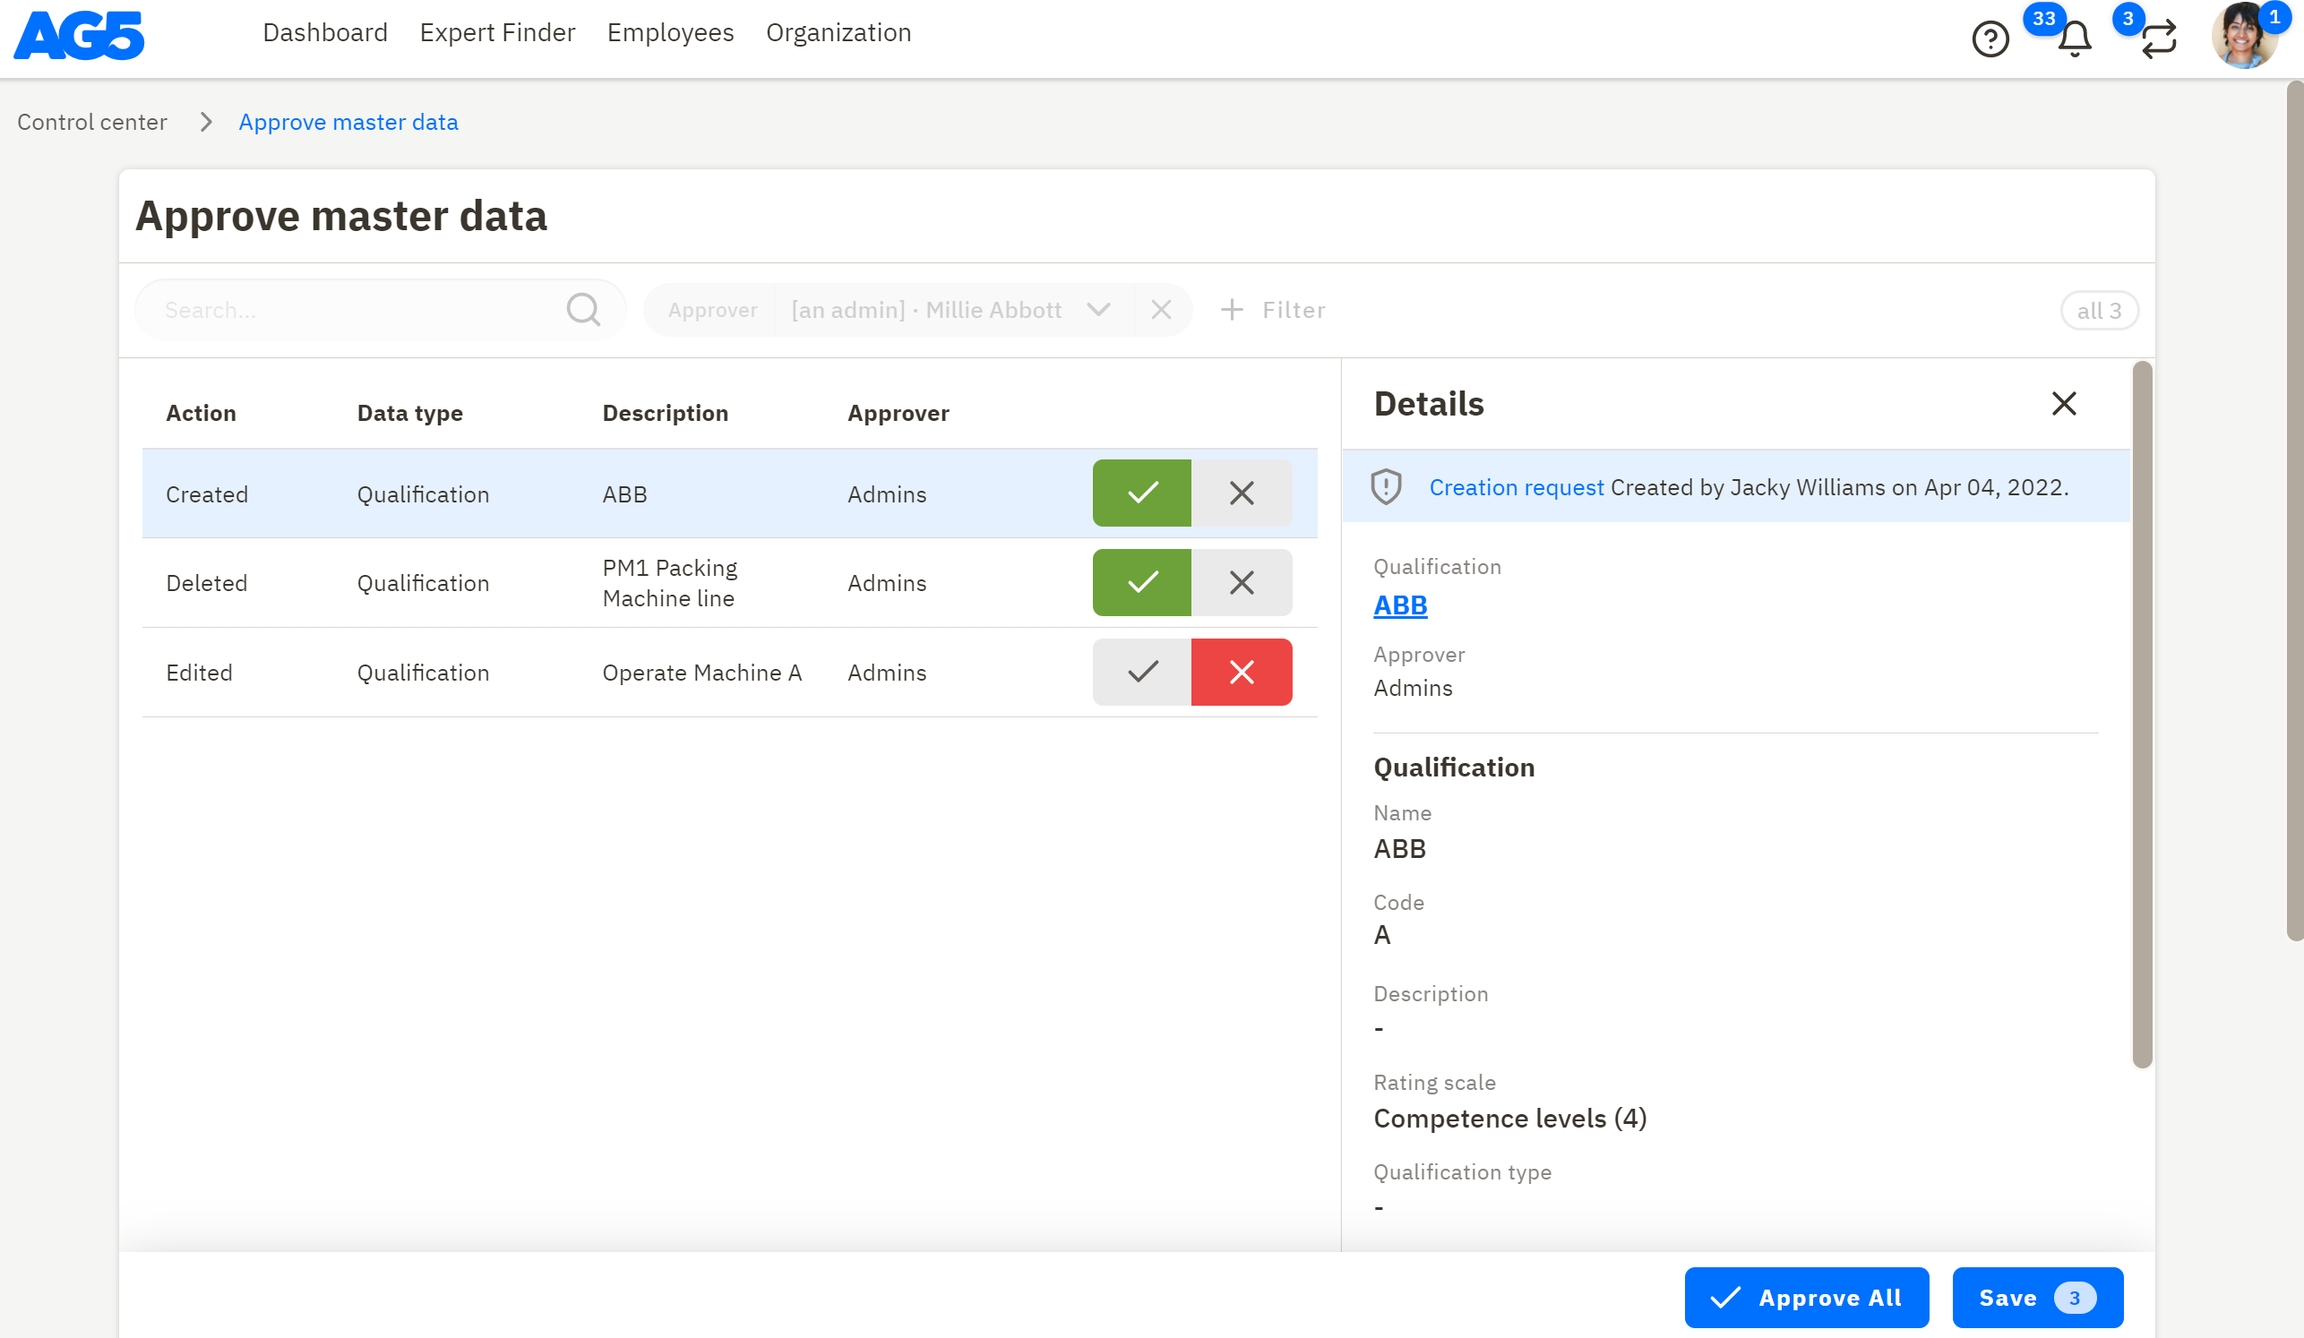
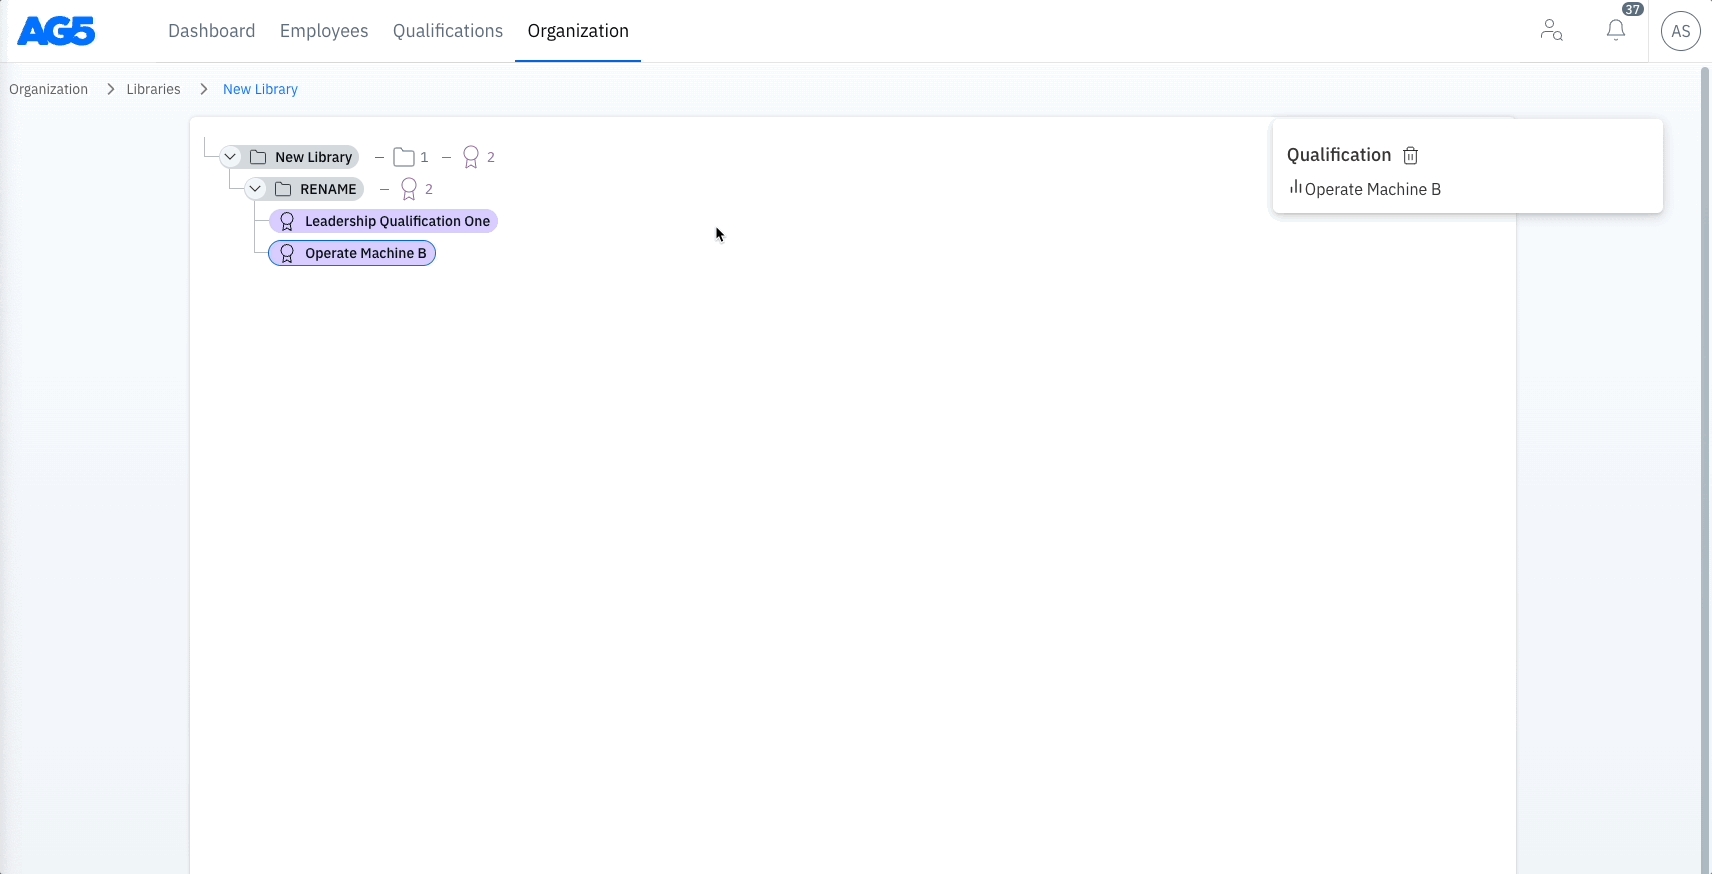
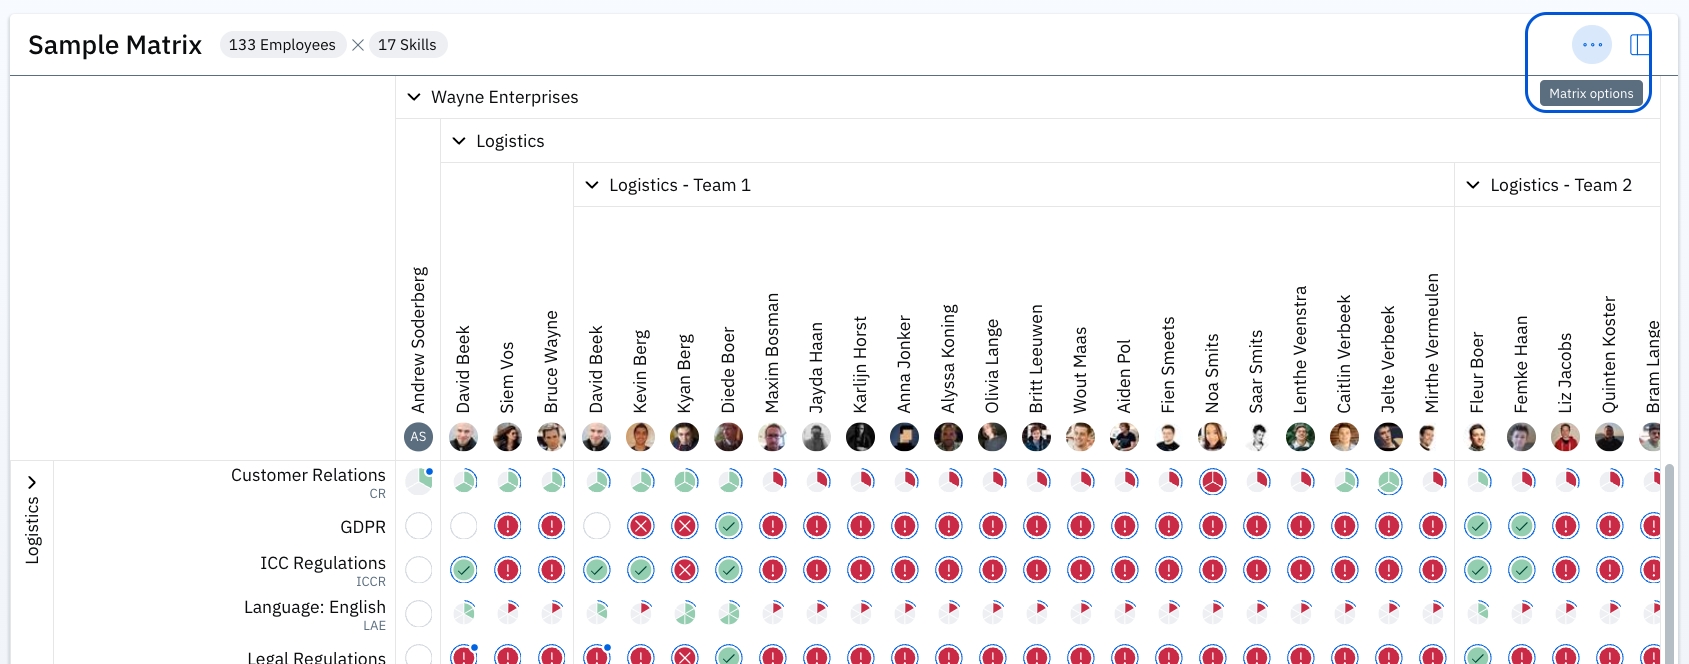
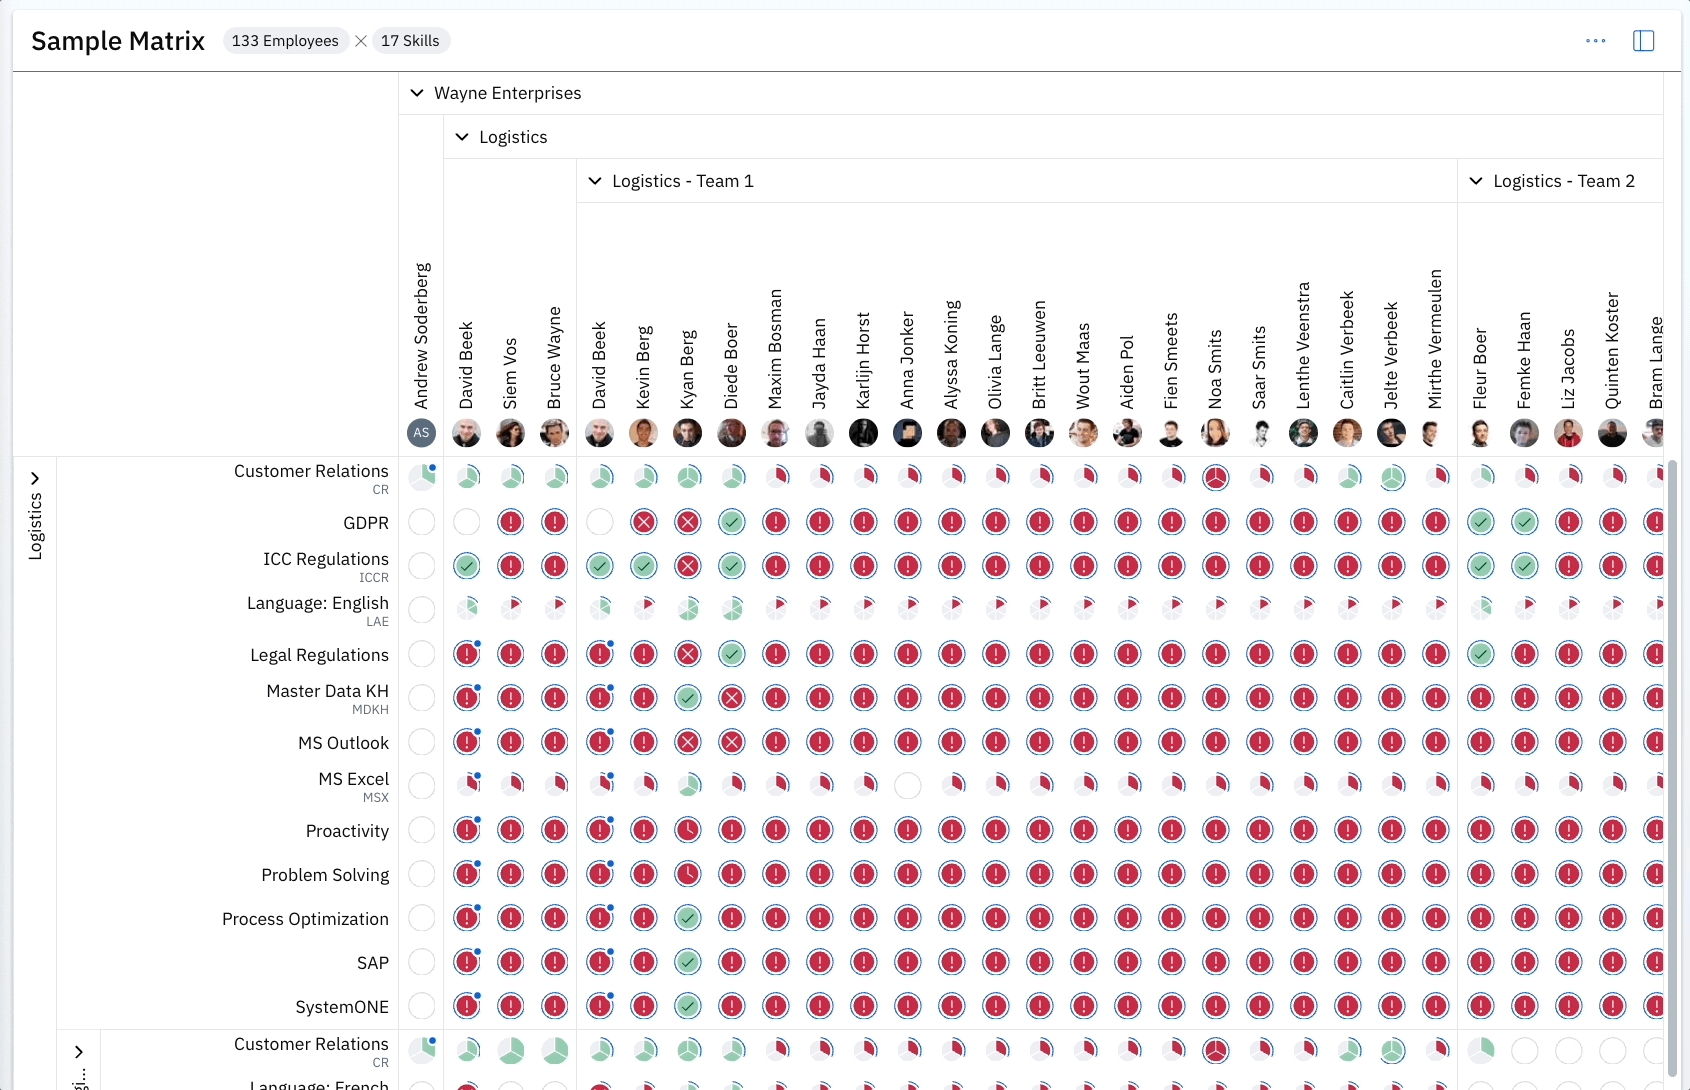
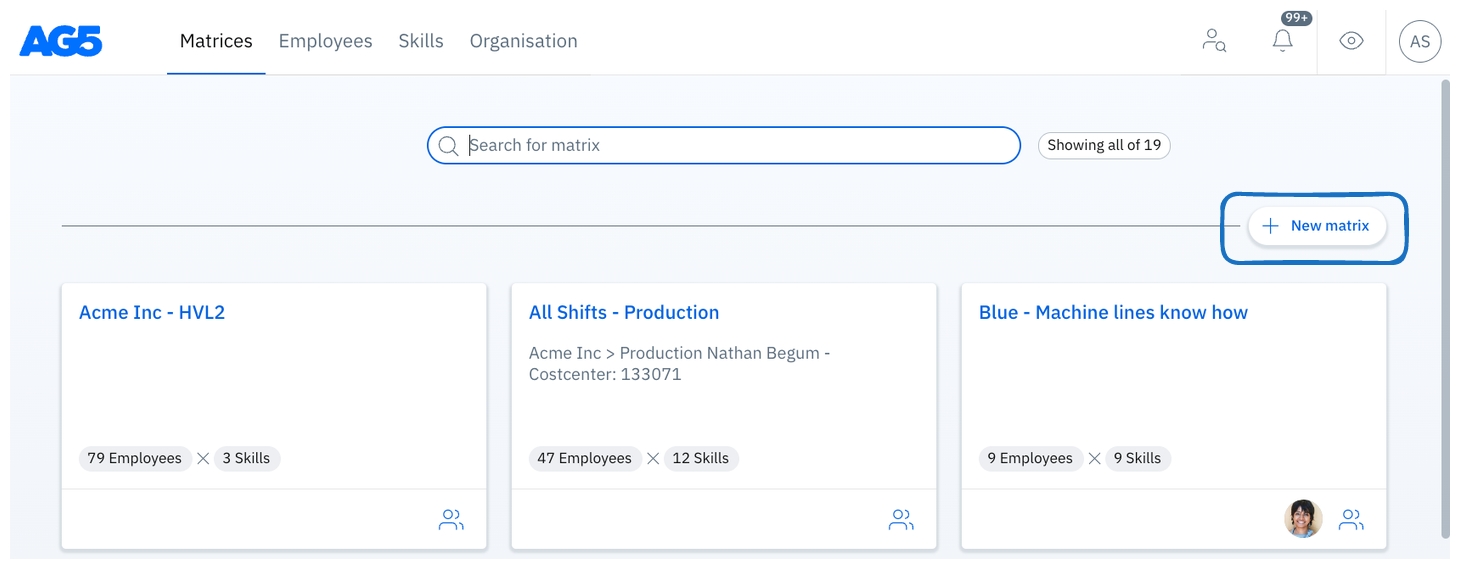


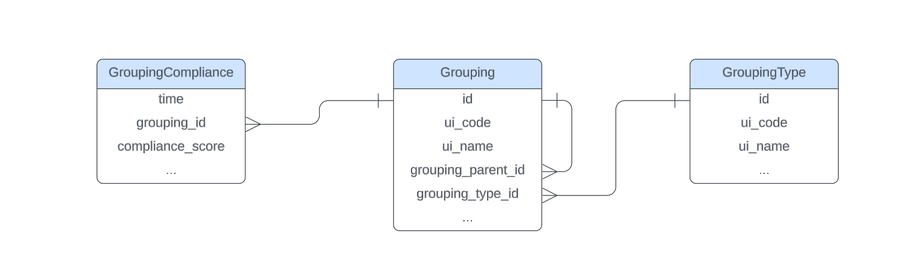
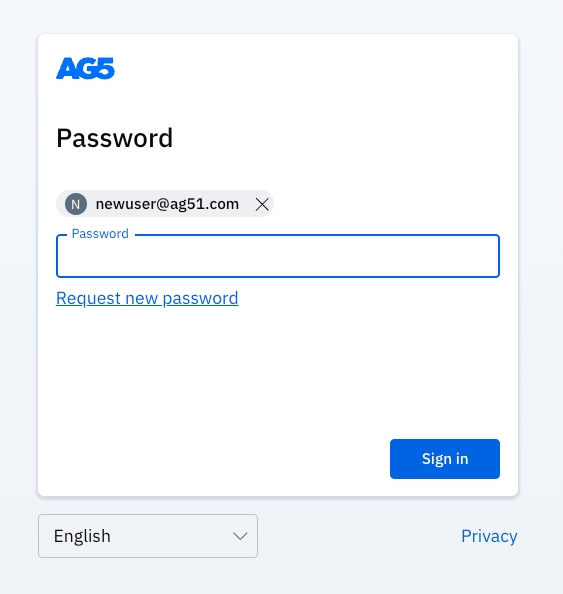
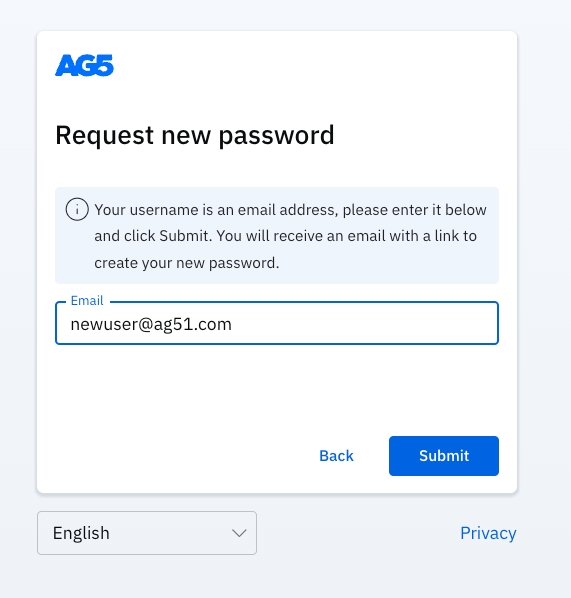
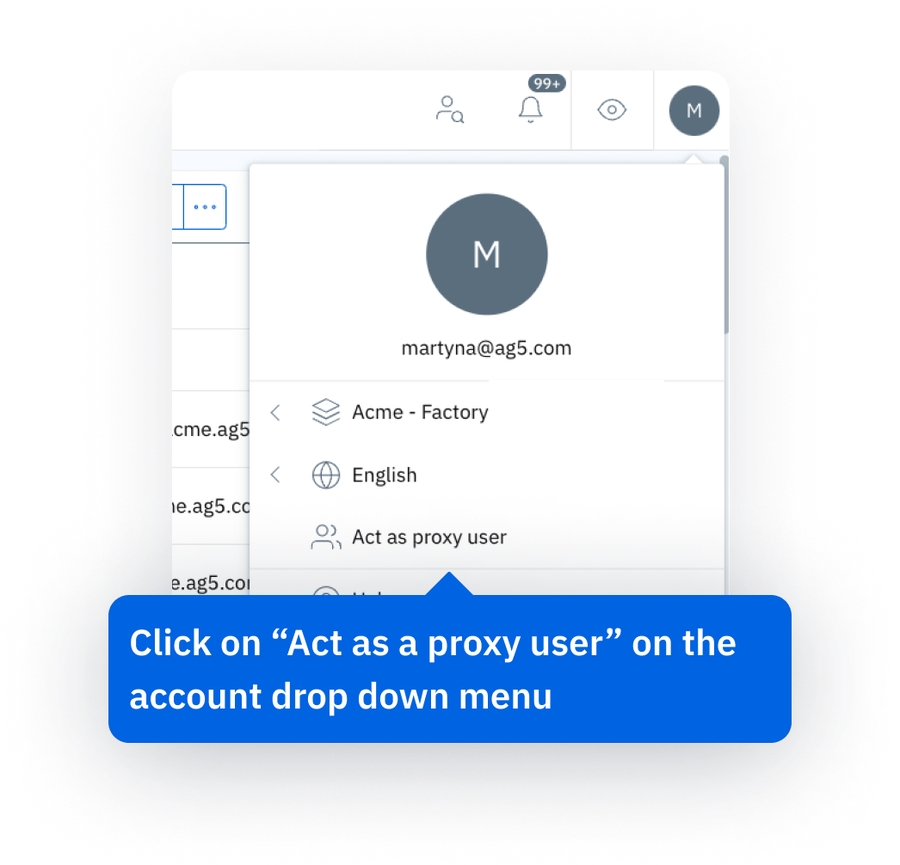

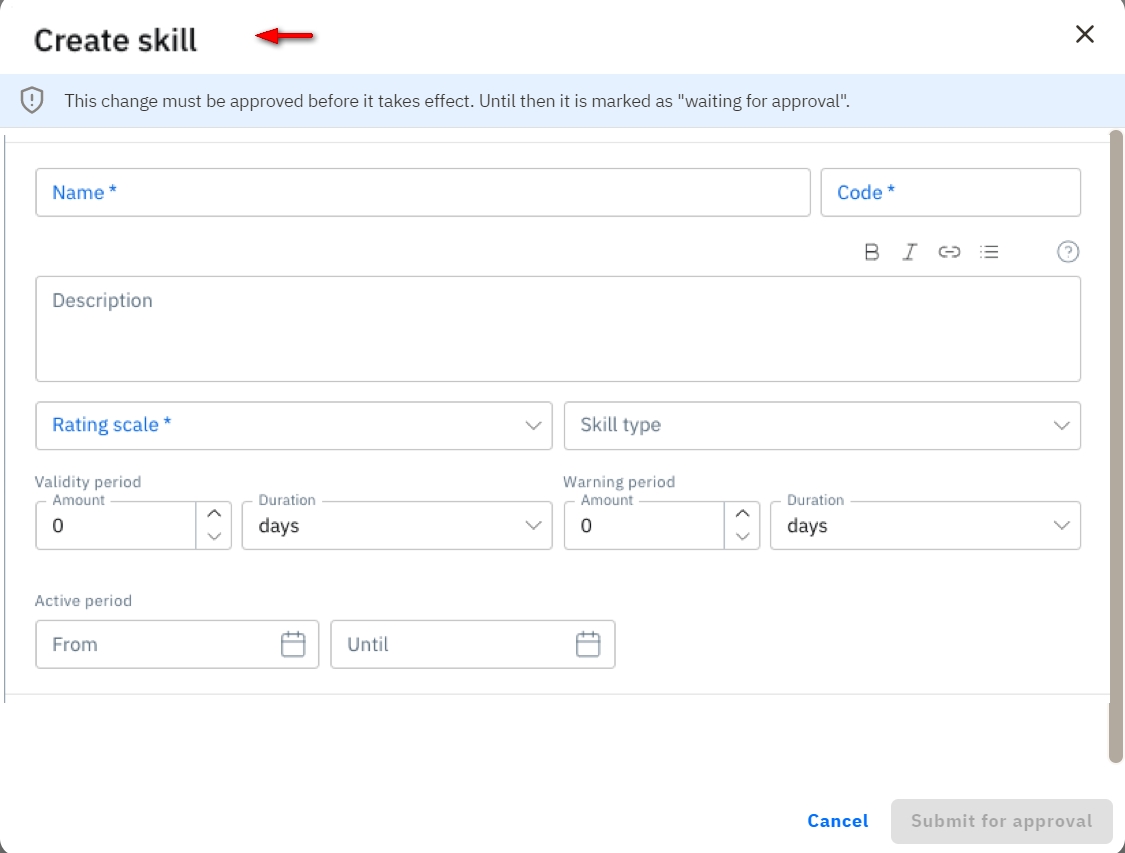
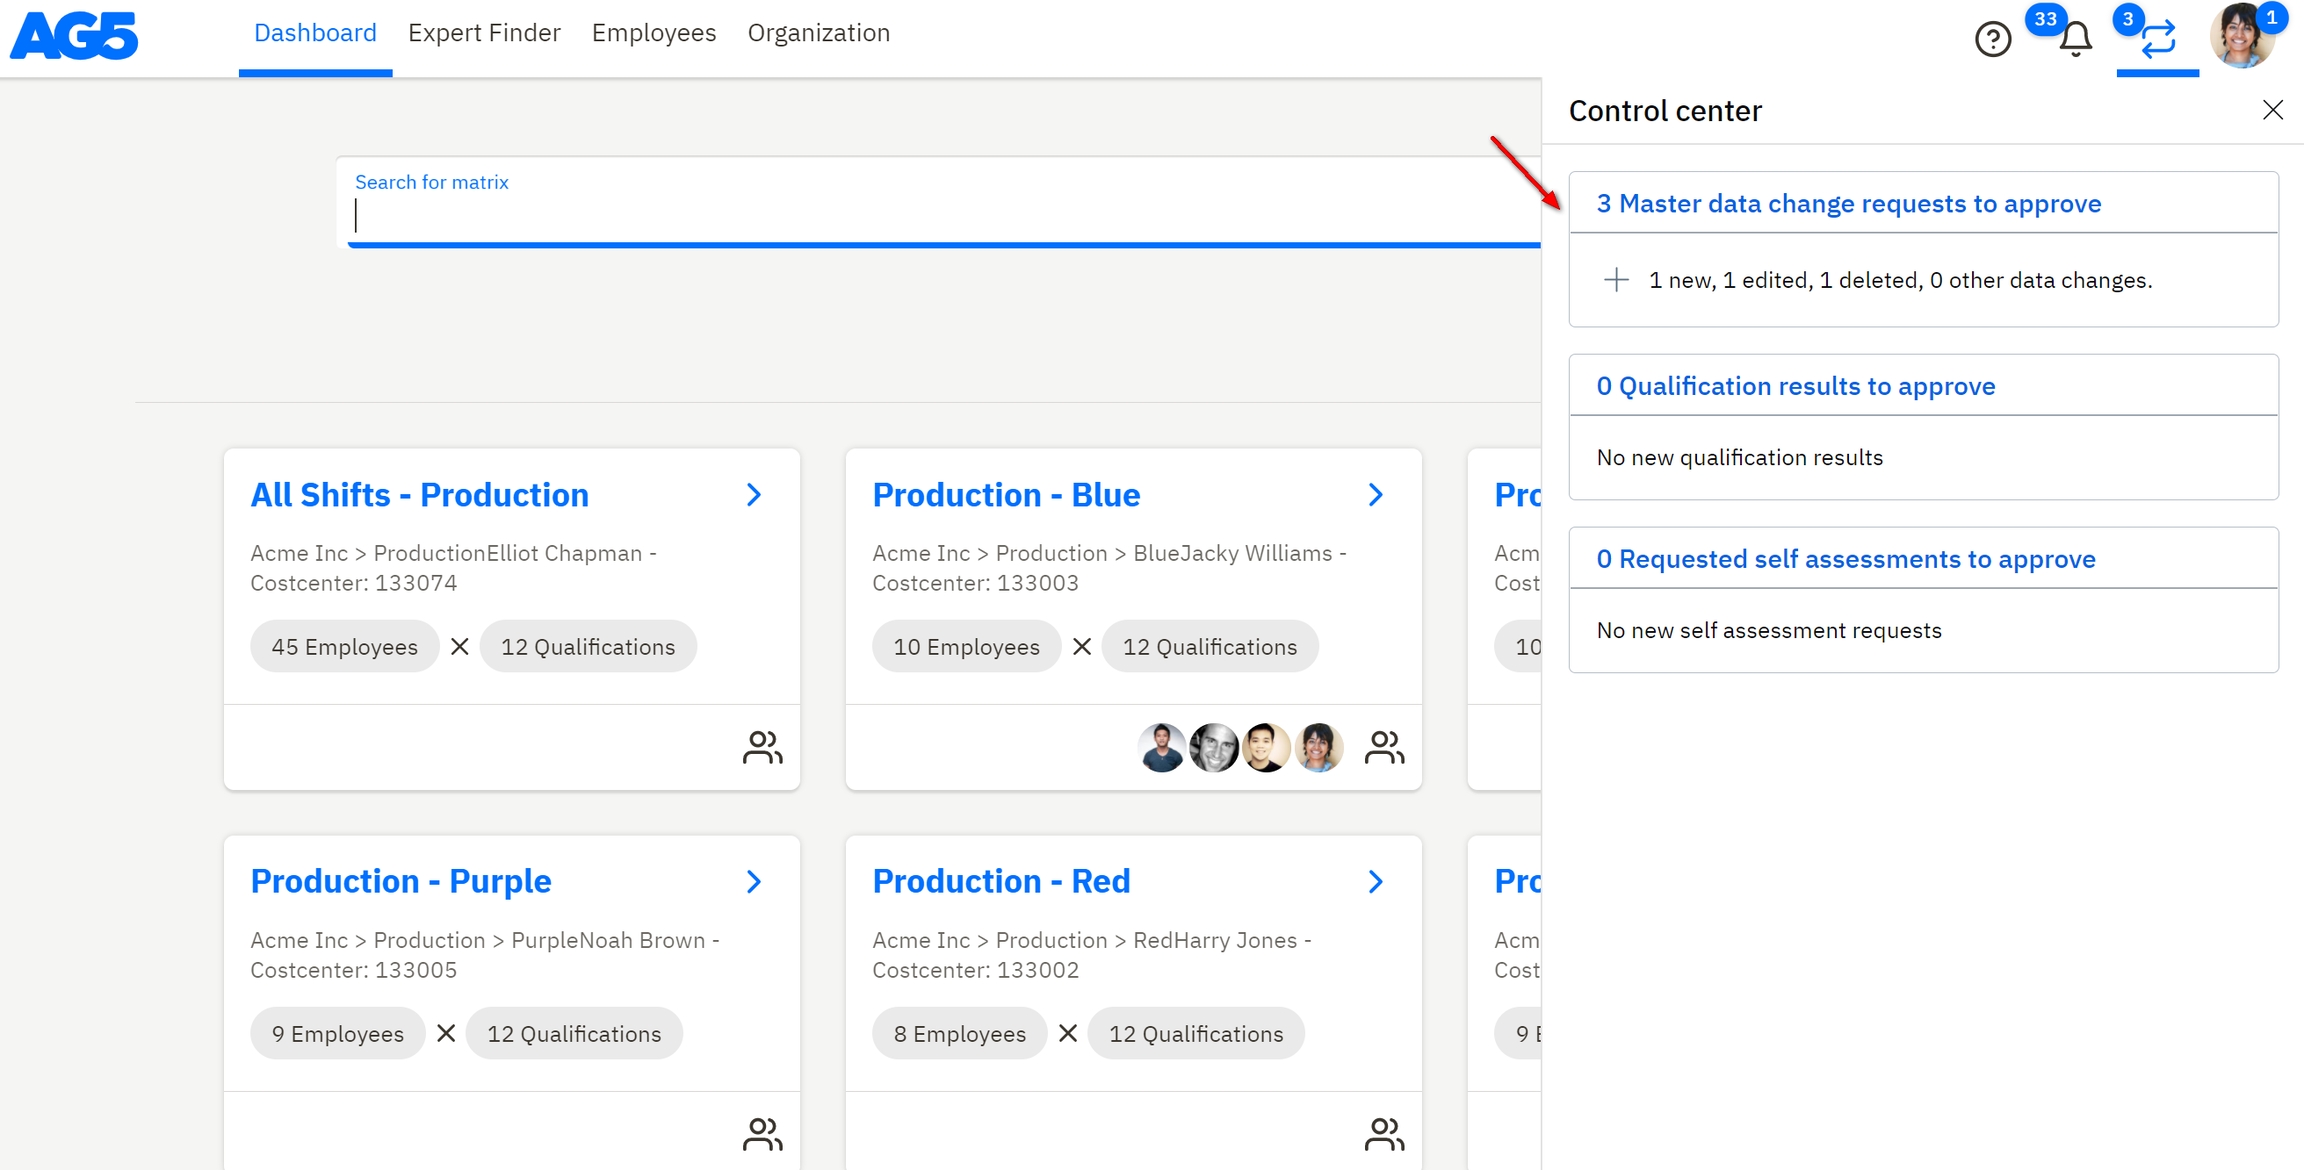
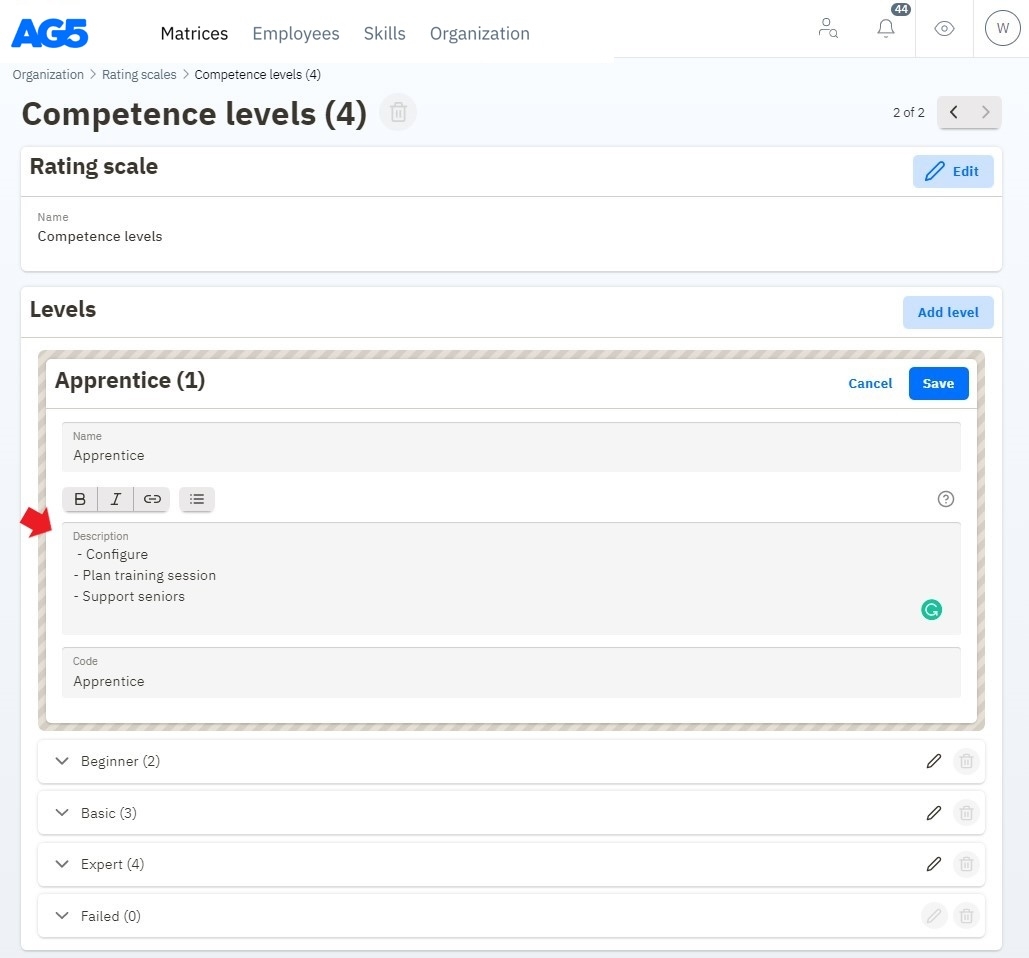
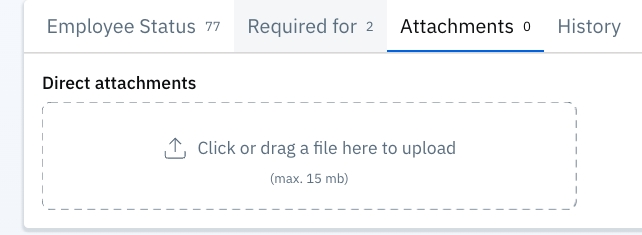
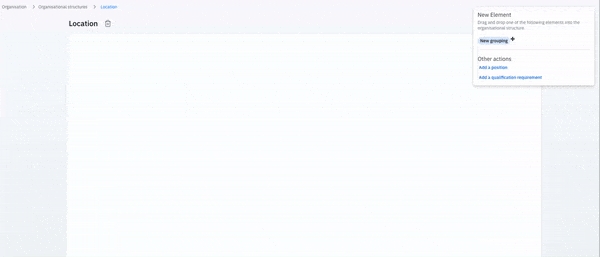

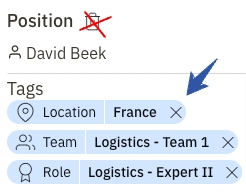
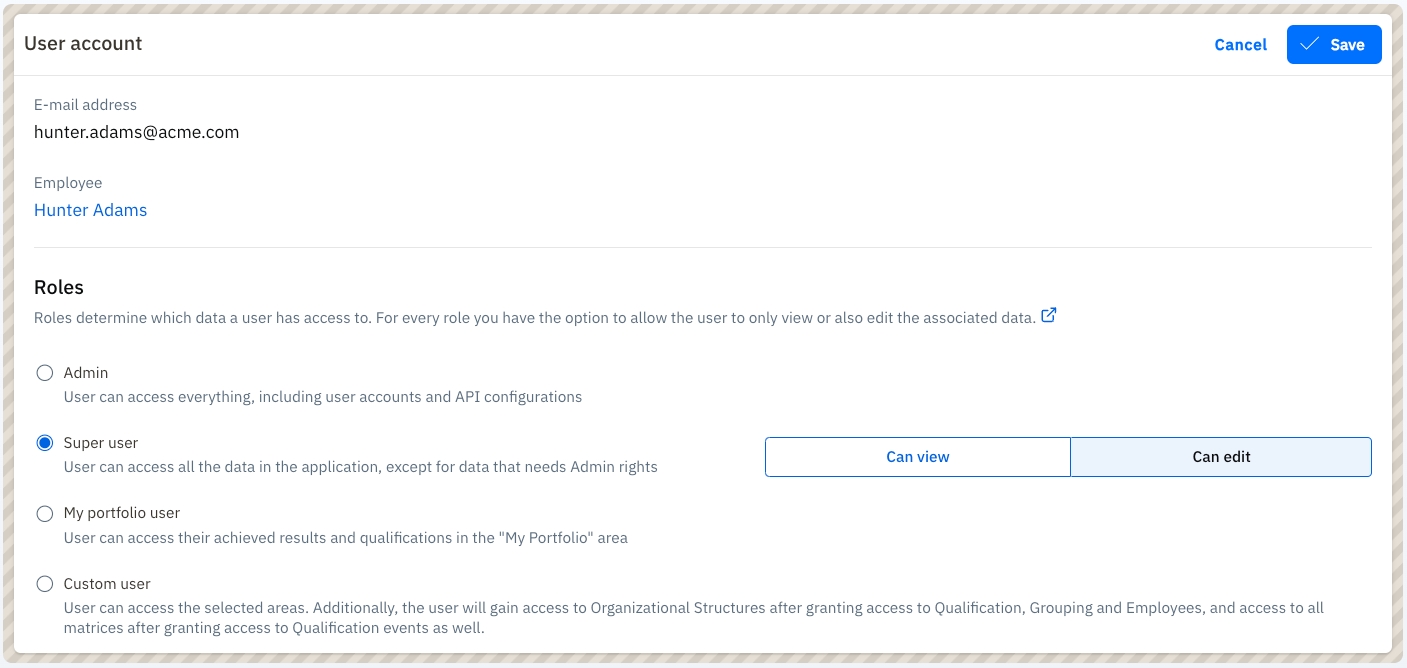
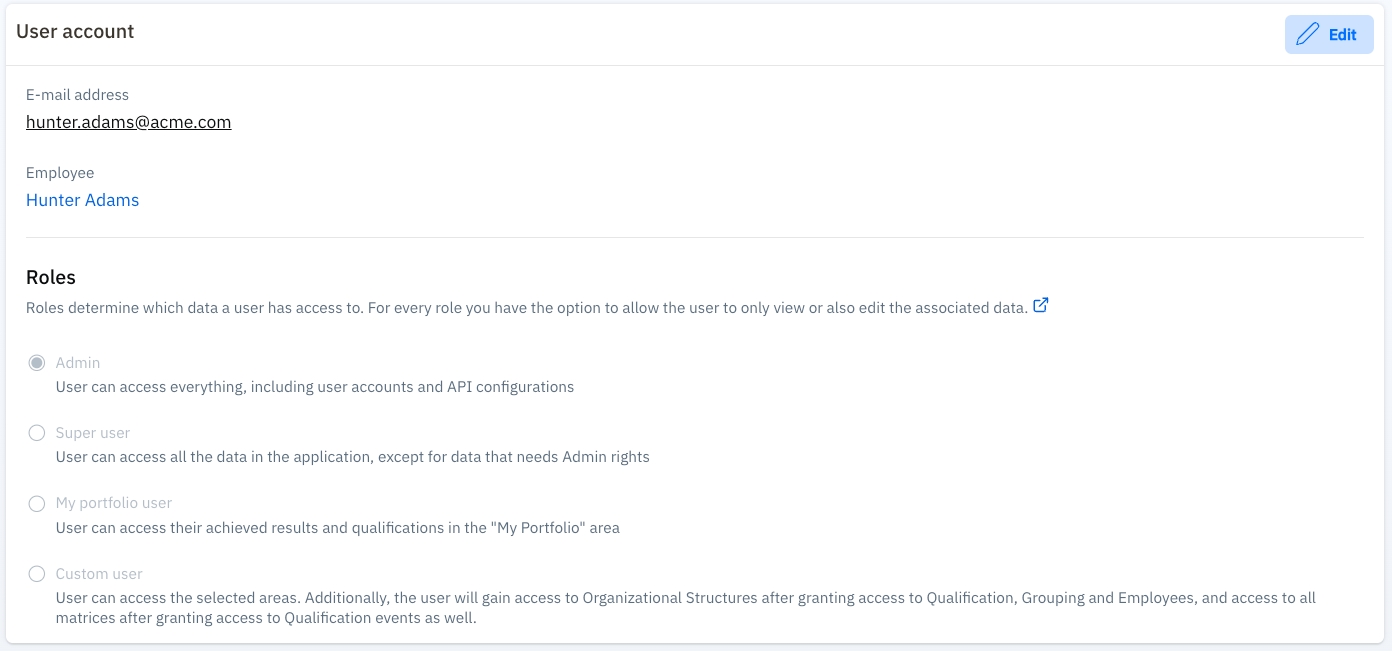
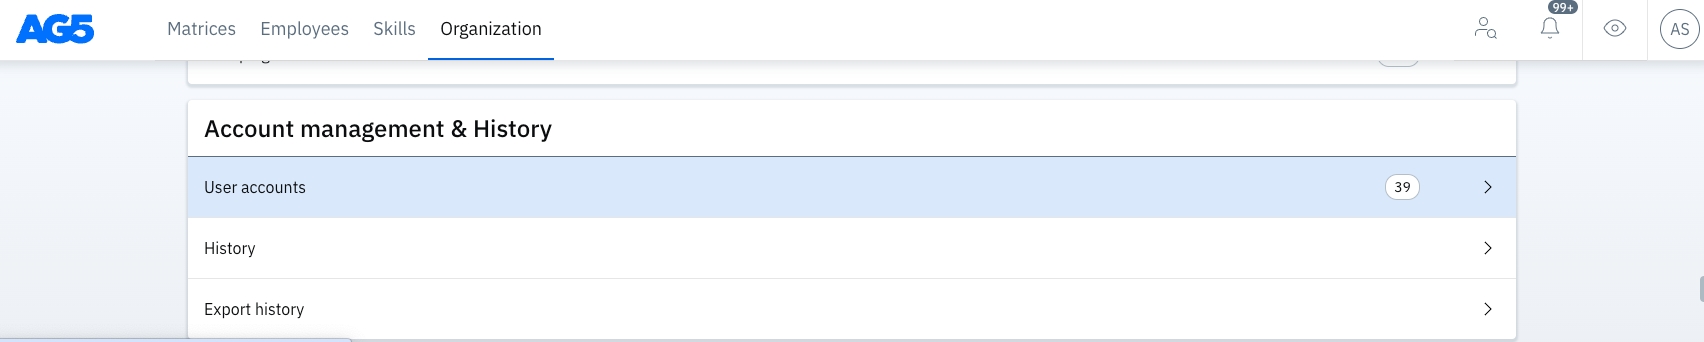
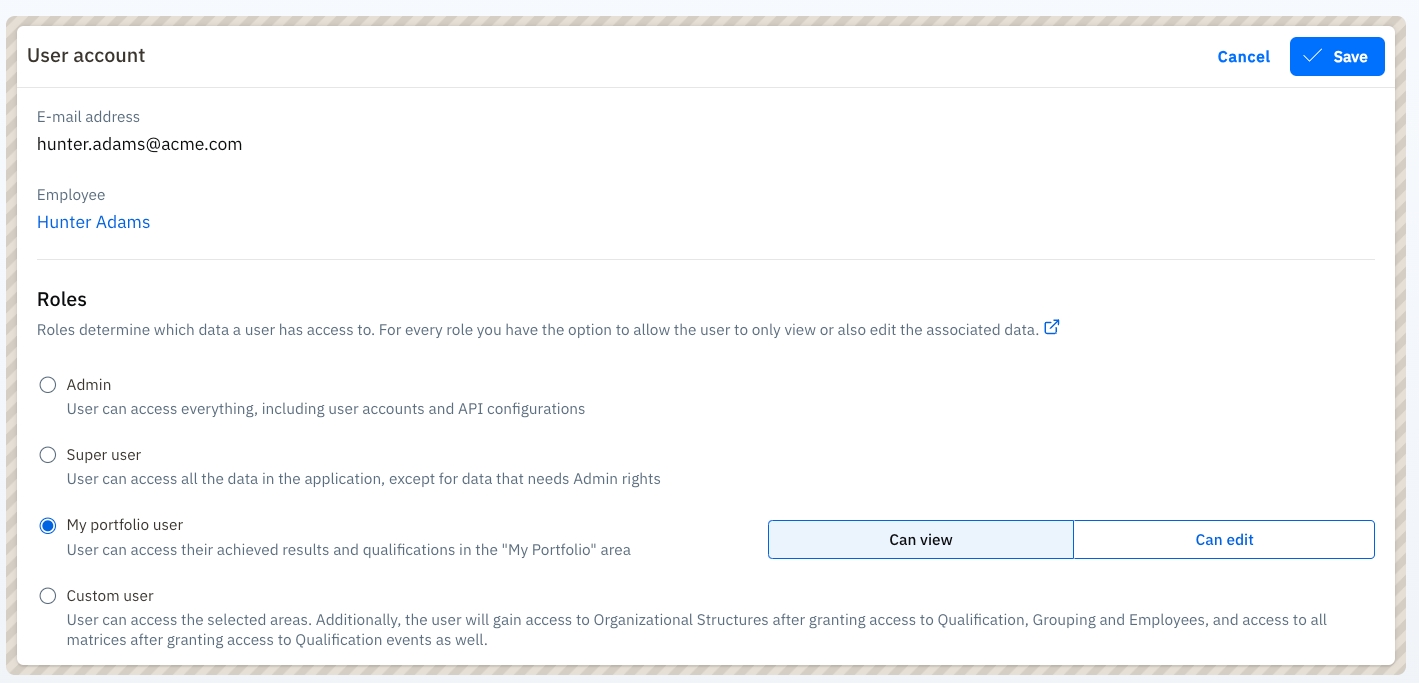
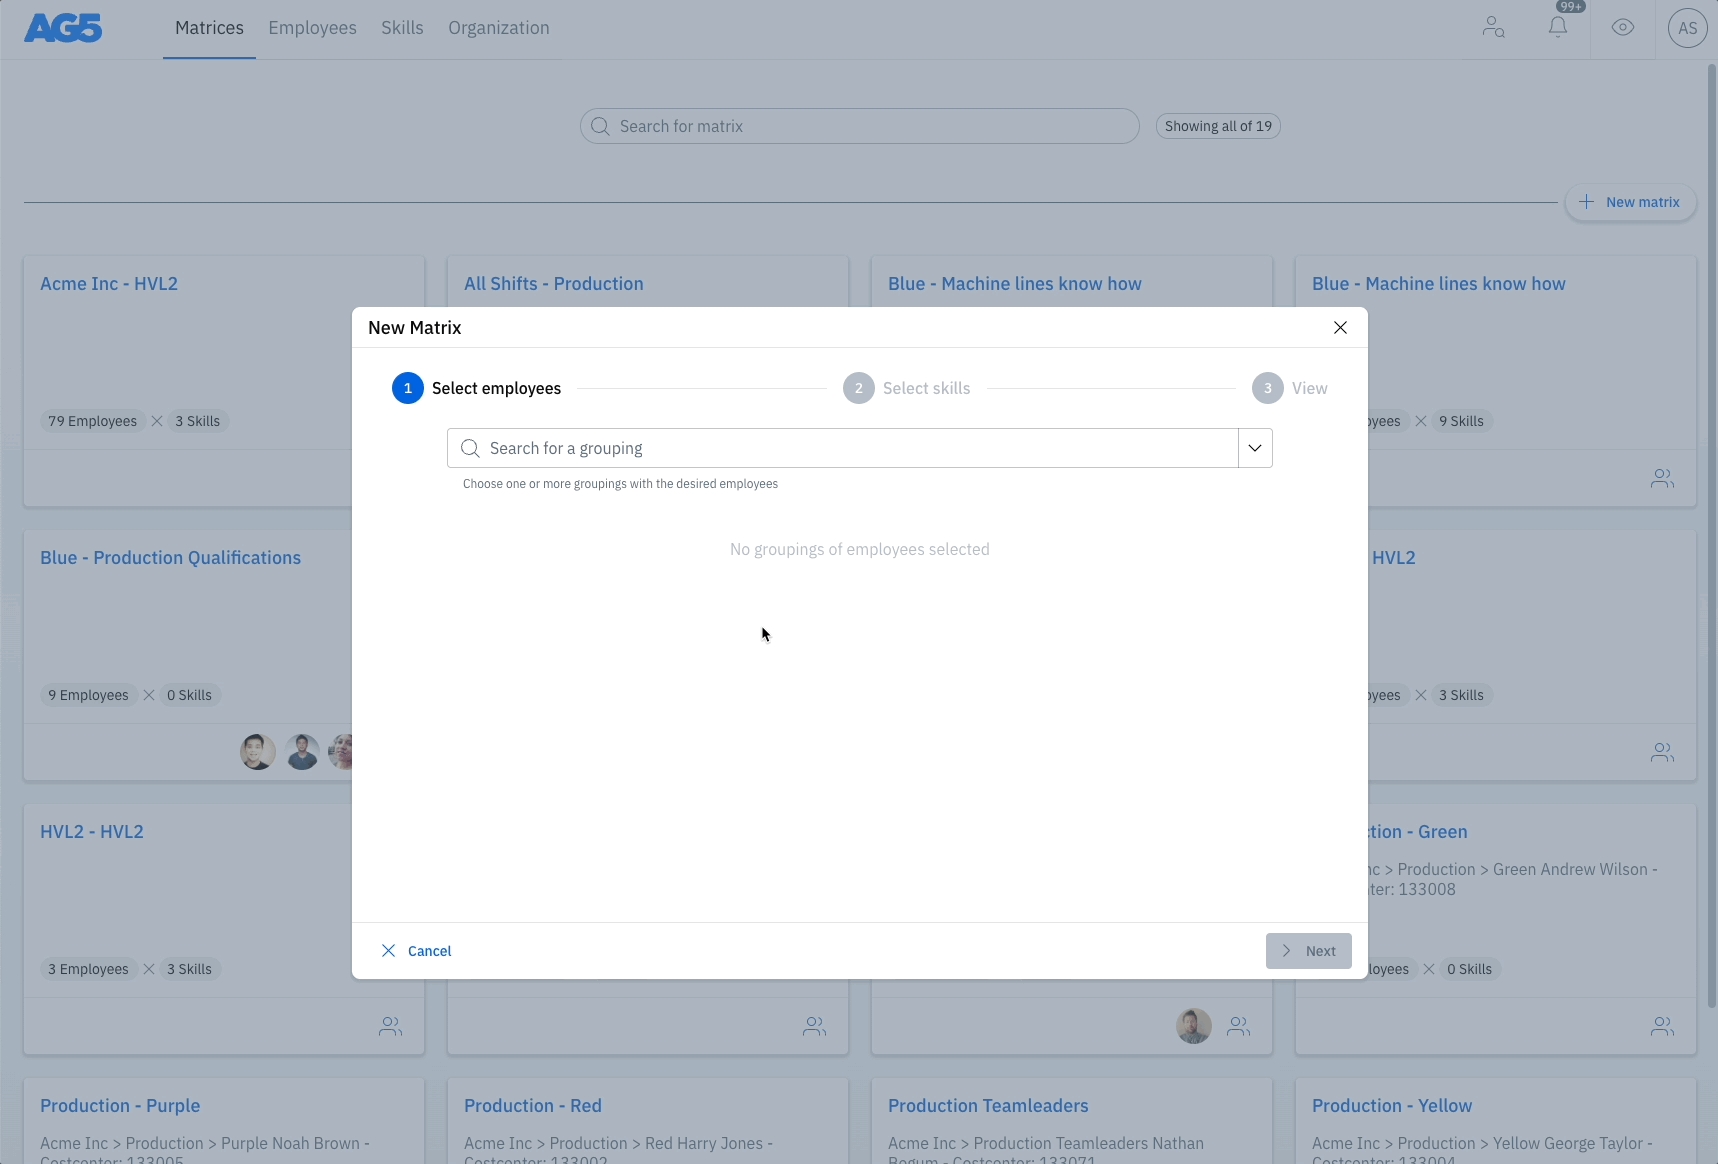
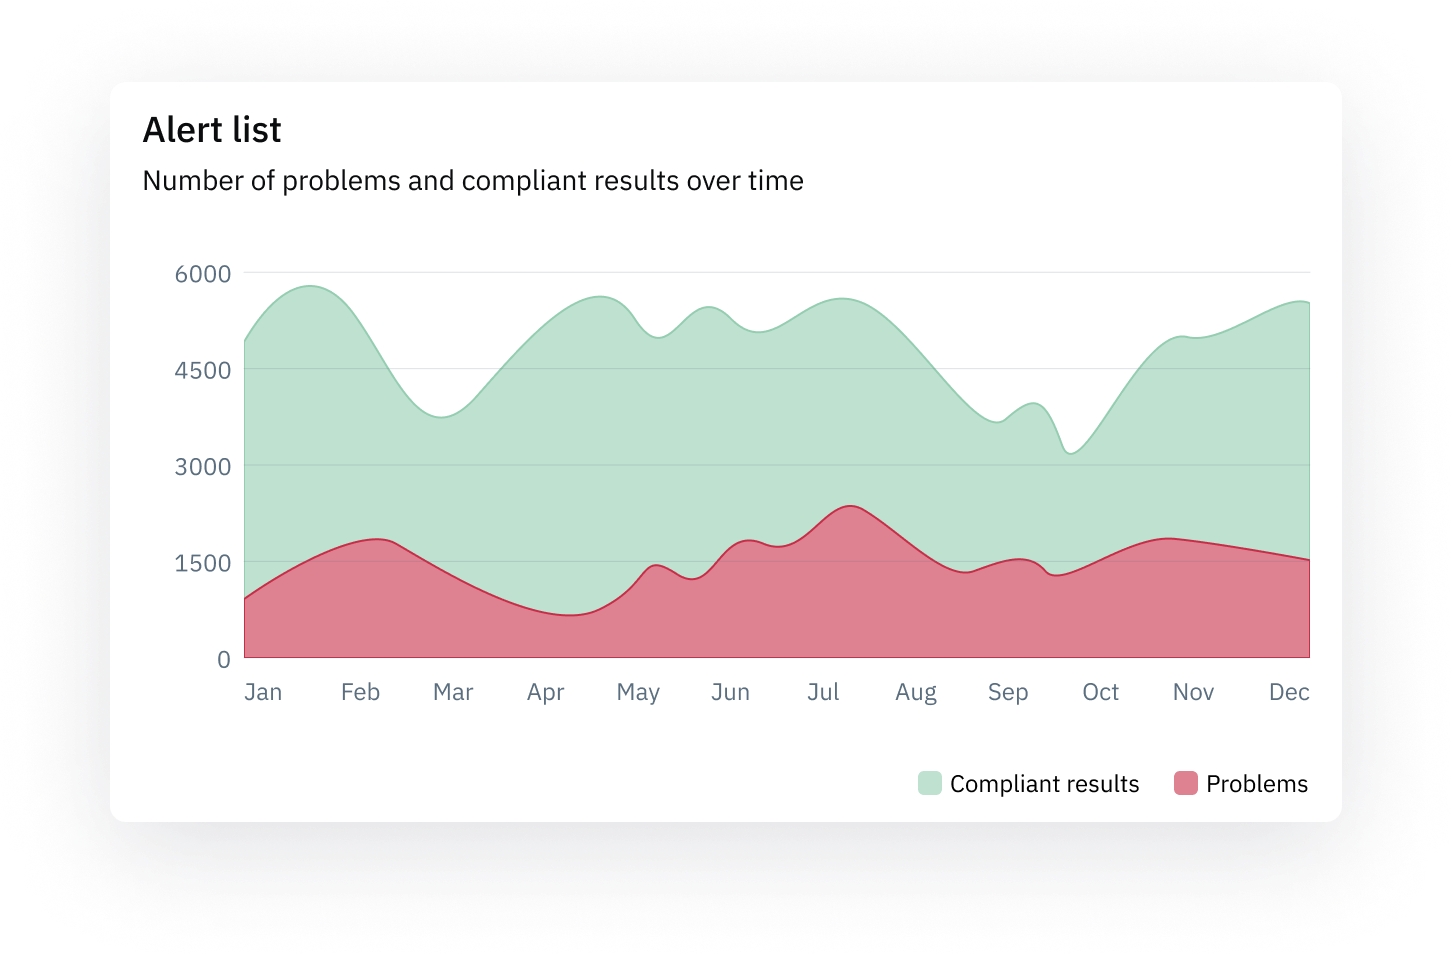
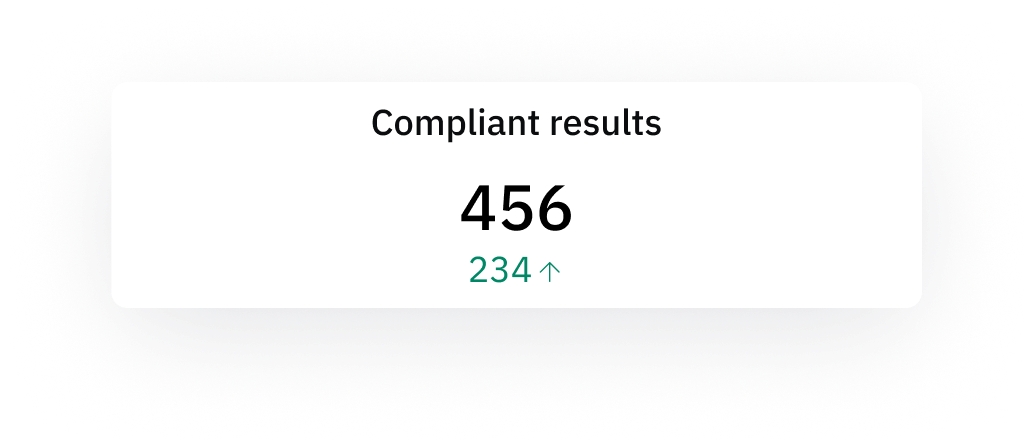
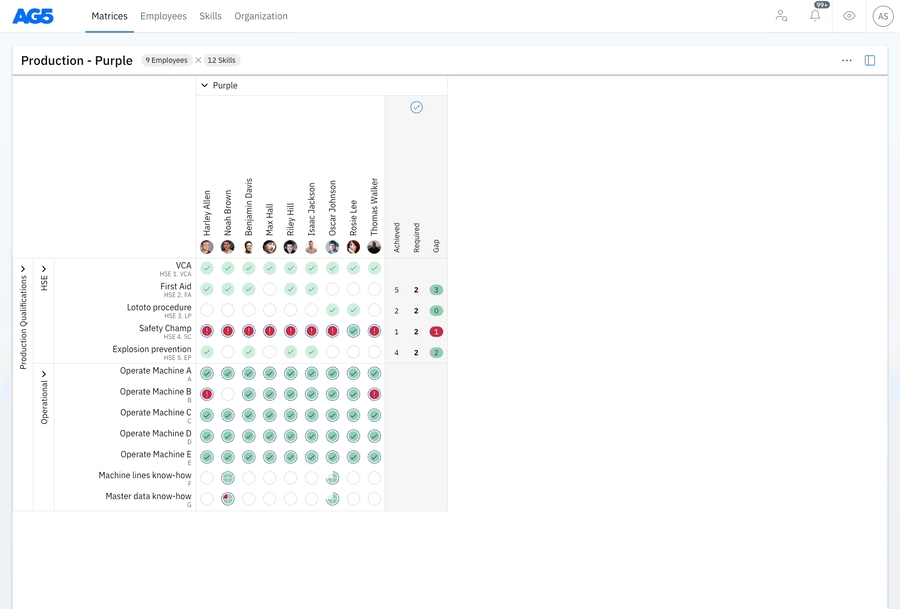
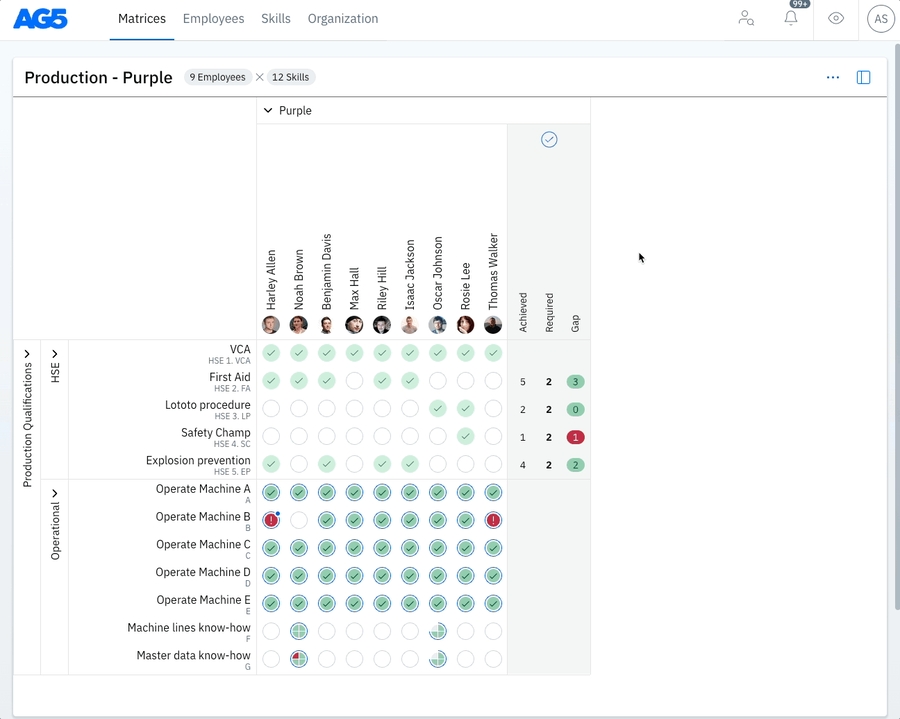

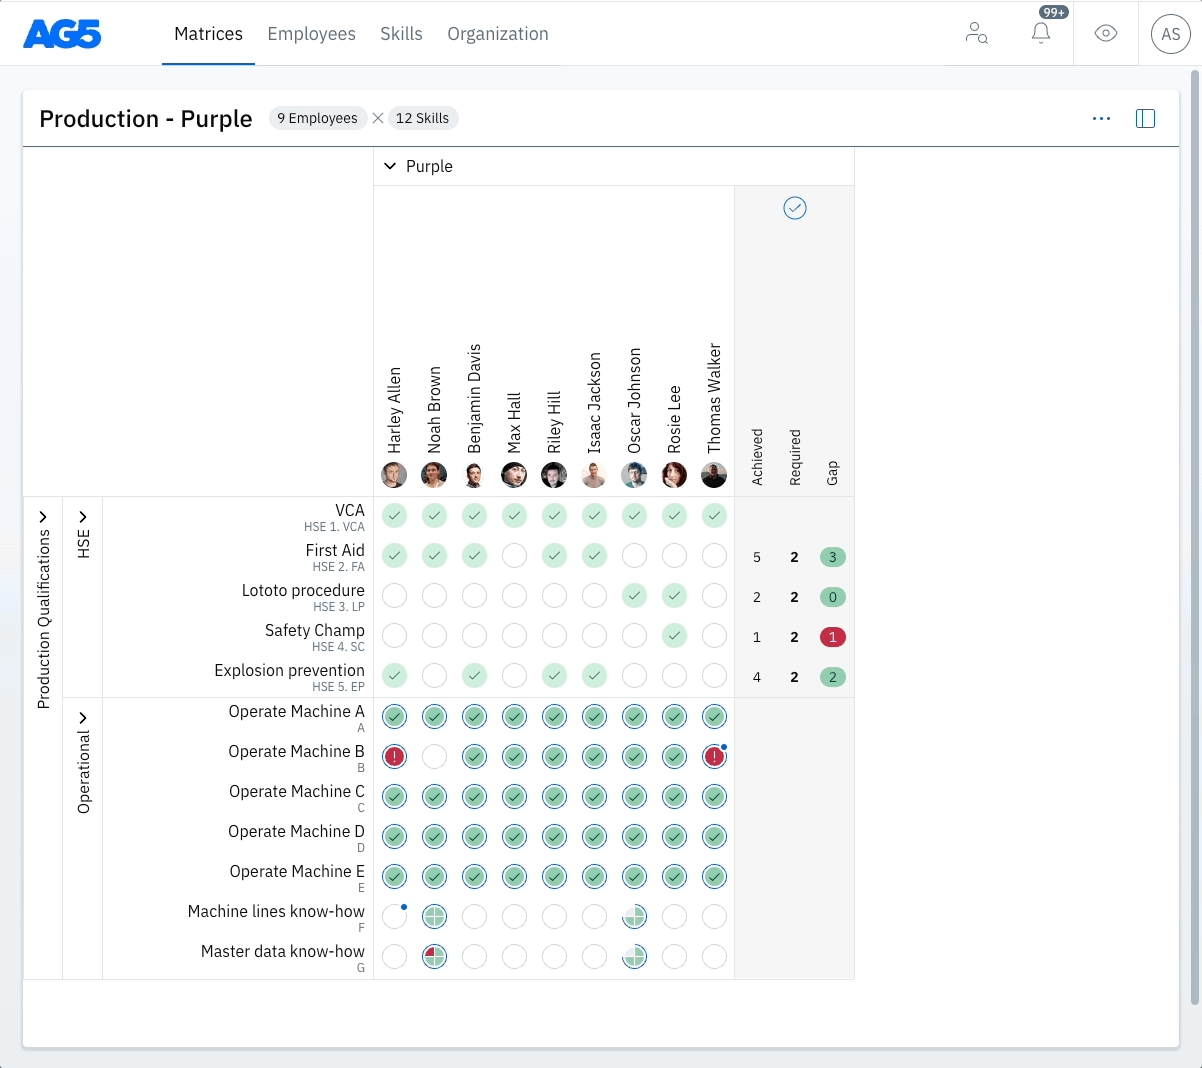
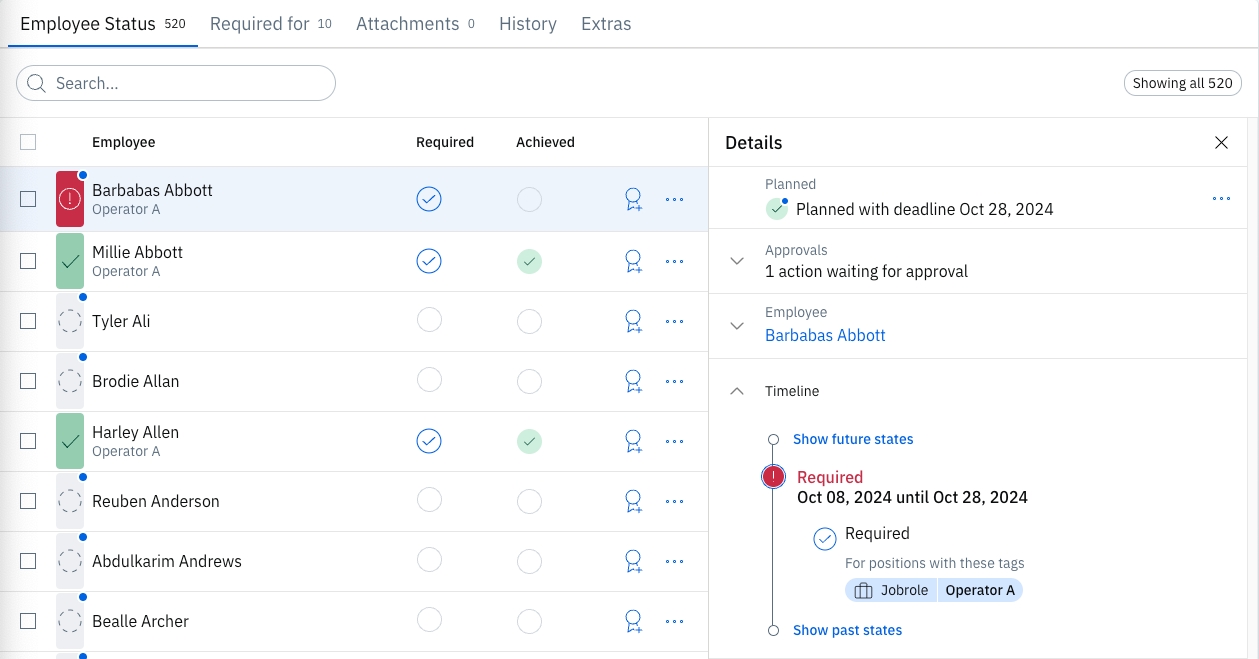
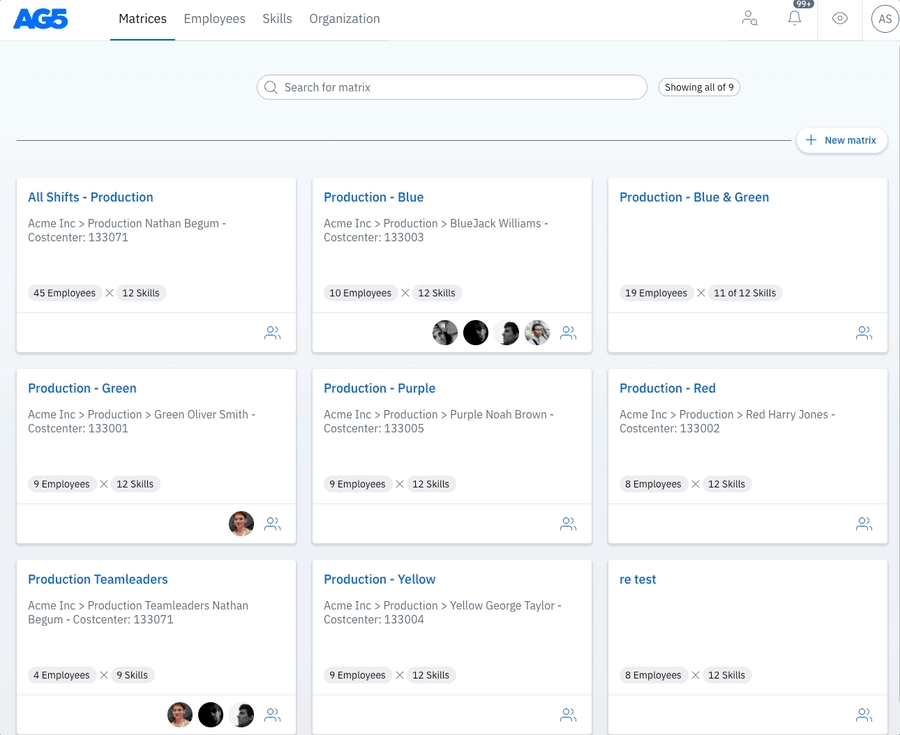
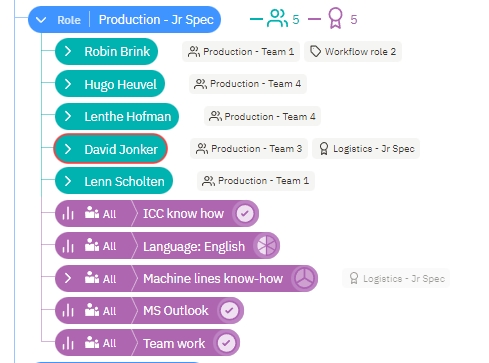
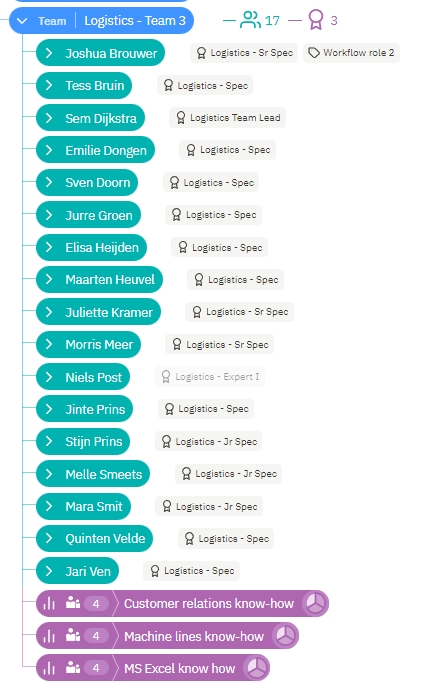
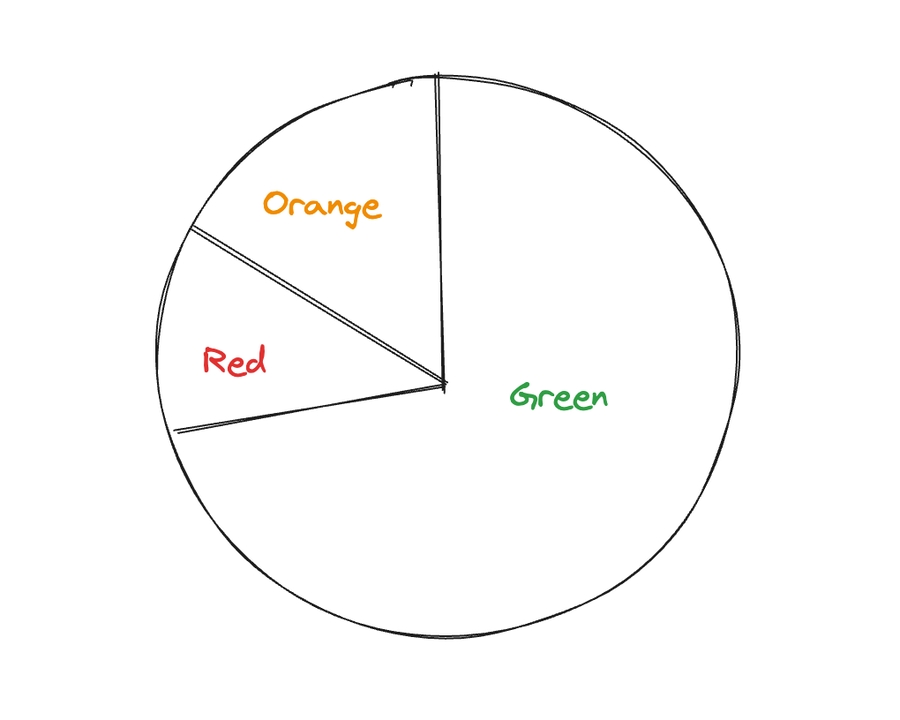
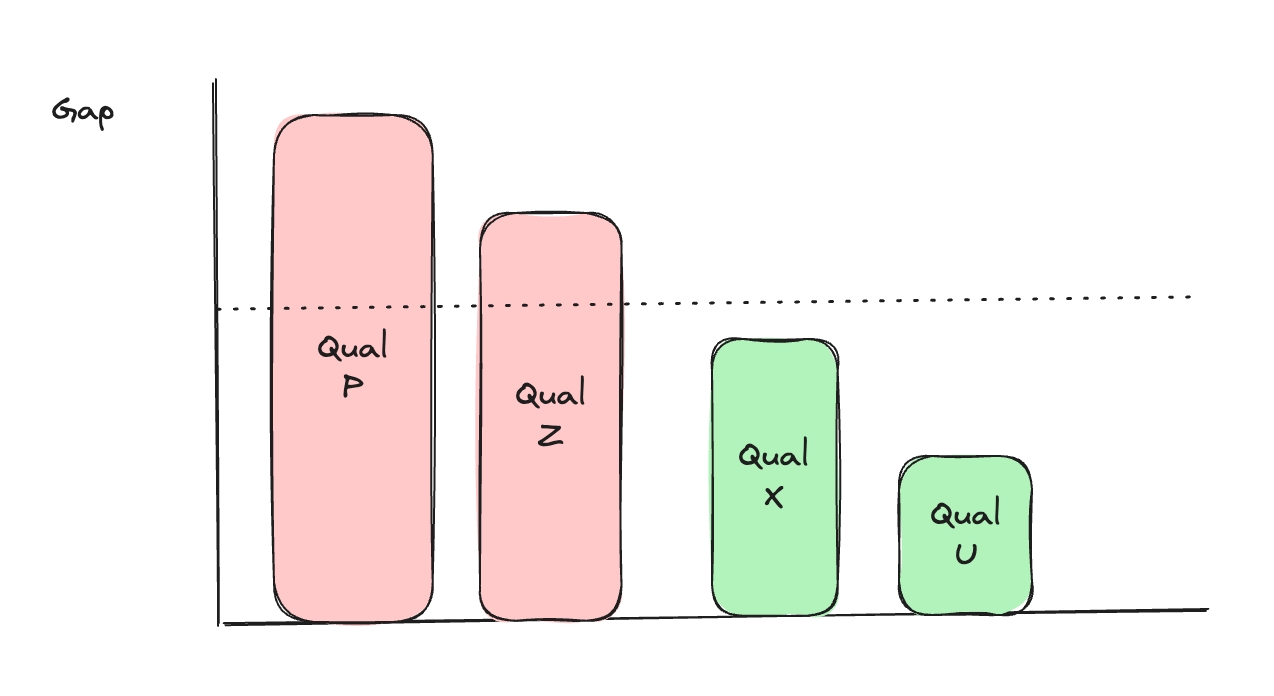


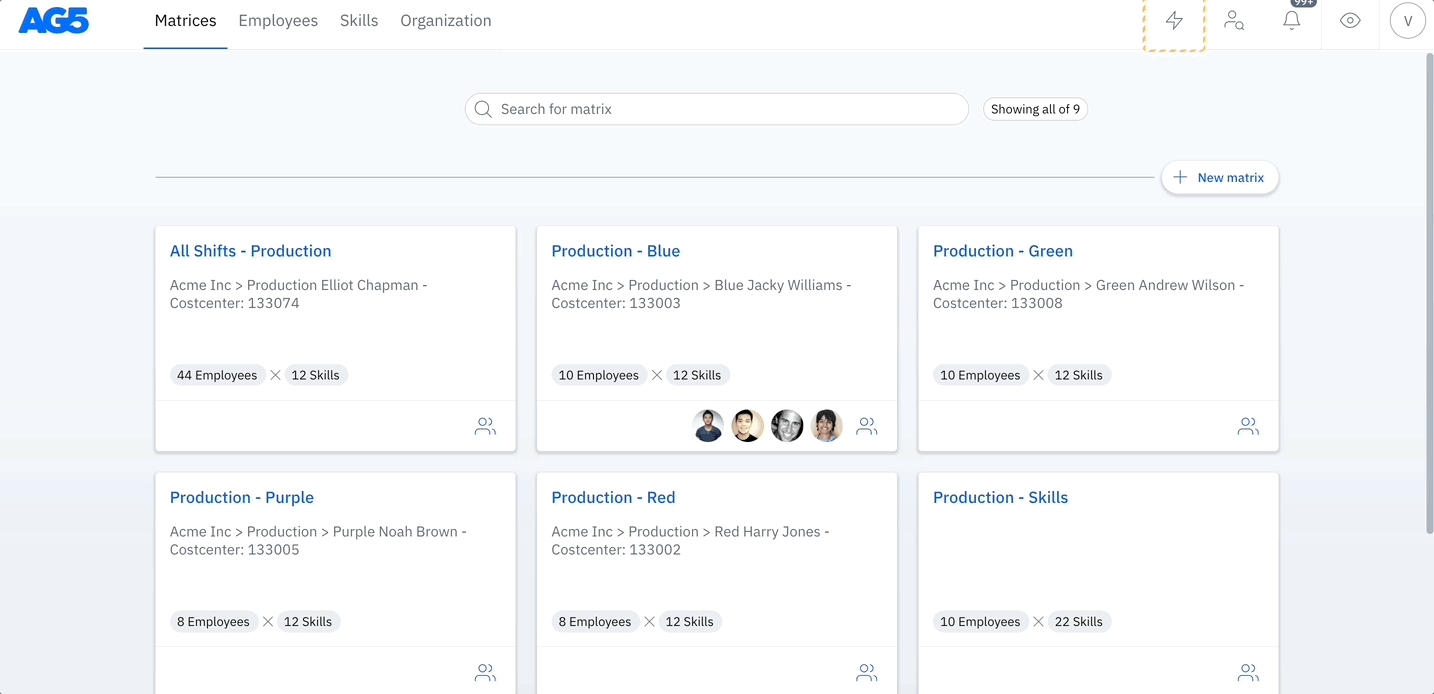

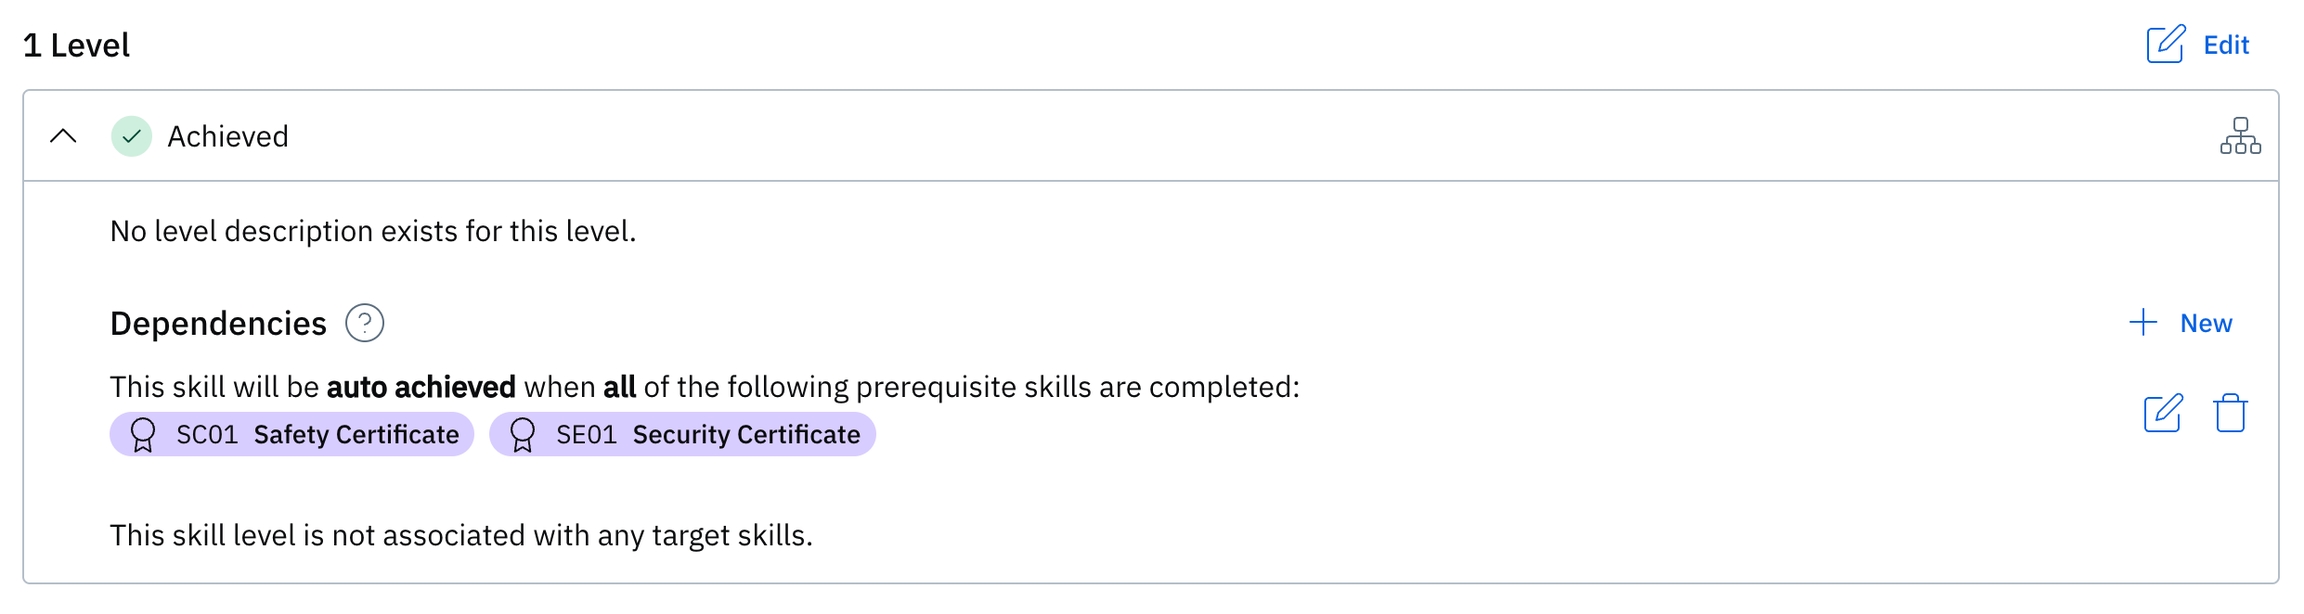
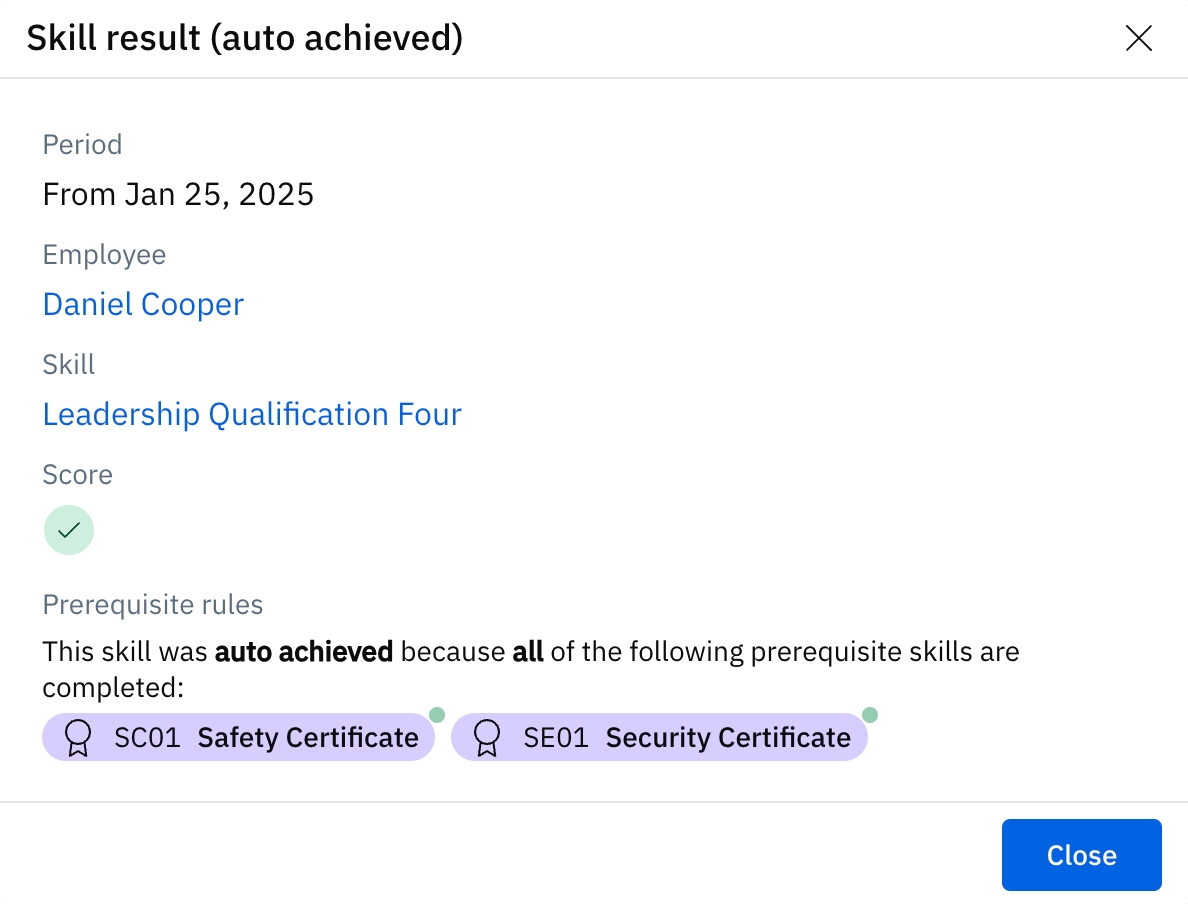
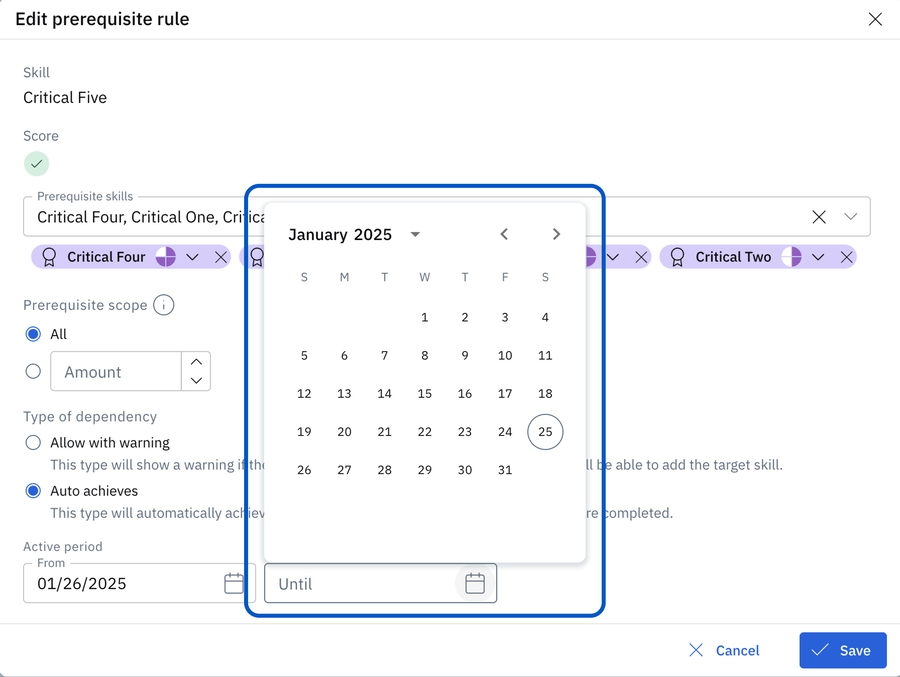
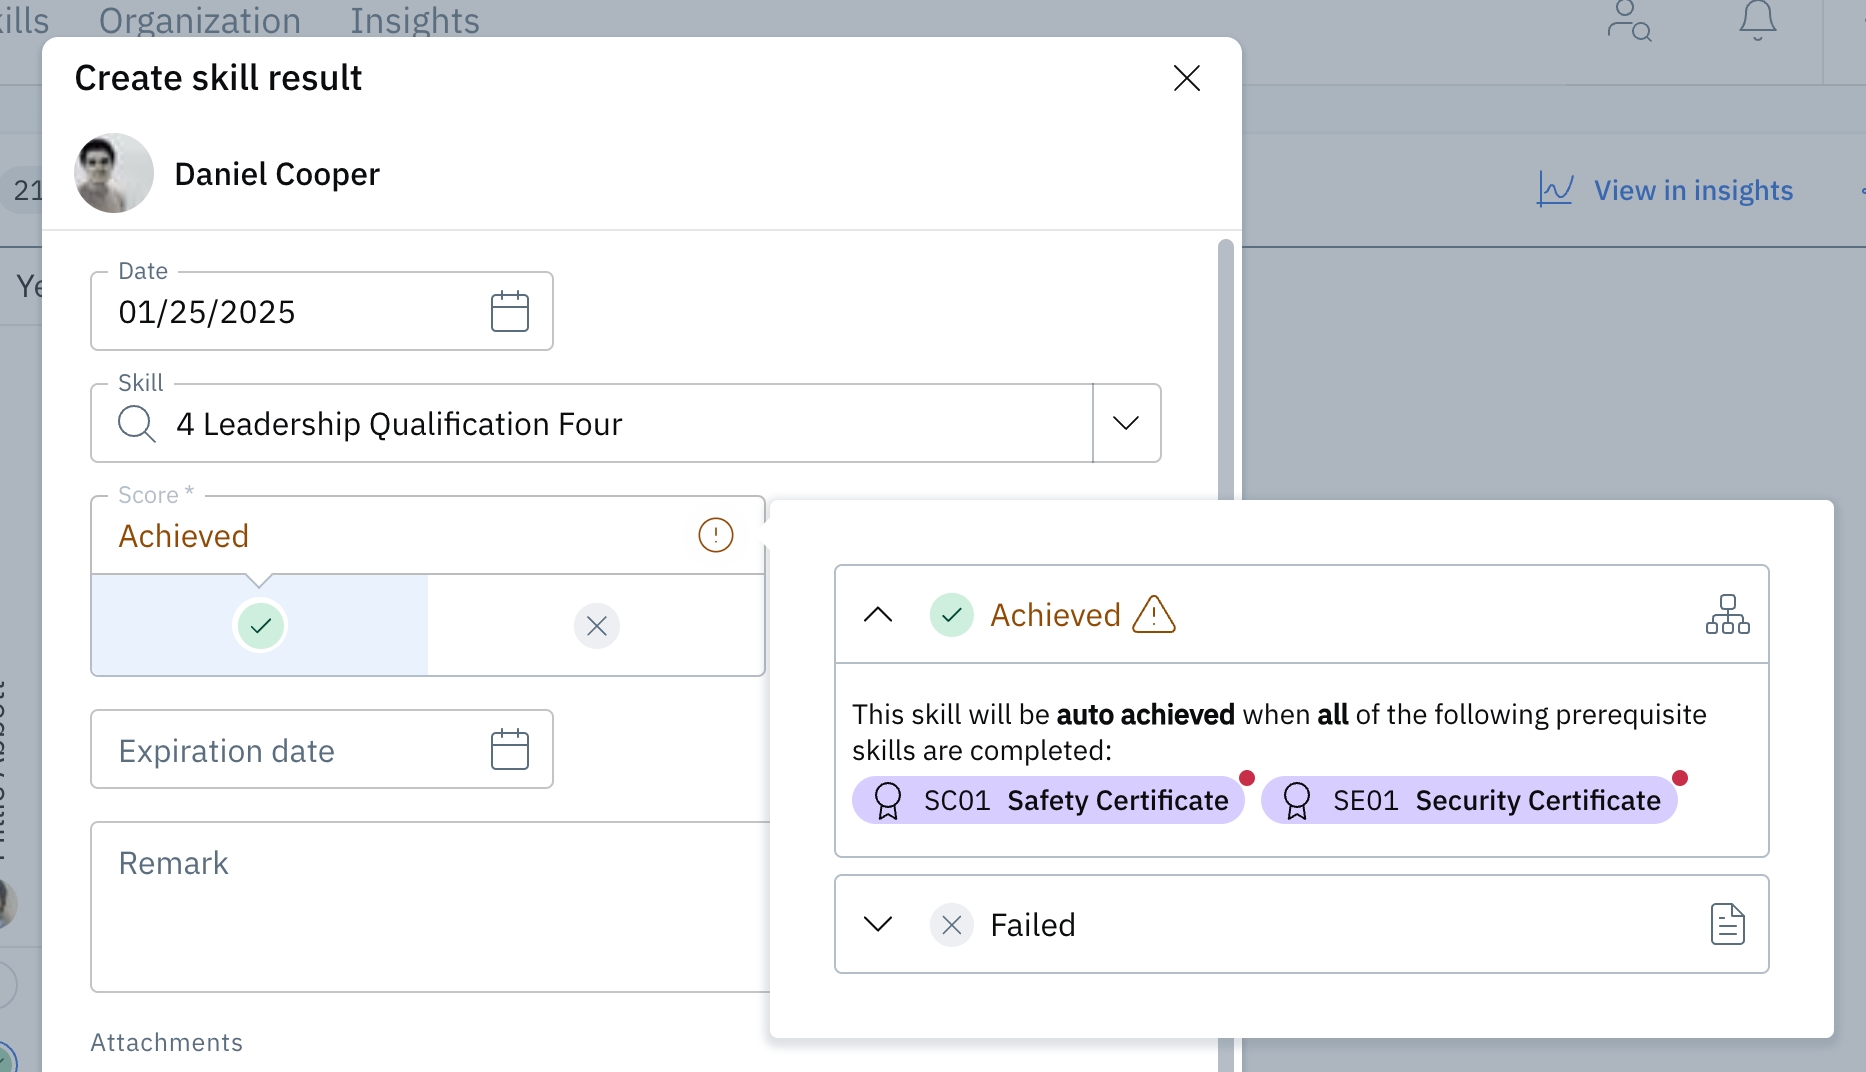
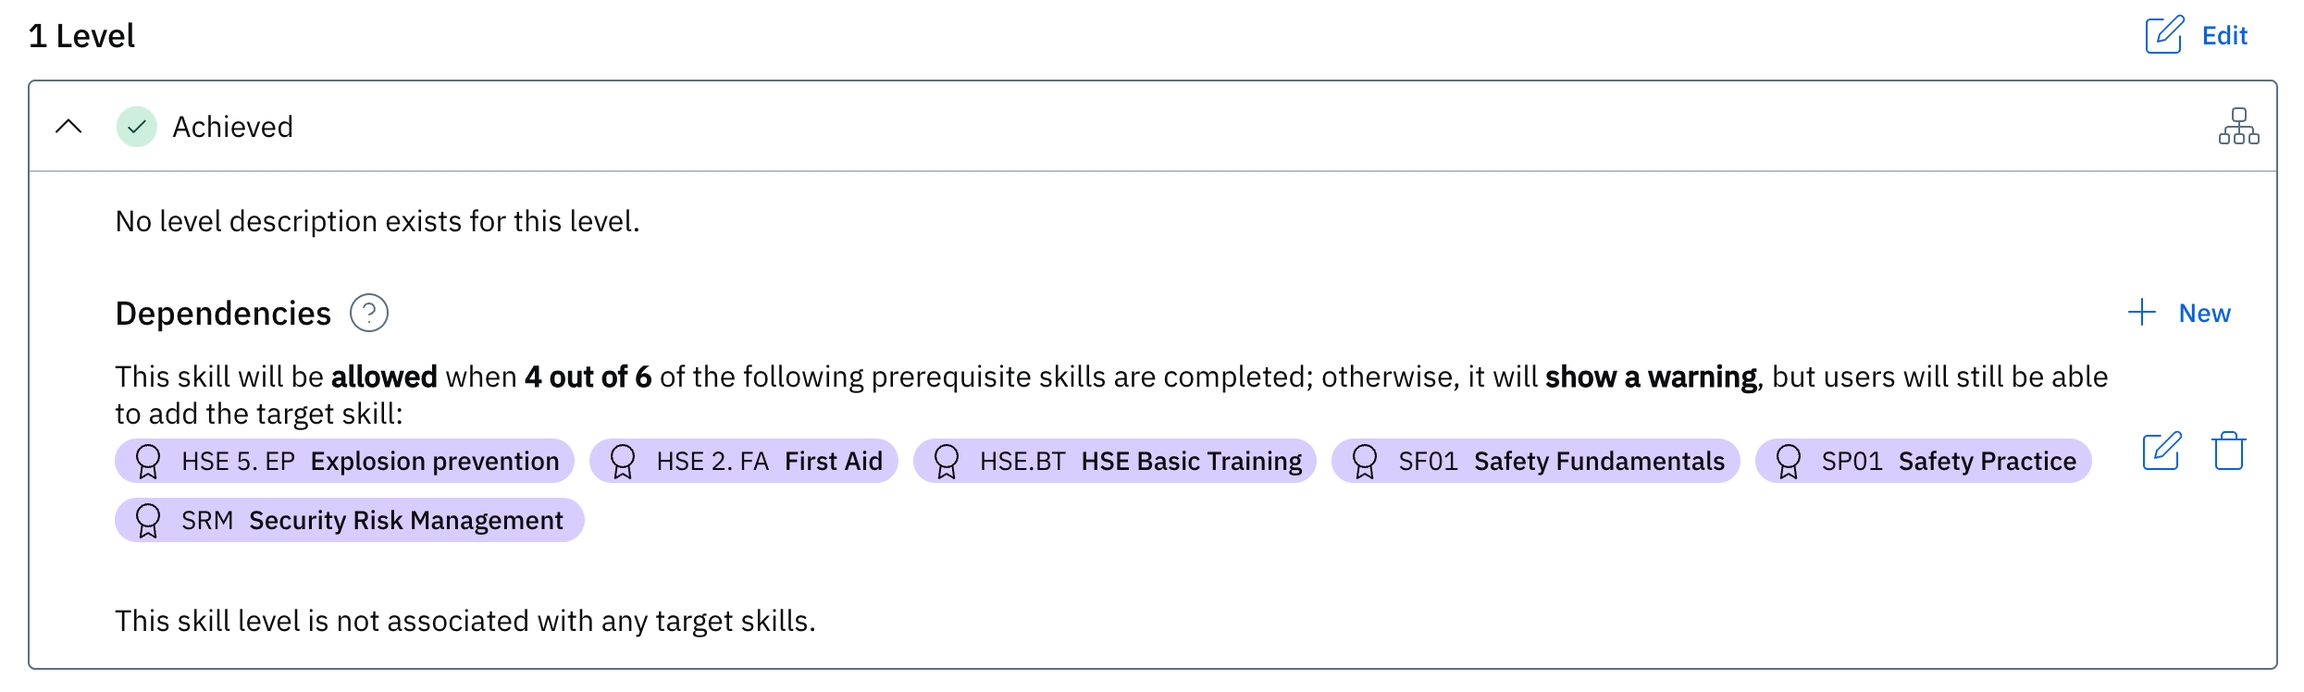
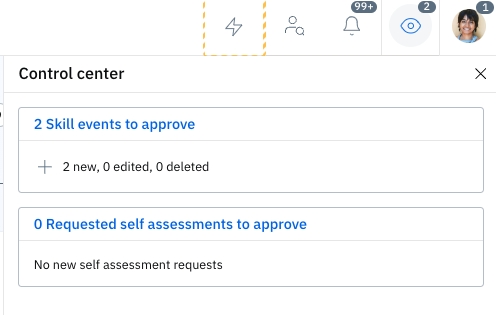
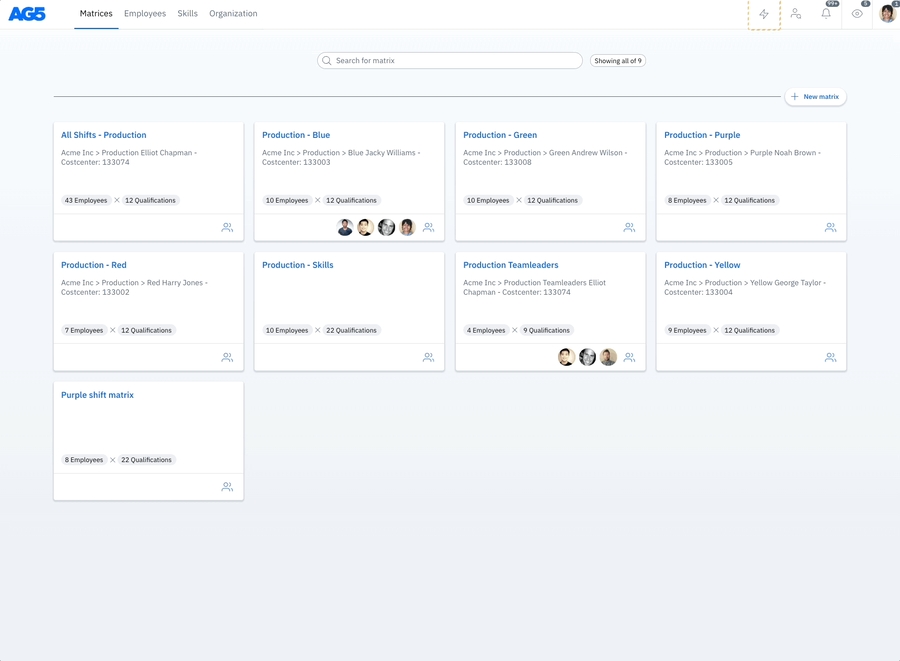


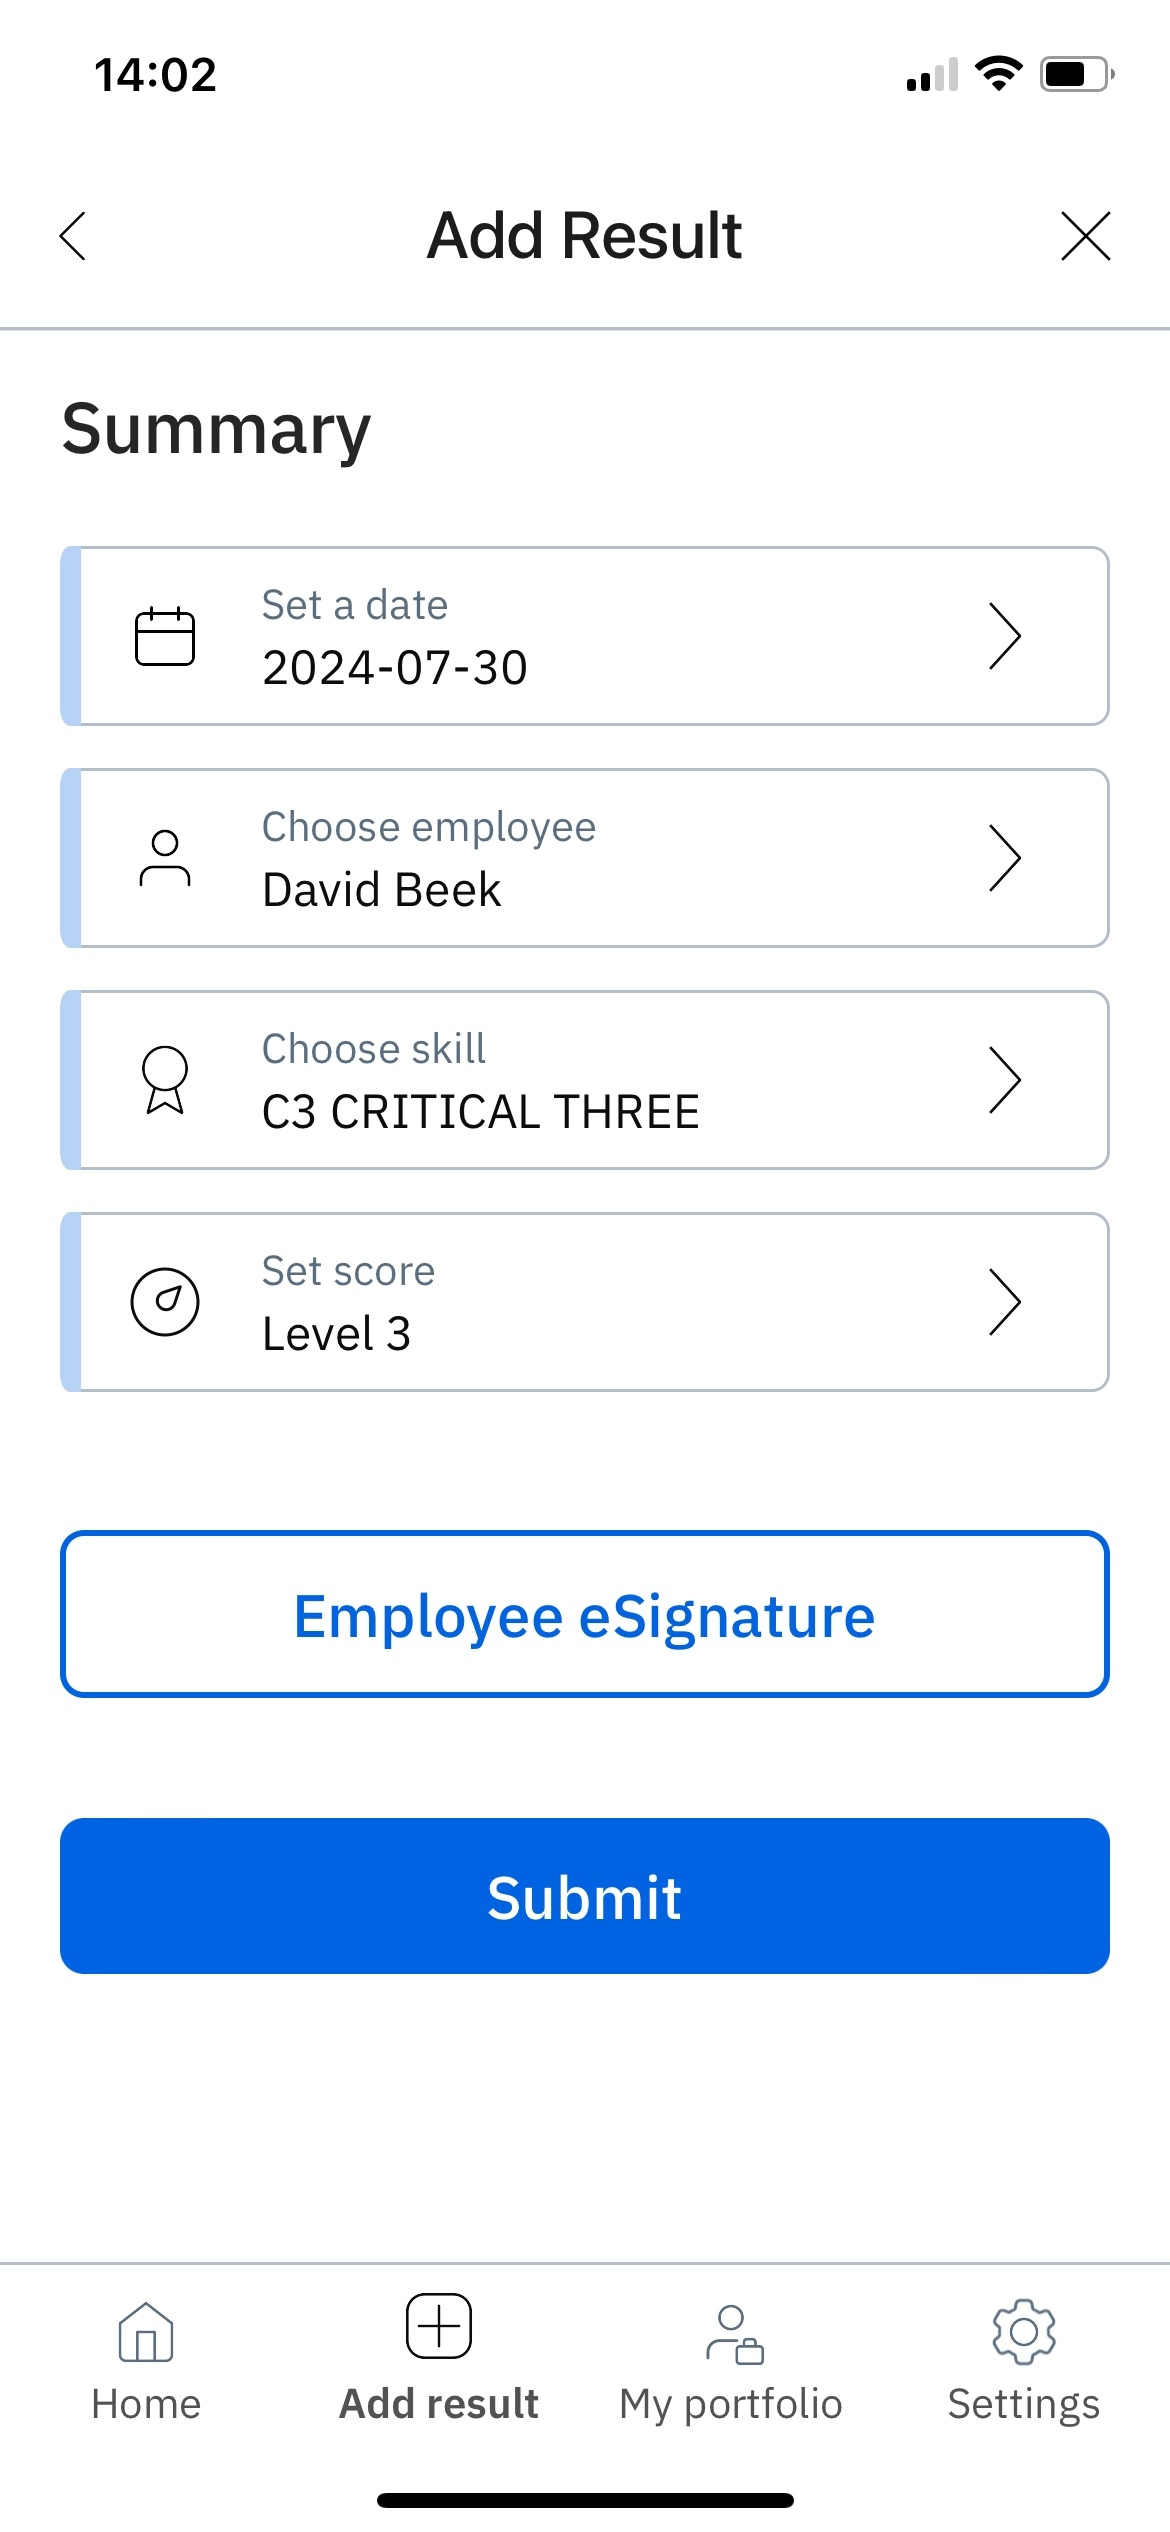
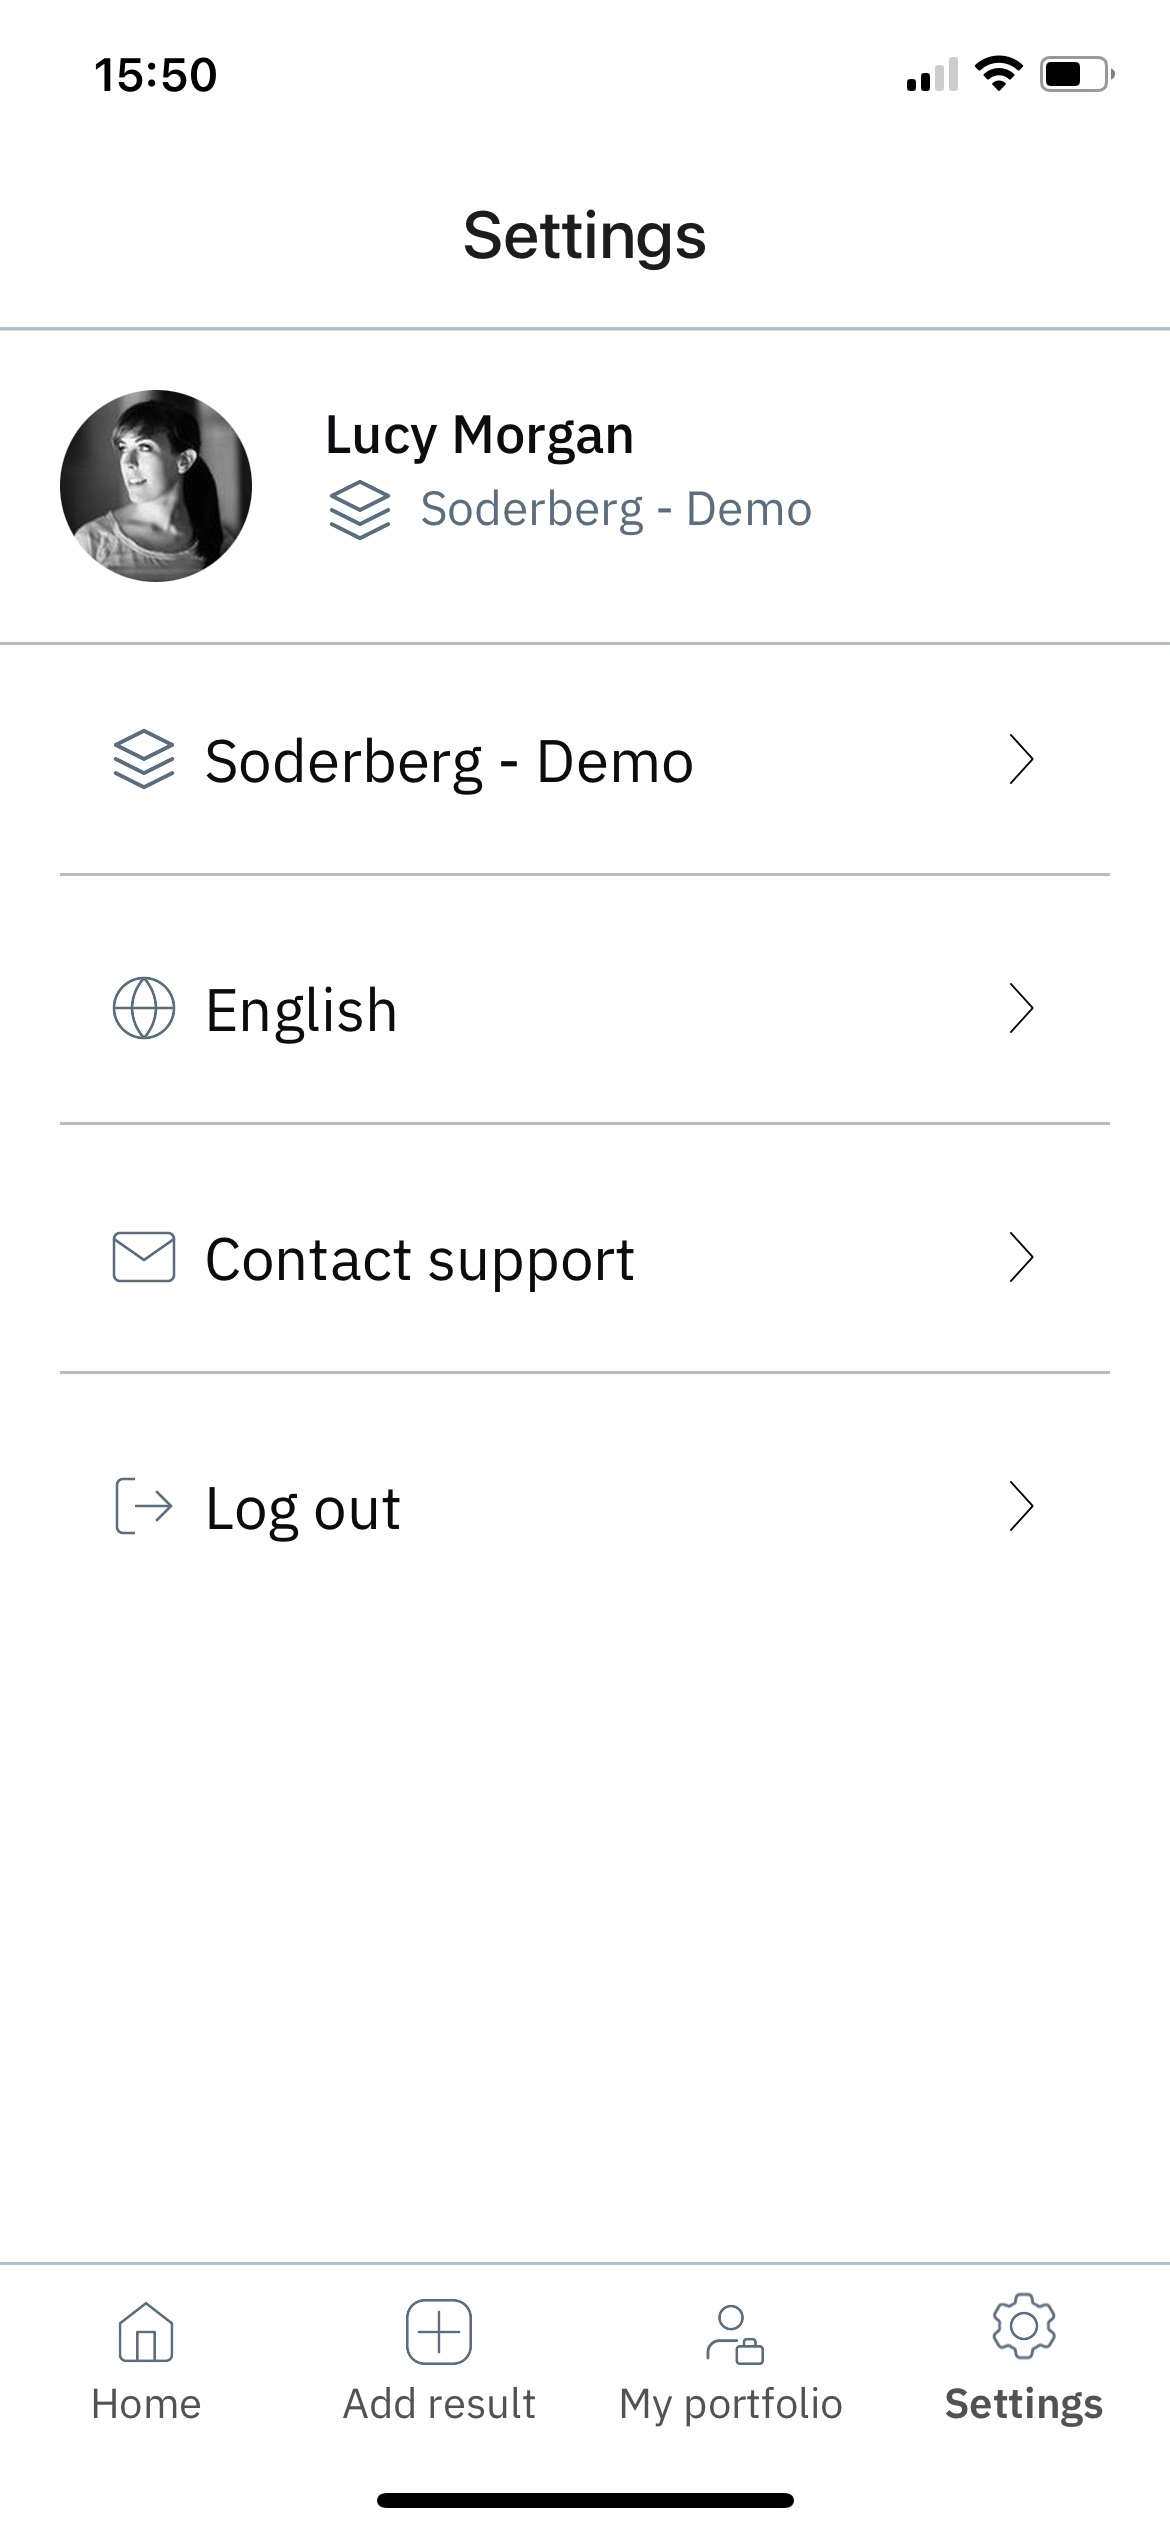


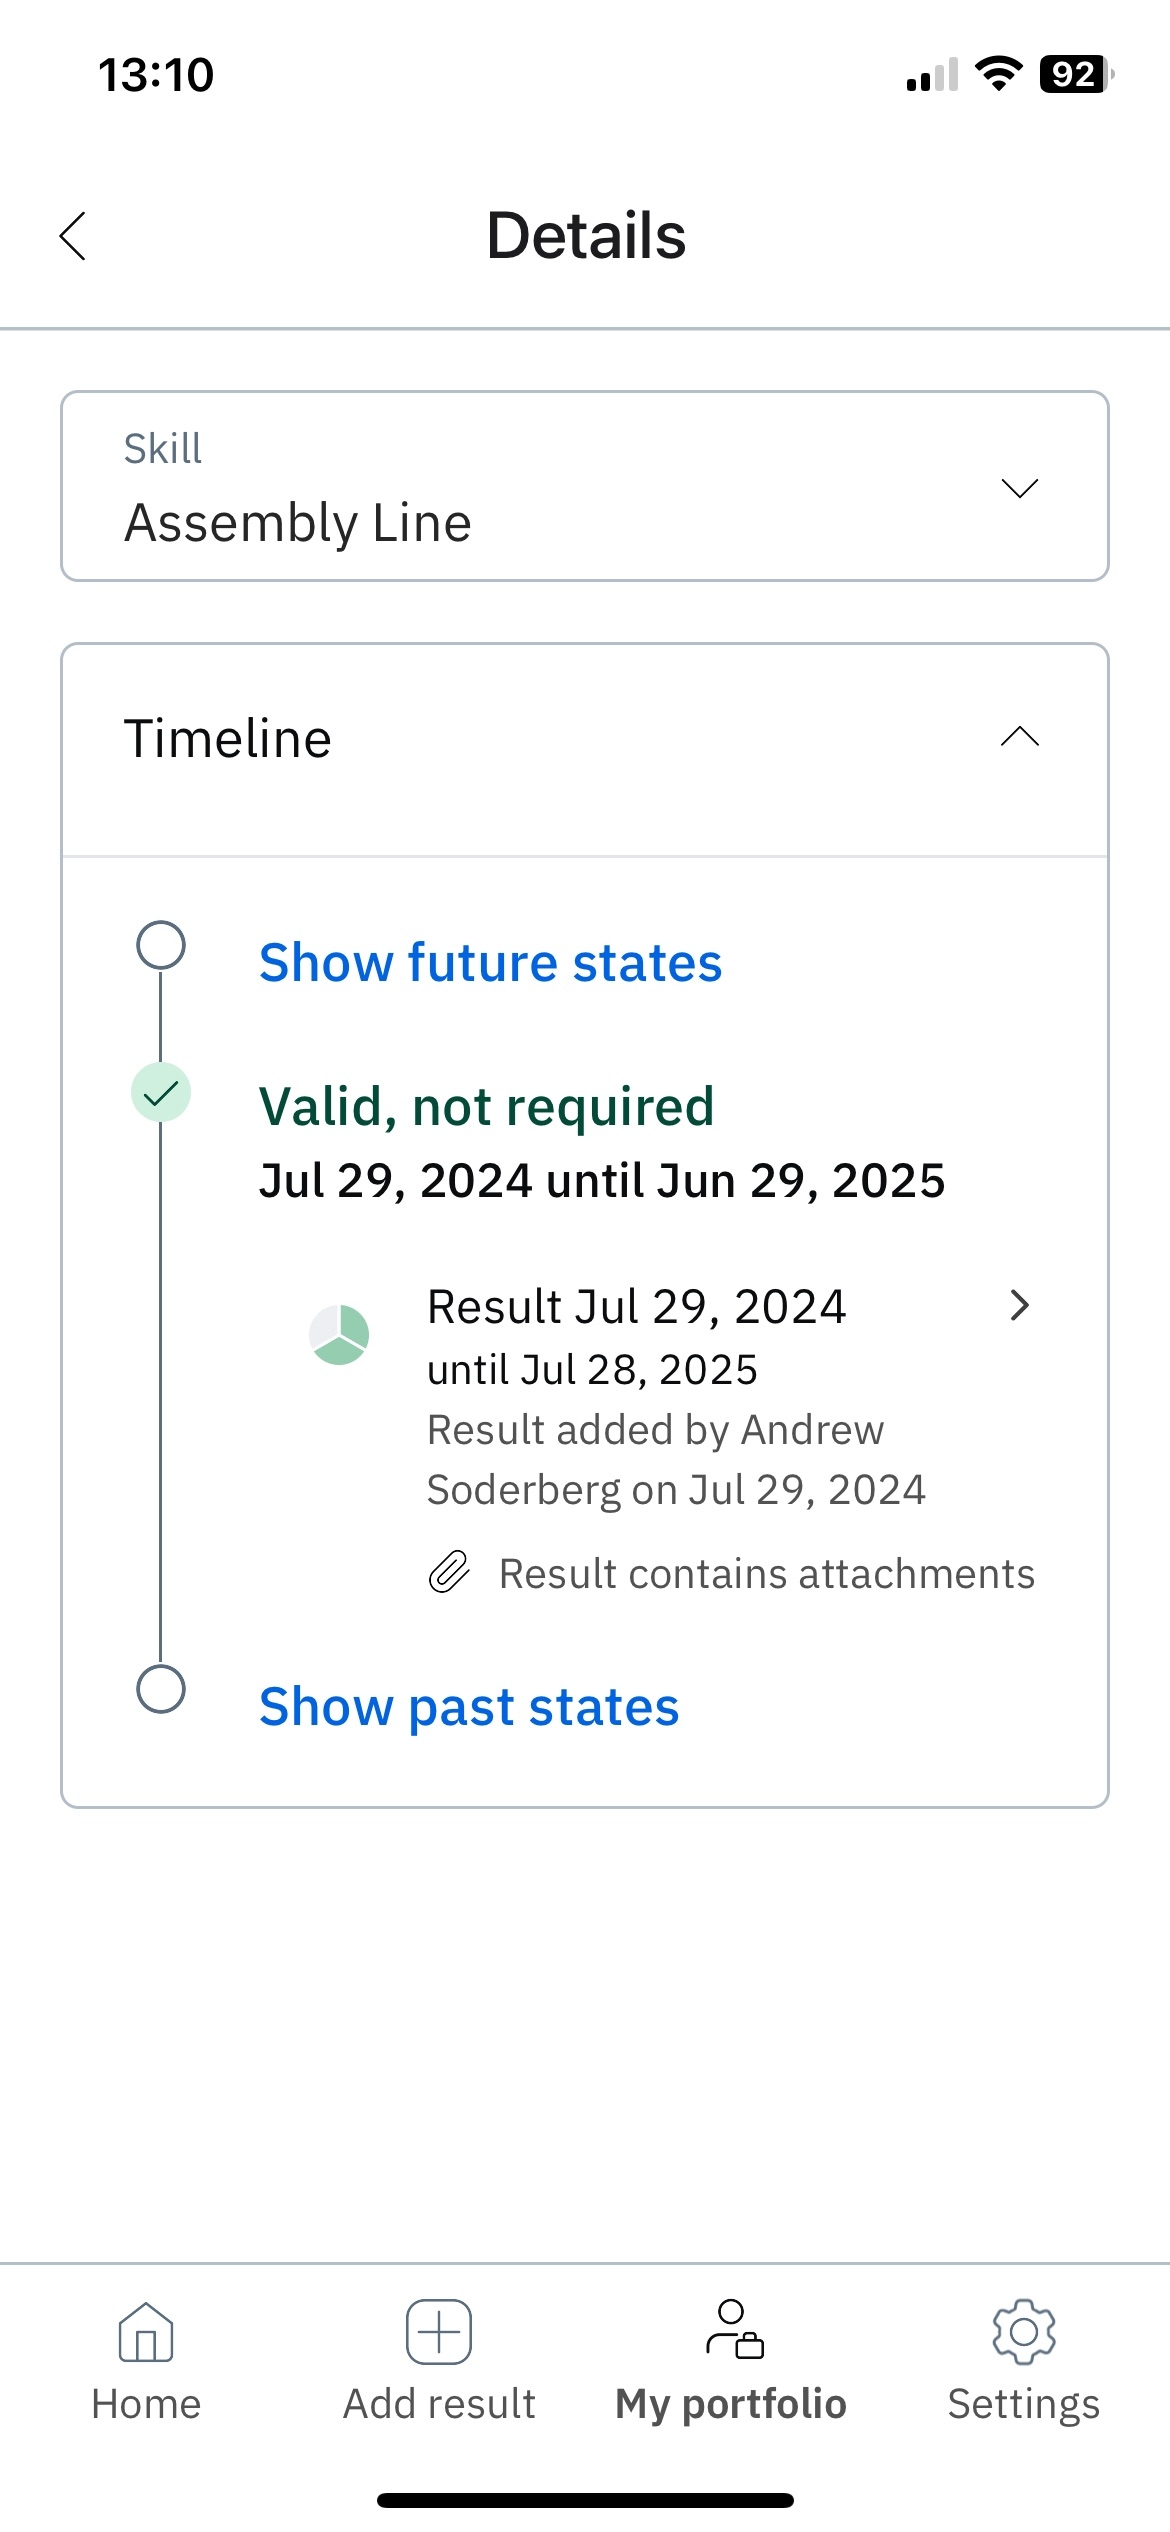


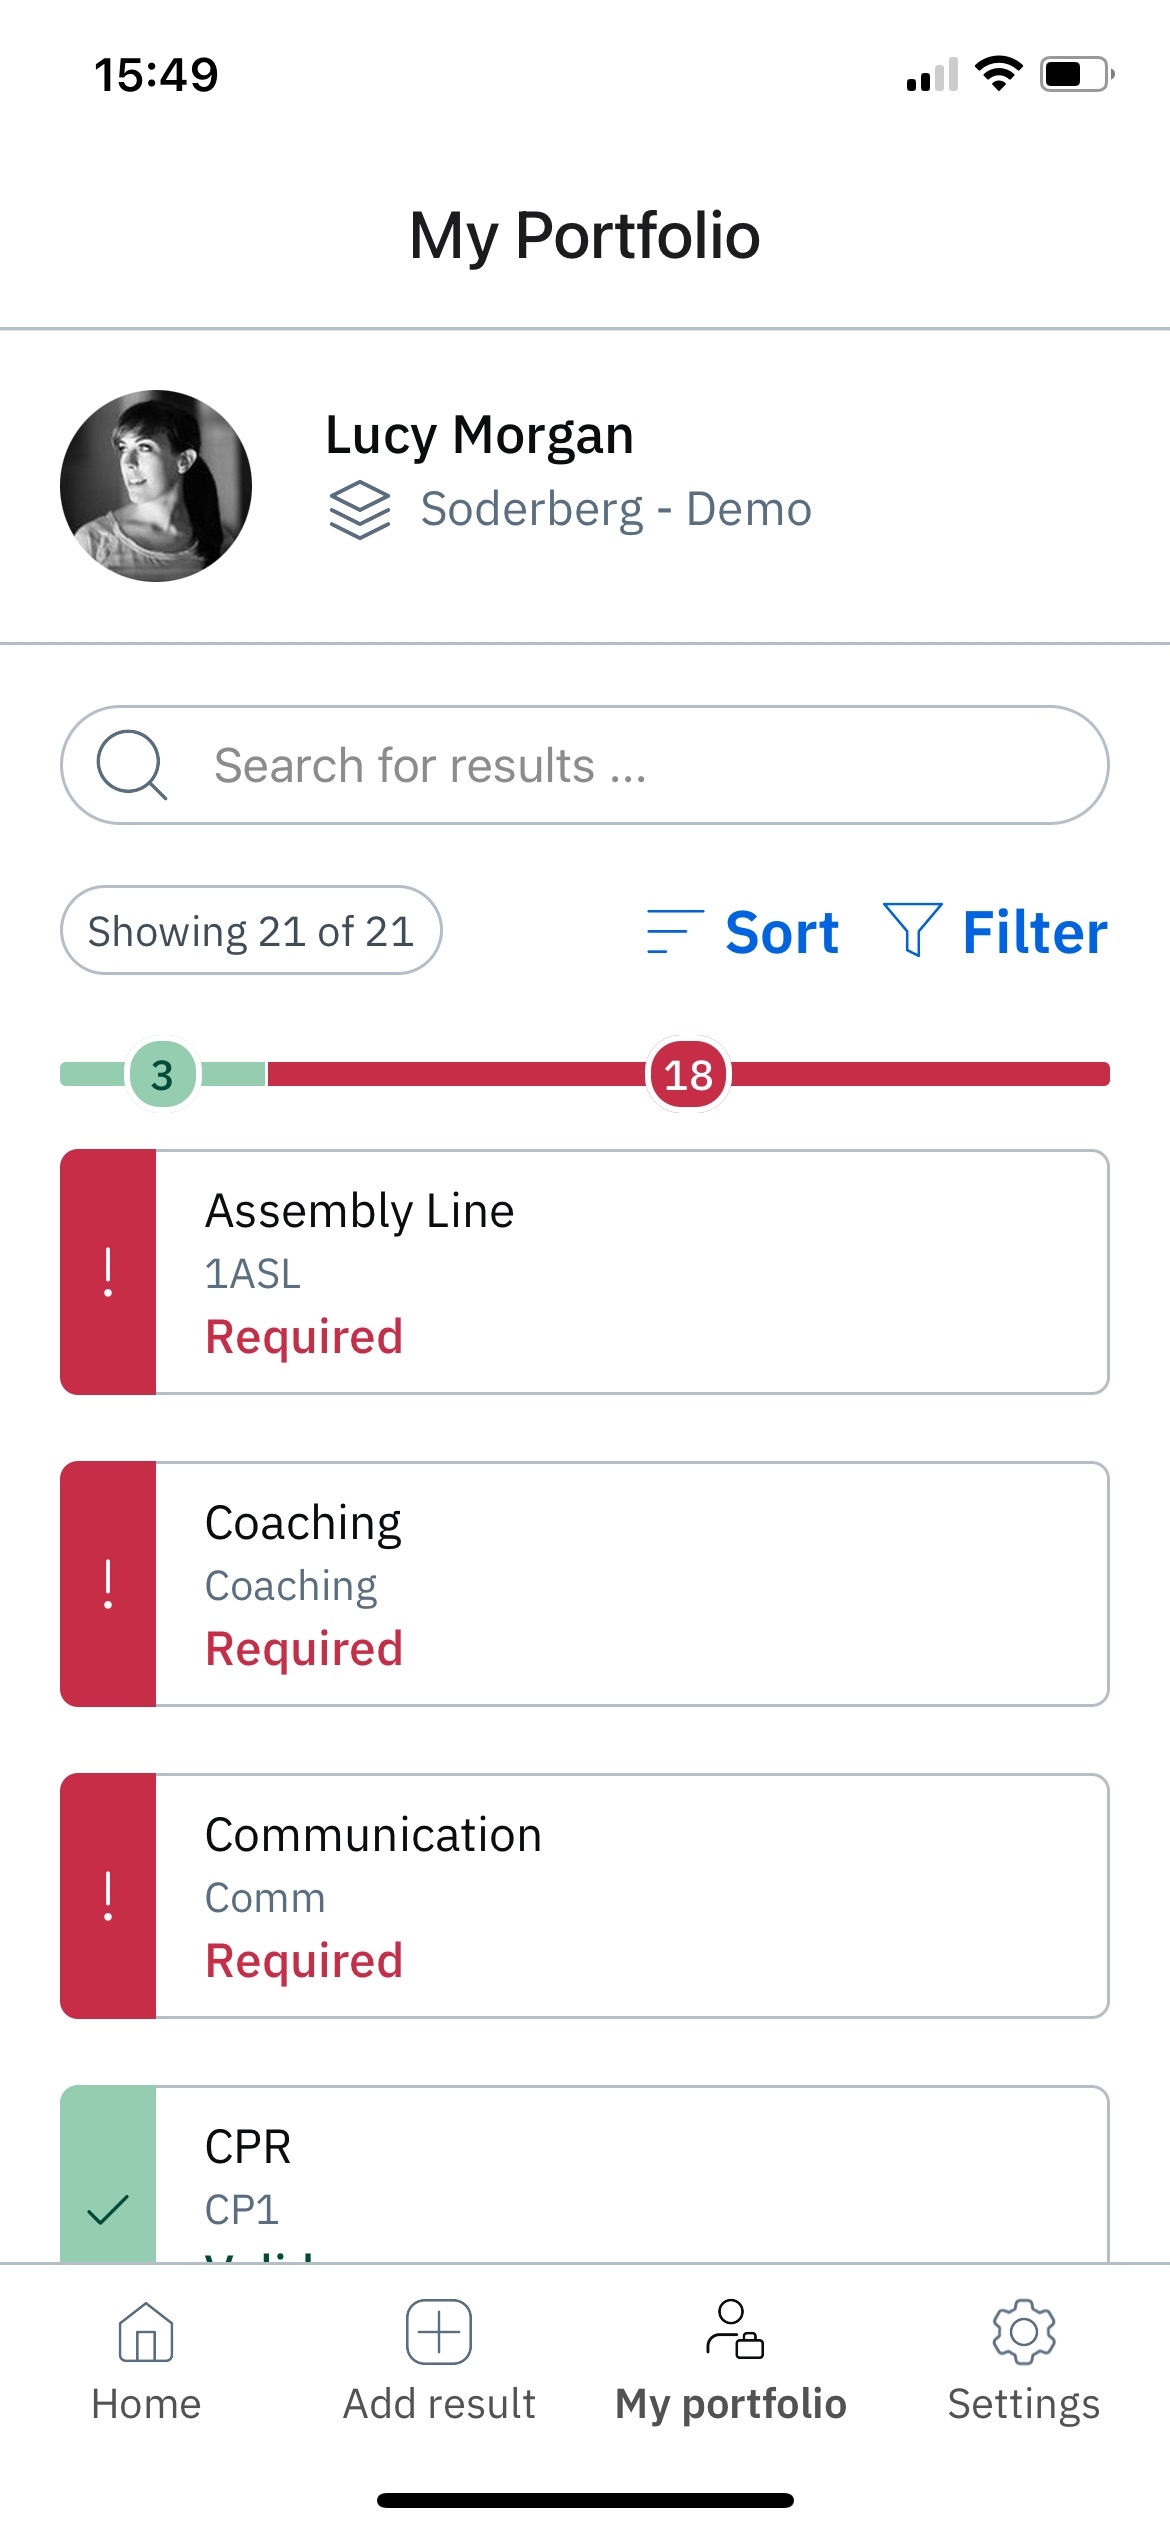


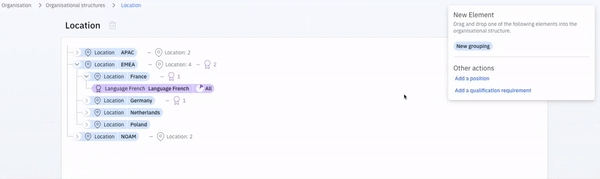


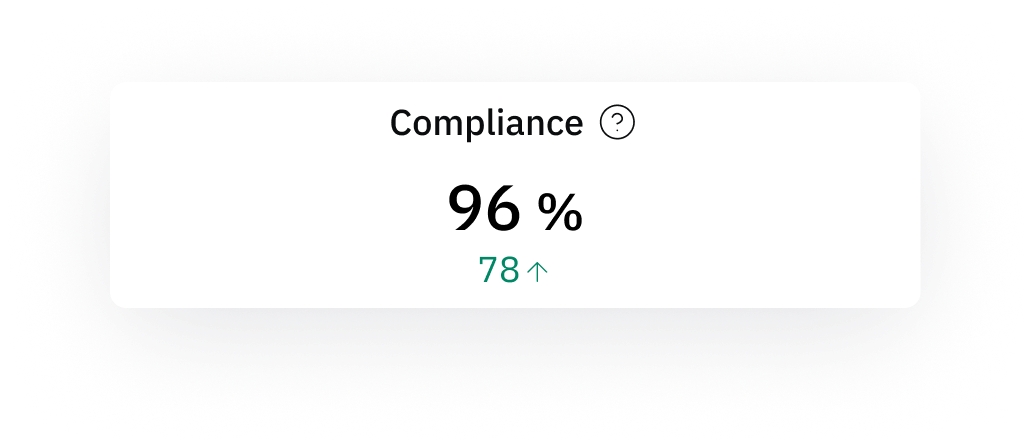
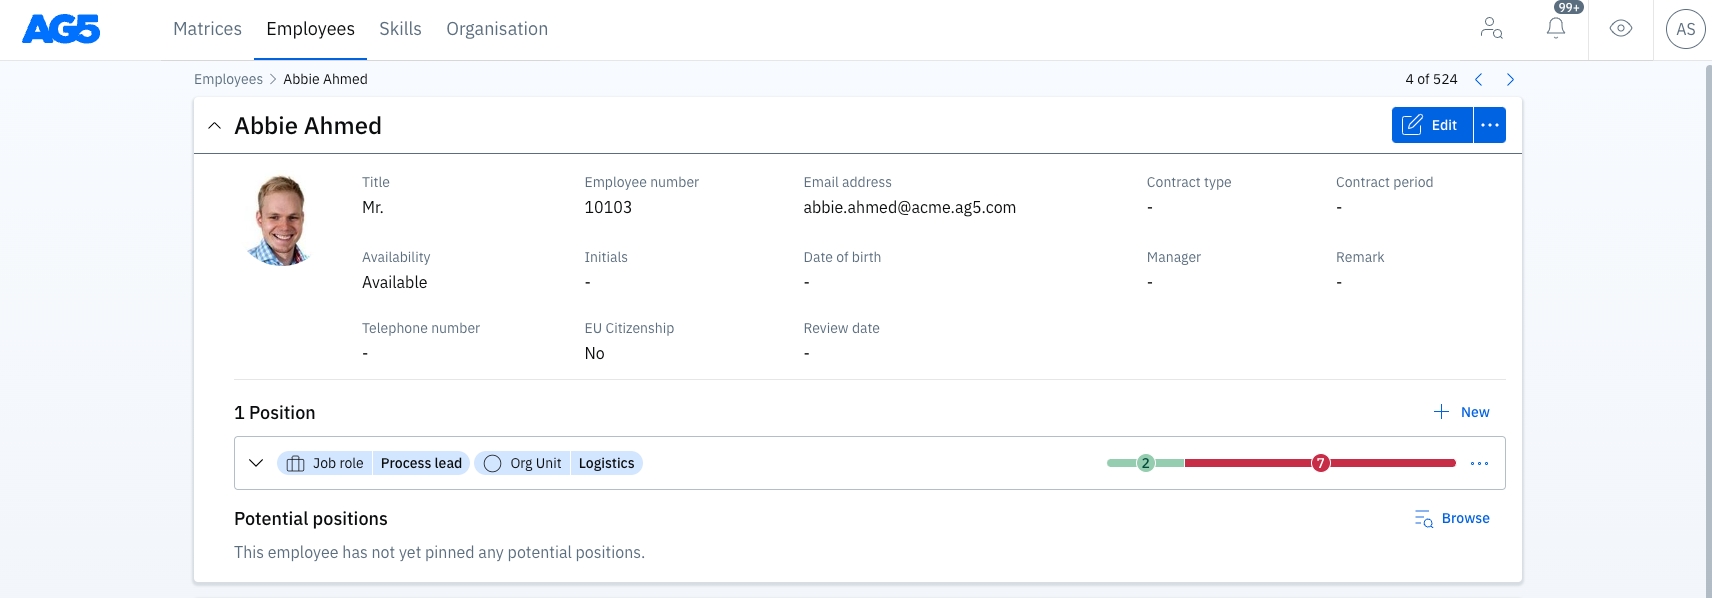
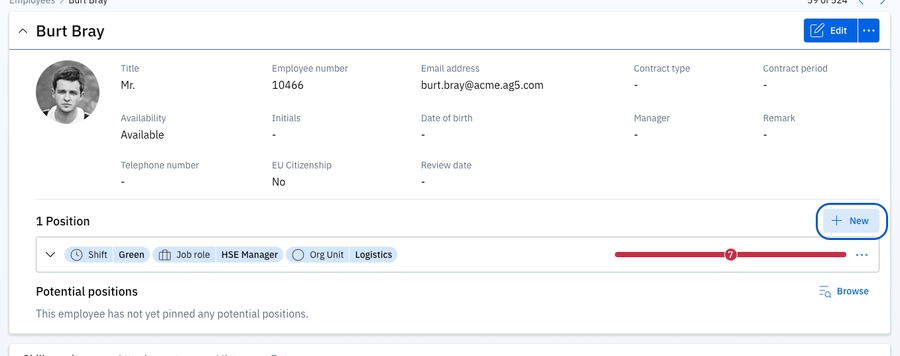
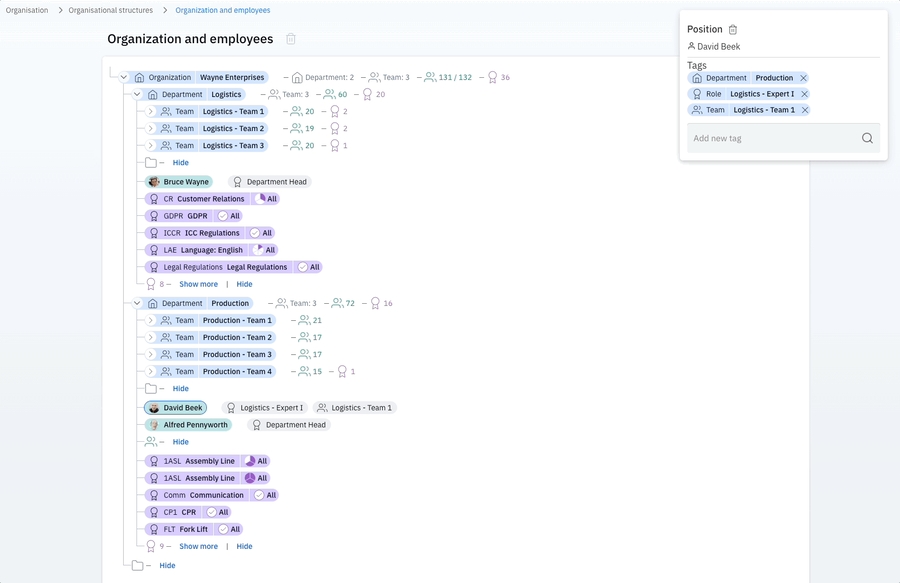
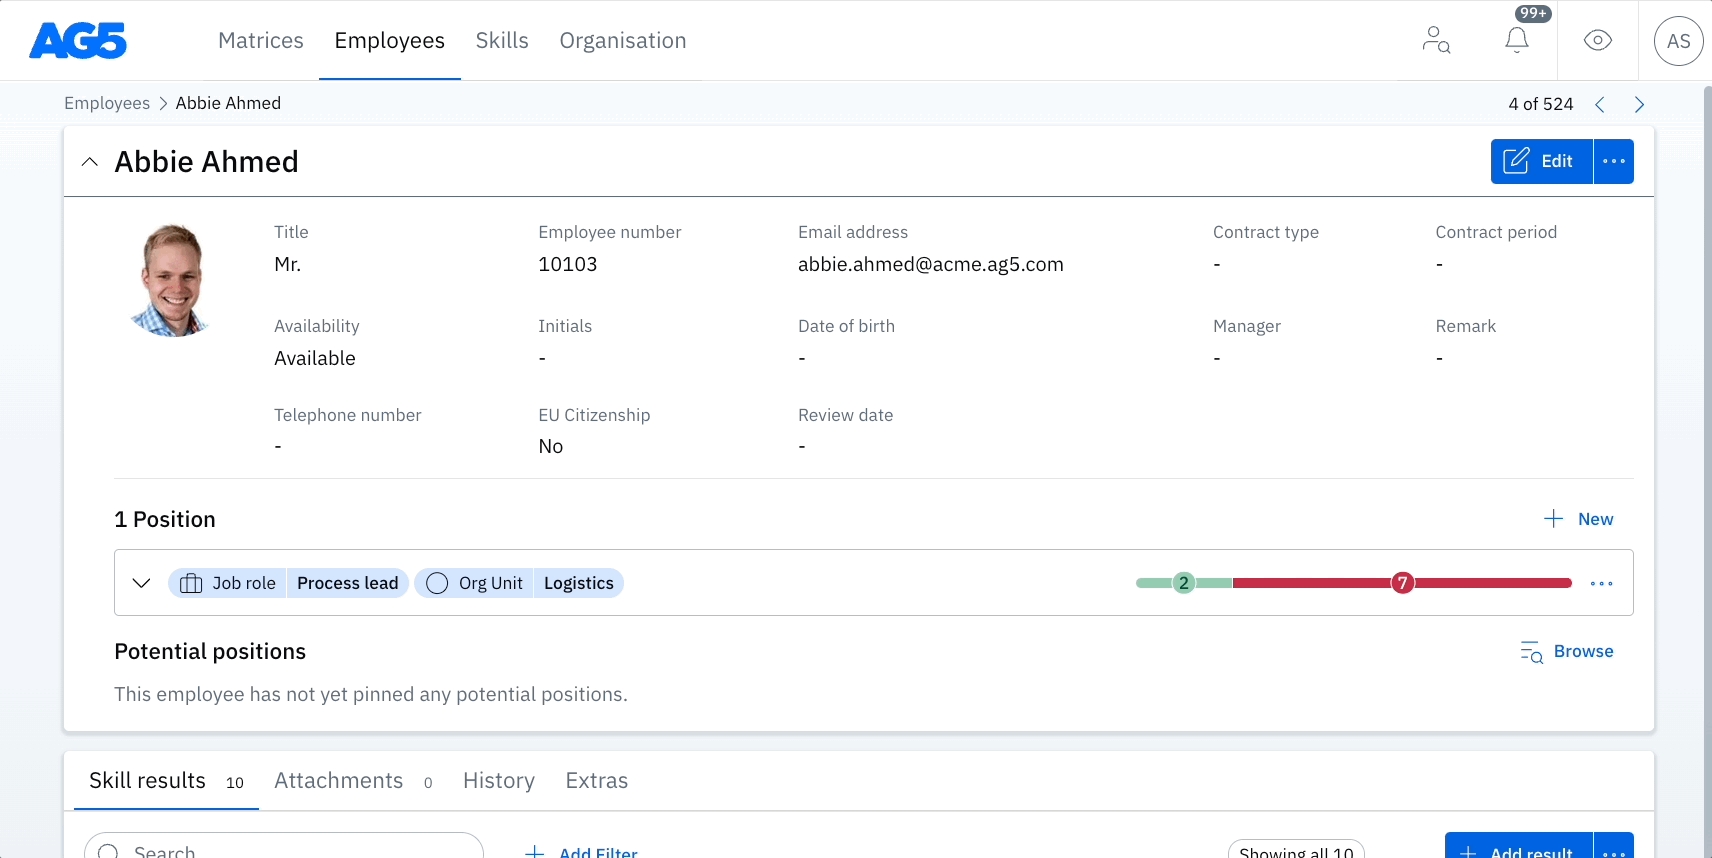
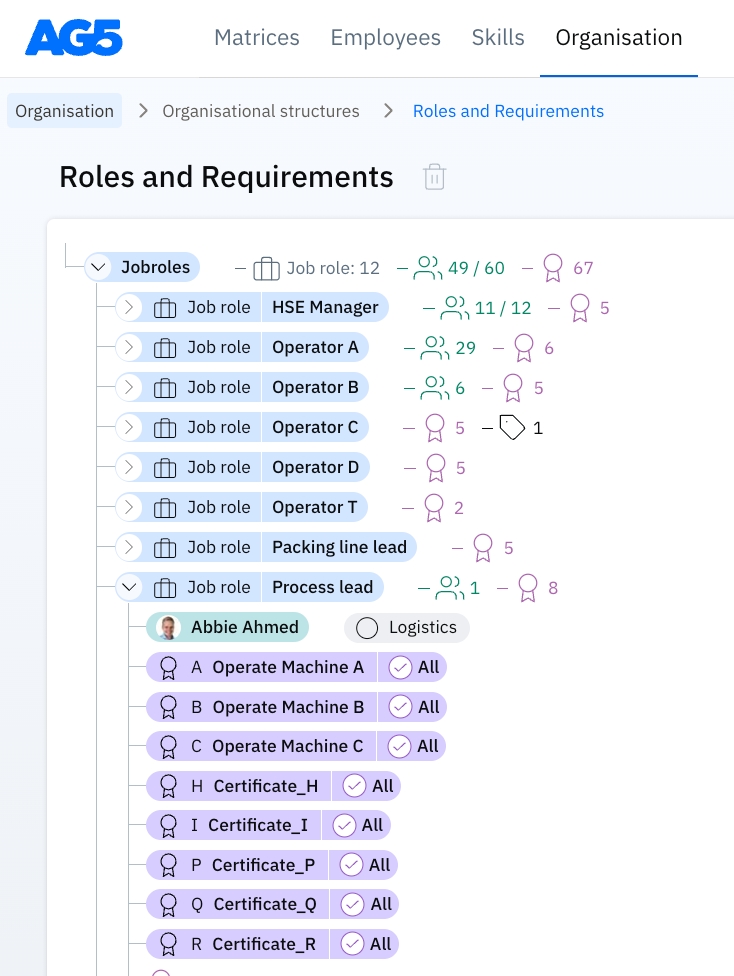
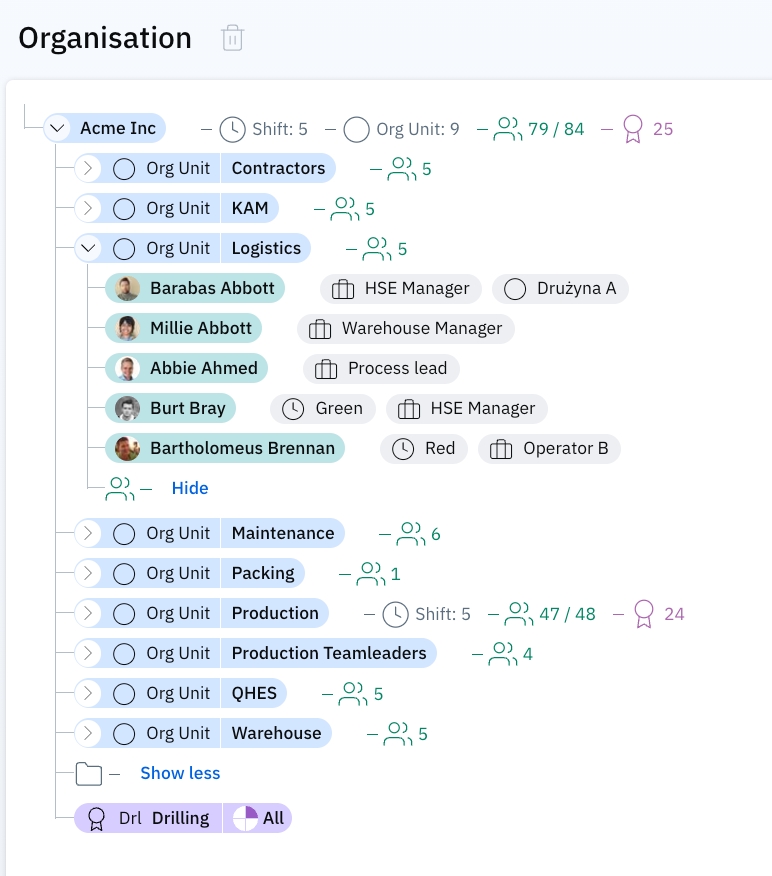
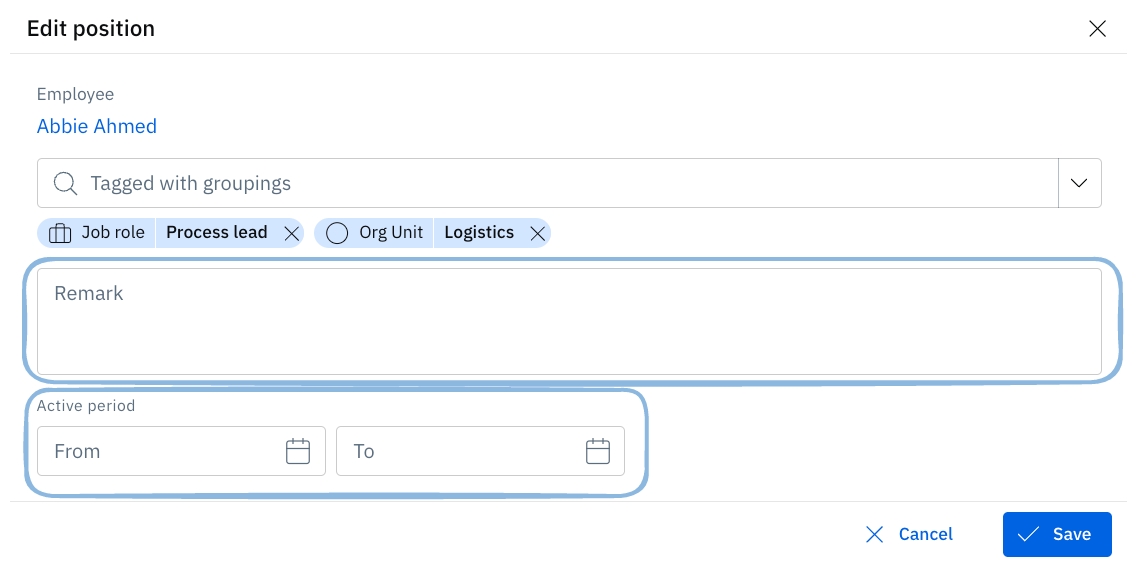
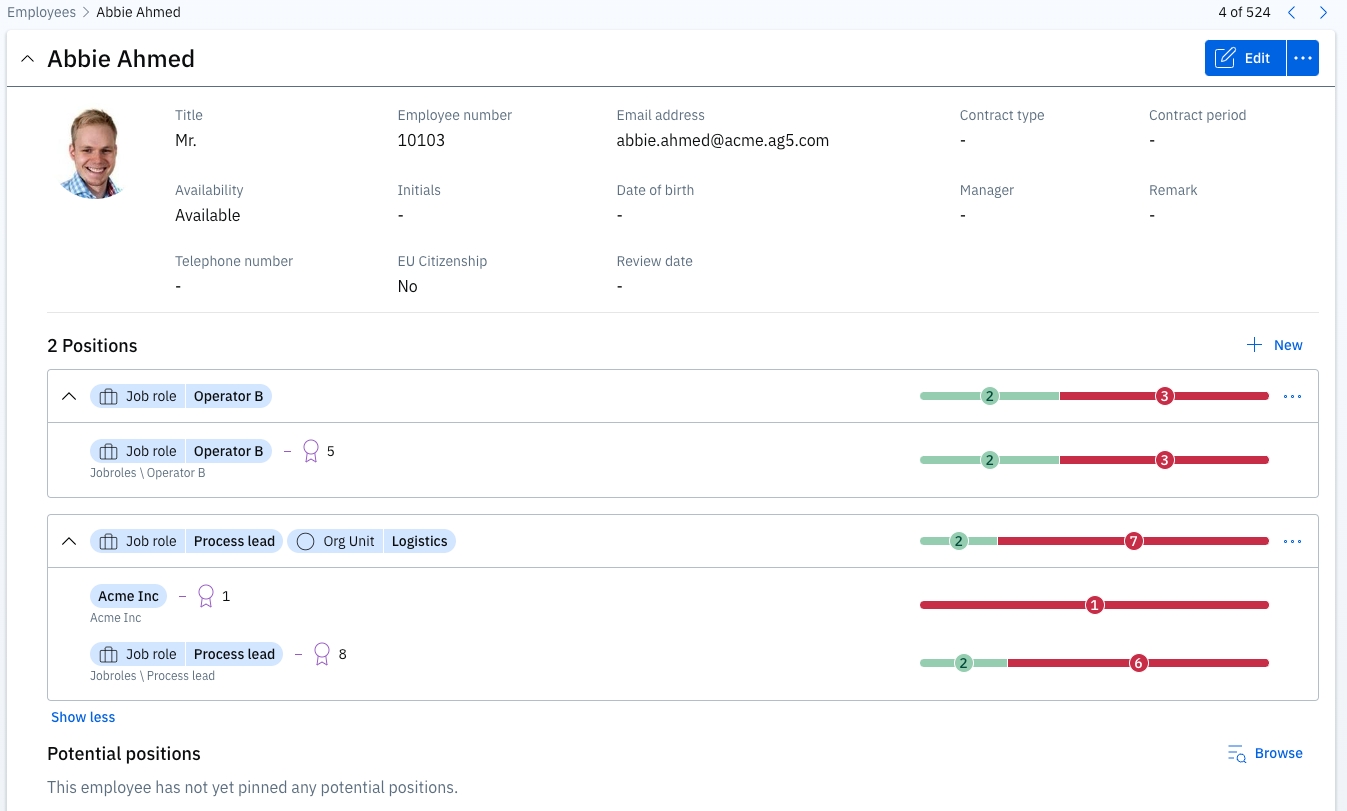
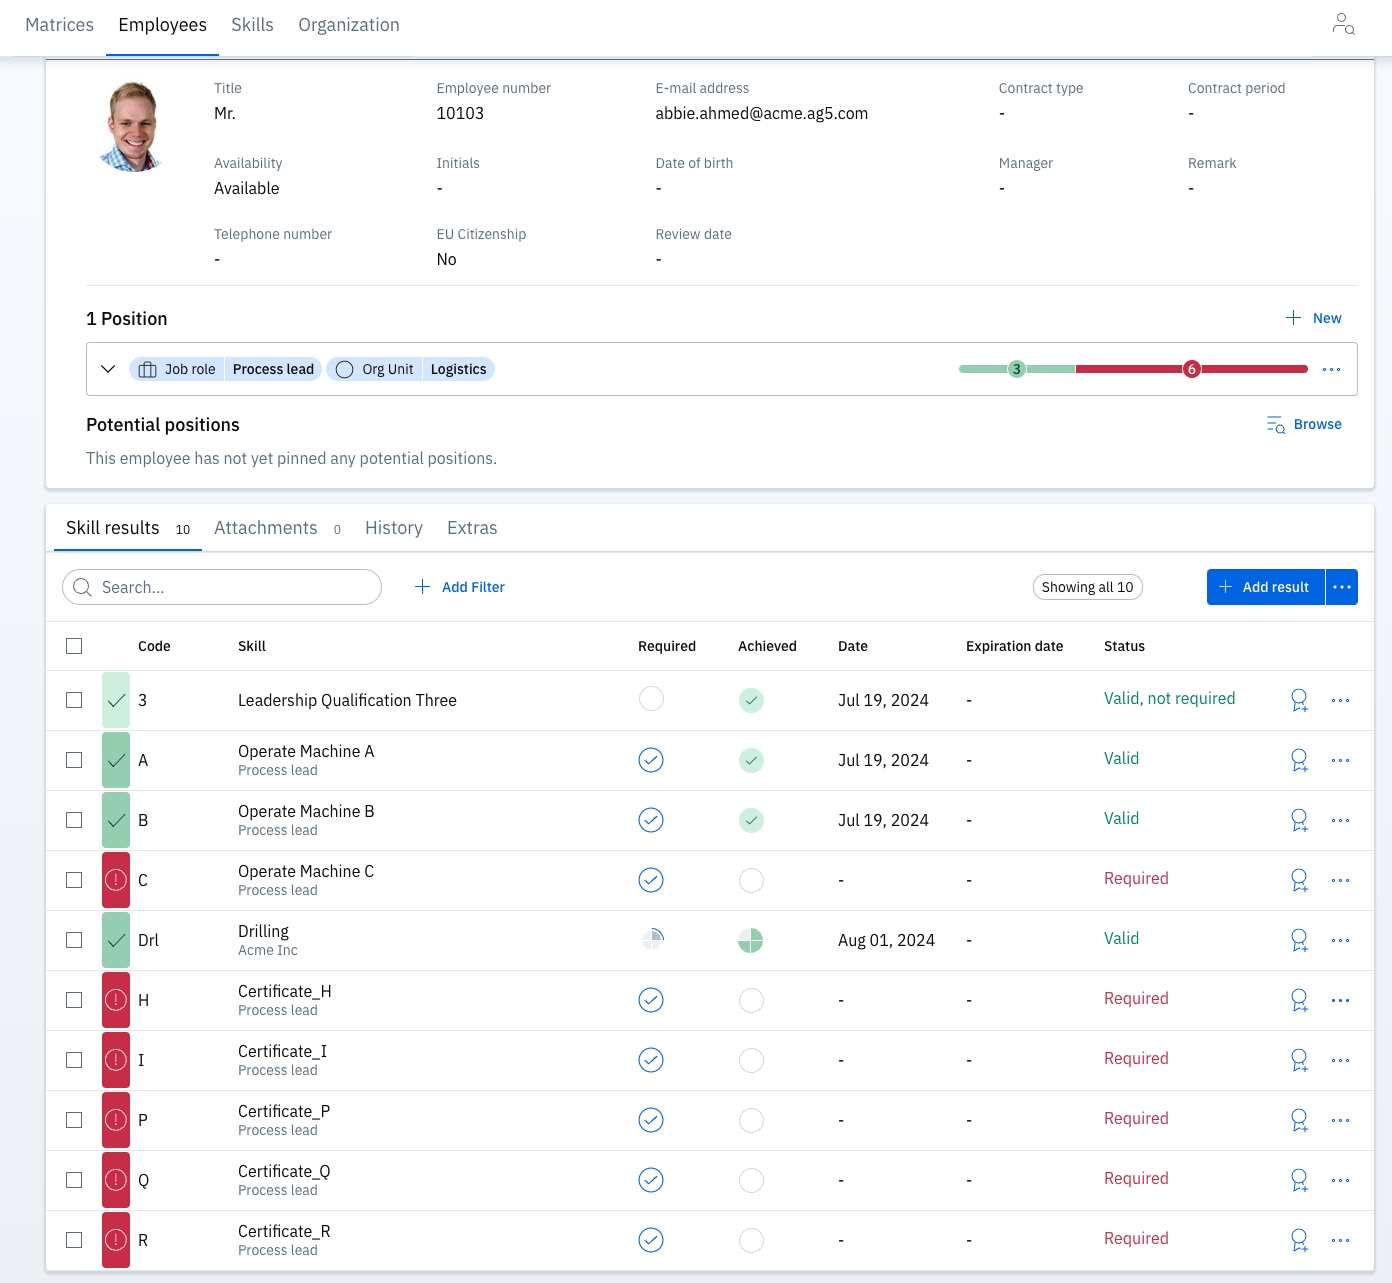
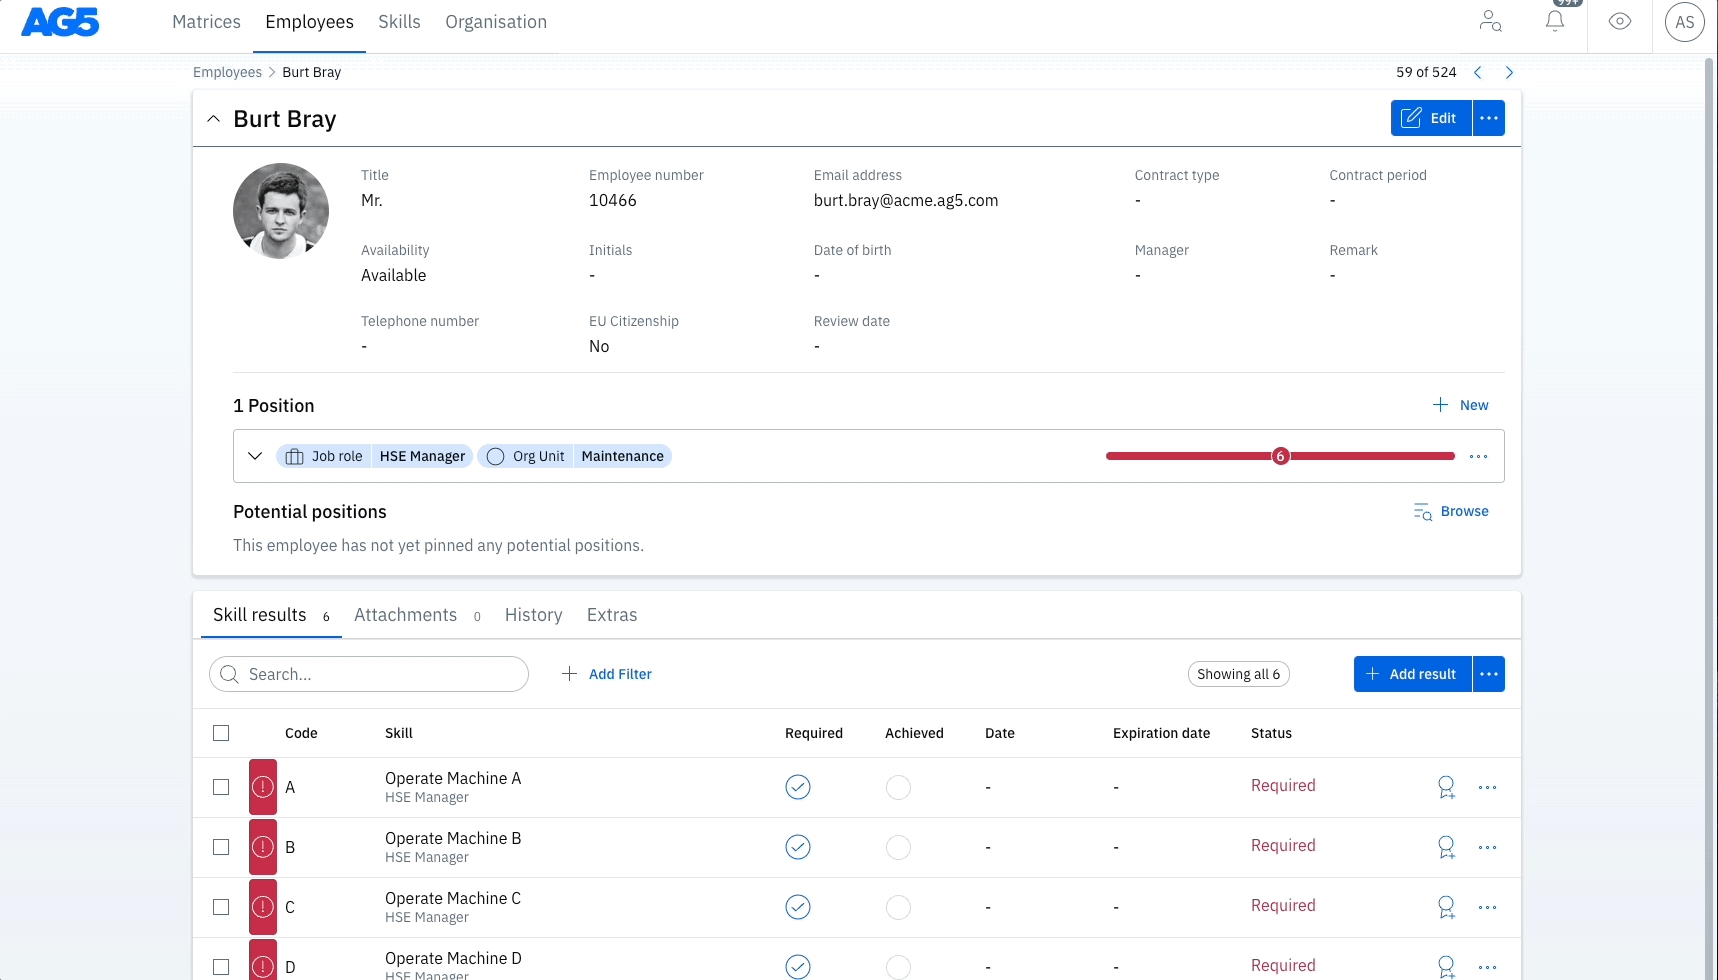
The text covers the concept of skill results, including what they are, who can add them, what different scores mean, how to add them using various methods, and where to view and track all results.
A skill (also known as a qualification) result is a score recorded against both a skill and an employee on a specific date. Results can be obtained by an employee after attending a course, taking a test, doing training, or any other form of assessment.
Results exist as records to provide insight into whether or not an employee is qualified for a specific skill.
Often, results are created when a skill is required for an employee to be able to do their job. However, it's also possible to record results for skills which are not strictly required.
Users who have the correct system role and authorization rights can add results:
Who you want to give the rights to add skill results will depend on your organizational structure. Read in these articles more about .
Results are scored against whichever is applied to a skill. All rating scales range from 0 (Failed) to an achievement of 1 or more.
Broadly speaking, a "Failed" result means that it has been attempted, but not achieved.
Failed results count just the same as Achieved results do towards your results total.
There are several ways to add a skill result. You can either add a result for a single employee or add results for multiple employees at the same time. See below for the textual and visual explanations of the different methods of adding results.
Information required
Date (required)
This is the date that this result was verified. Although it defaults to the present date, it can be changed and does not have to be the same date as the day a result is entered into AG5. AG5 separately tracks both the date submitted here, as well as the date of entry.
Score (required)
Expiration date (optional)
It's not currently possible for AG5 to set optional fields as required fields (e.g. remarks, attachments).
Open a matrix.
Select a skill of an employee.
Select the button.
Verify the date of assessment, which defaults to the current day (AG5 stores both the date of achievement, chosen at the top, and the date of entry).
Open a matrix.
Select a skill.
Select the button.
Verify the date of assessment, which defaults to the current day (AG5 stores both the date of achievement, chosen at the top, and the date of entry).
Select an employee to see their profile.
Go to the "Employees" page from anywhere in AG5.
Find the right skill.
Select thesymbol next to your chosen skill.
Go to the "Employees" page from anywhere in AG5.
Select an employee to see their profile.
Select the skills you want to add results for via the checkboxes on the left side.
Select the button which appears on the right.
Go to the "Employees" page from anywhere in AG5.
Filter or search for the employees in question.
Select the employees you want to add results for via the checkboxes on the left side.
Select the button which appears on the right side of the screen.
Go to the "Organization" page from anywhere in AG5.
Go to the "Skill results" page from Skills section.
Select the button.
Select the date.
It's also possible to submit results via a Self-Assessment.
Results can be automatically achieved through AG5 by . Automatically achieved results are just as valid as manually submitted results.
Results can also be automatically submitted and by your Learning Management System (LMS), if you choose to integrate it with AG5. Automatically achieved results are just as valid as manually submitted results.
You are able to view and track all results added from the Skill results page, which is found under Organization. This also includes results which are auto-achieved, in case you have set up .
Filters are available, if you're looking for a specific set of results.
The total number of results is visible both in the Skills section and from within the Skill results page.

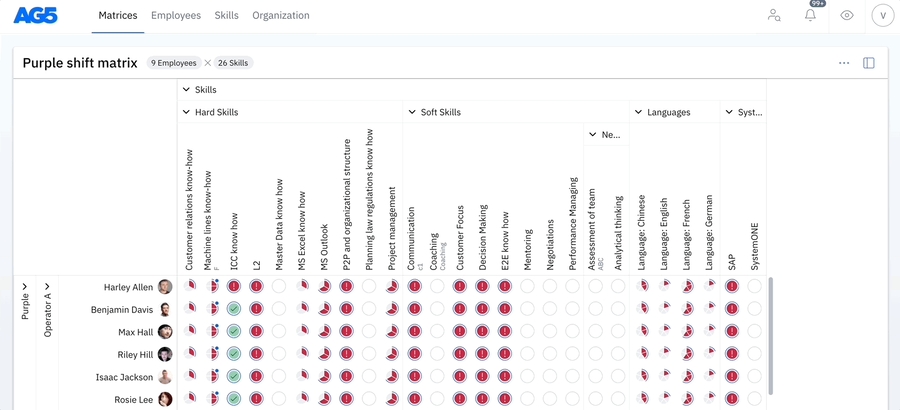
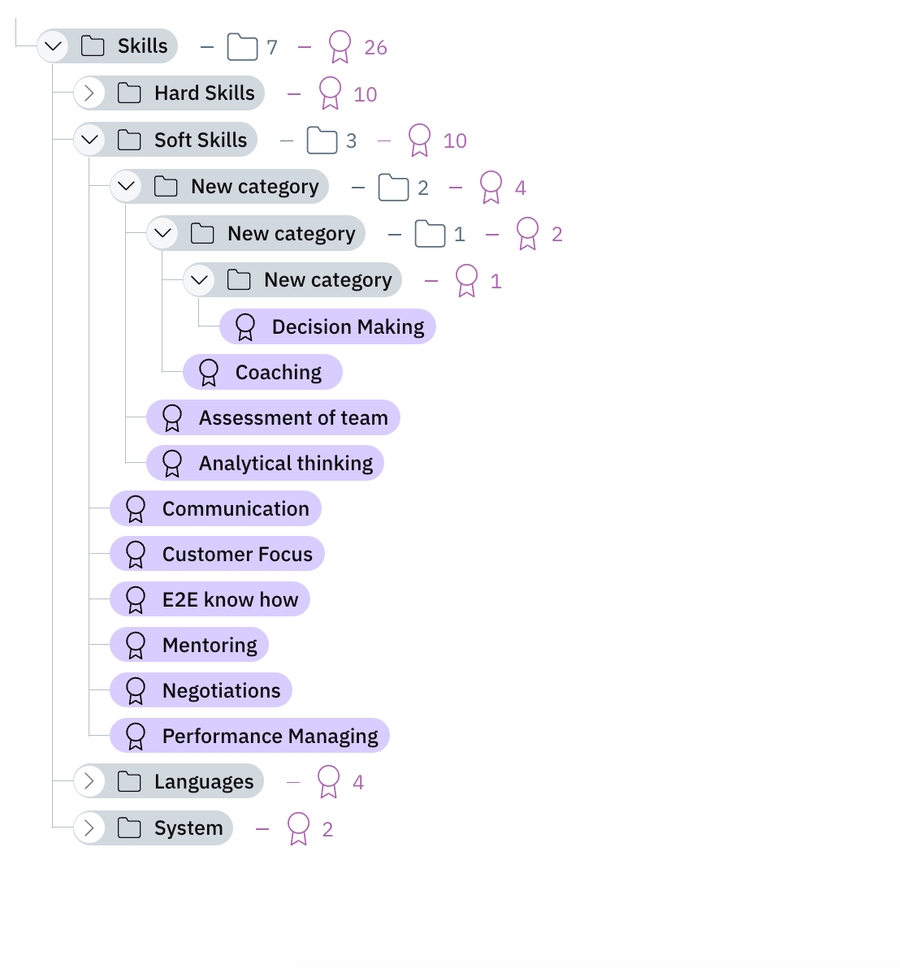


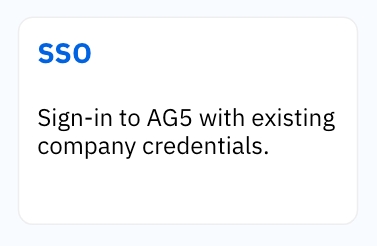
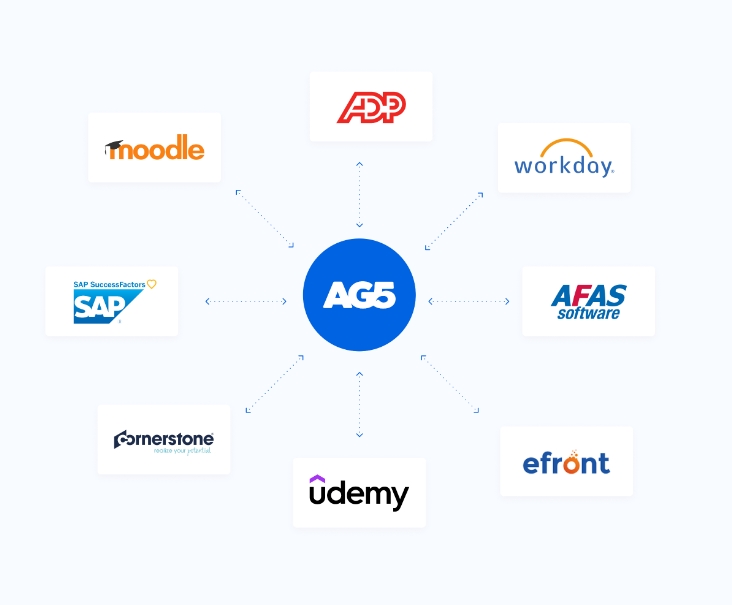
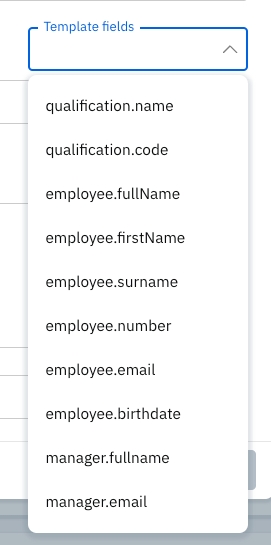

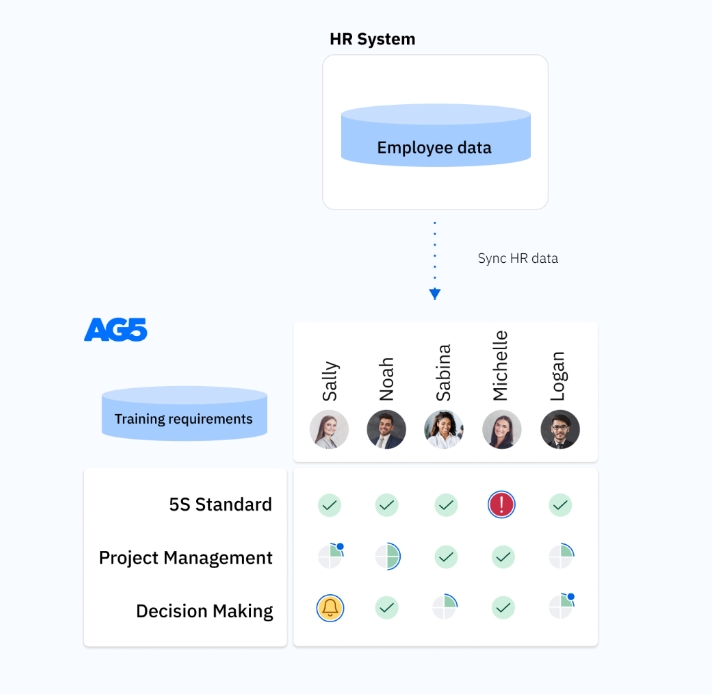
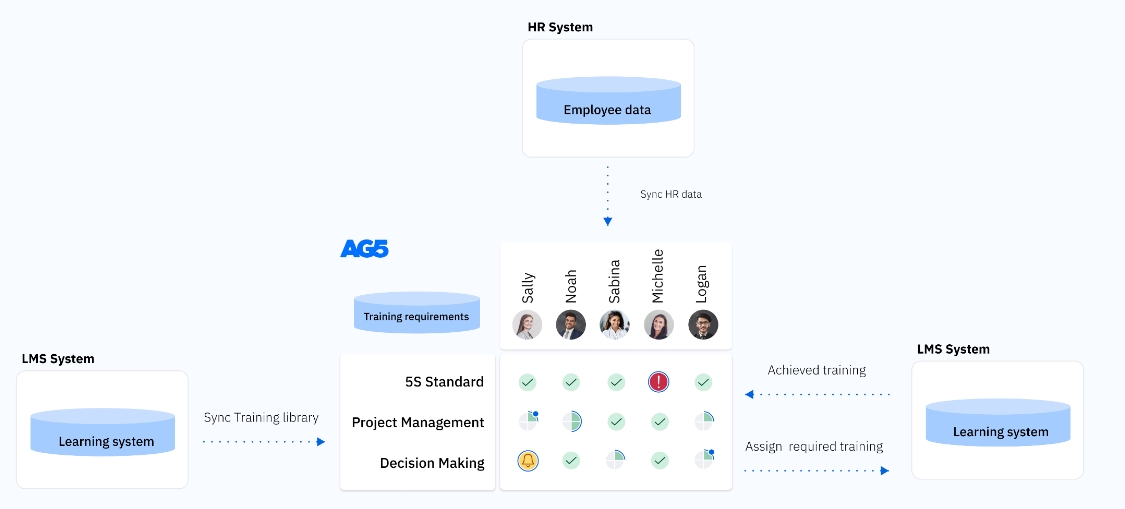
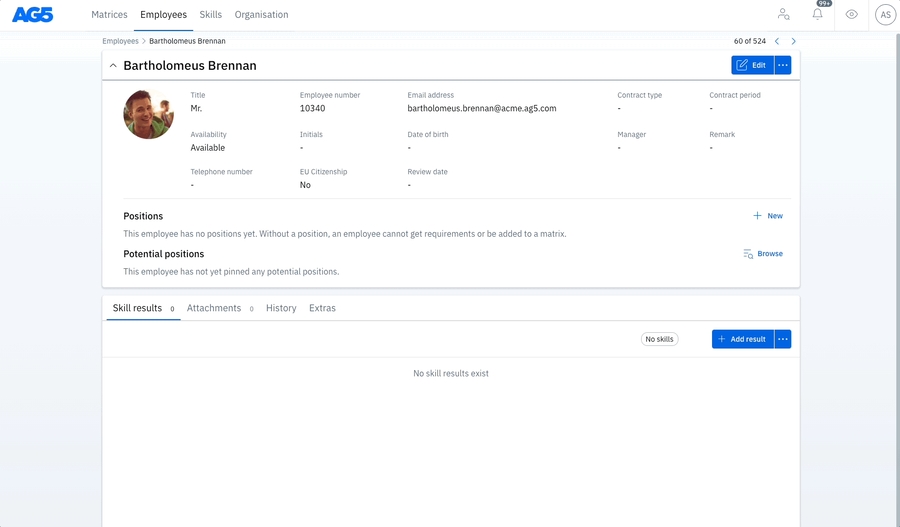
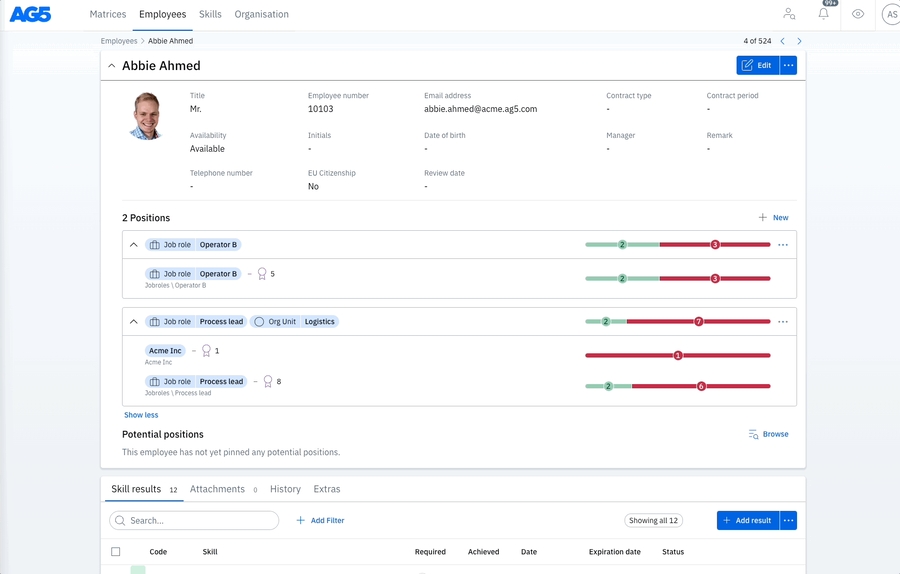
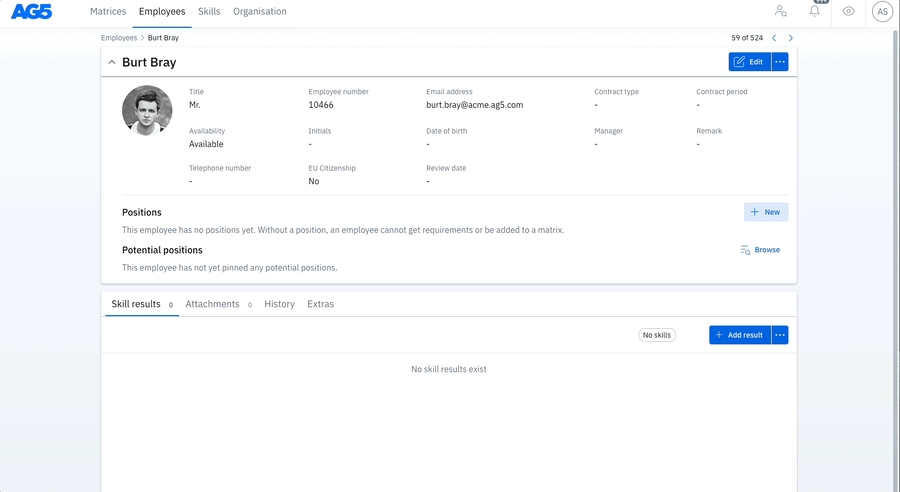

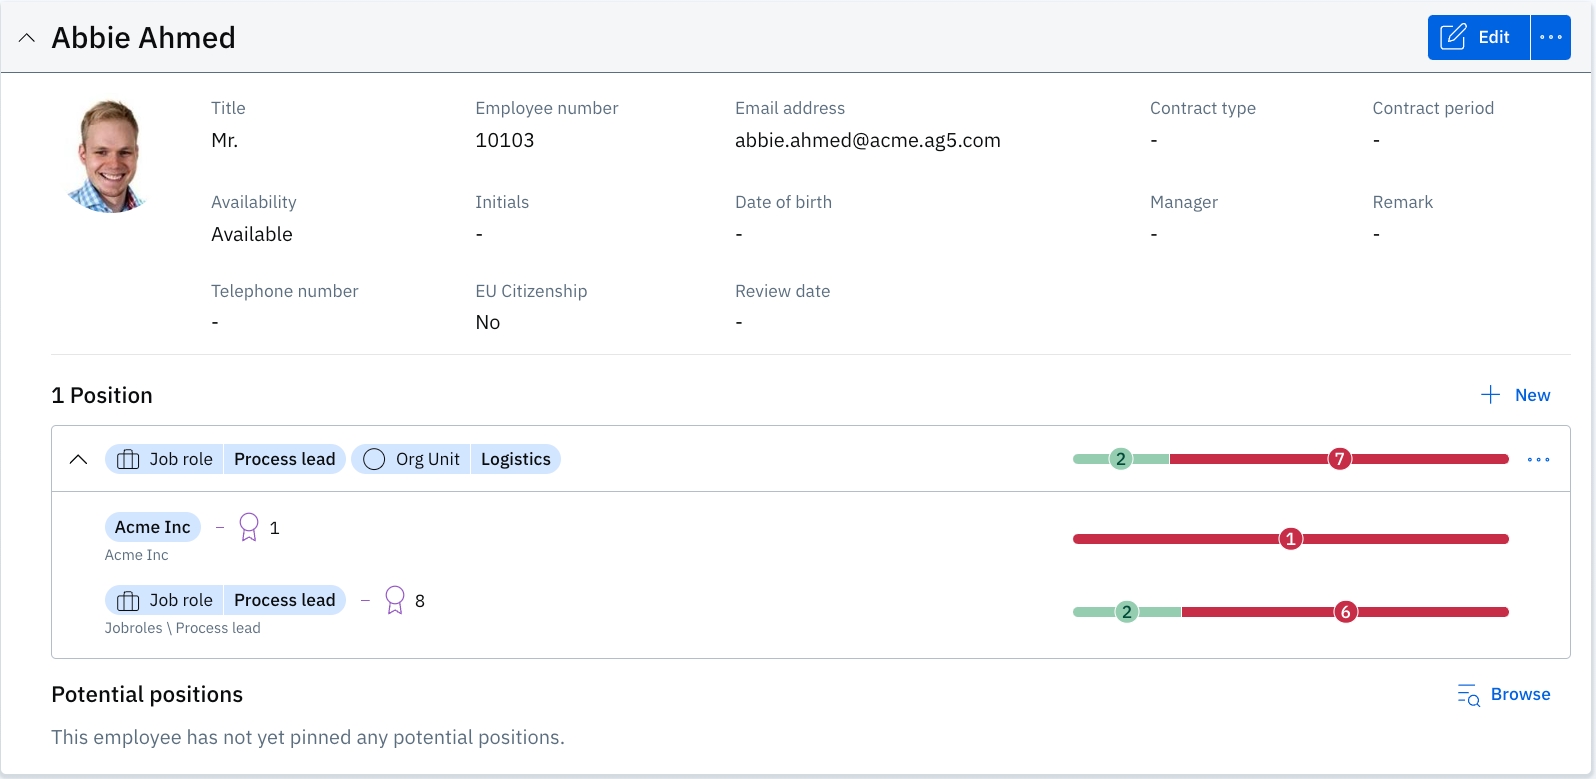
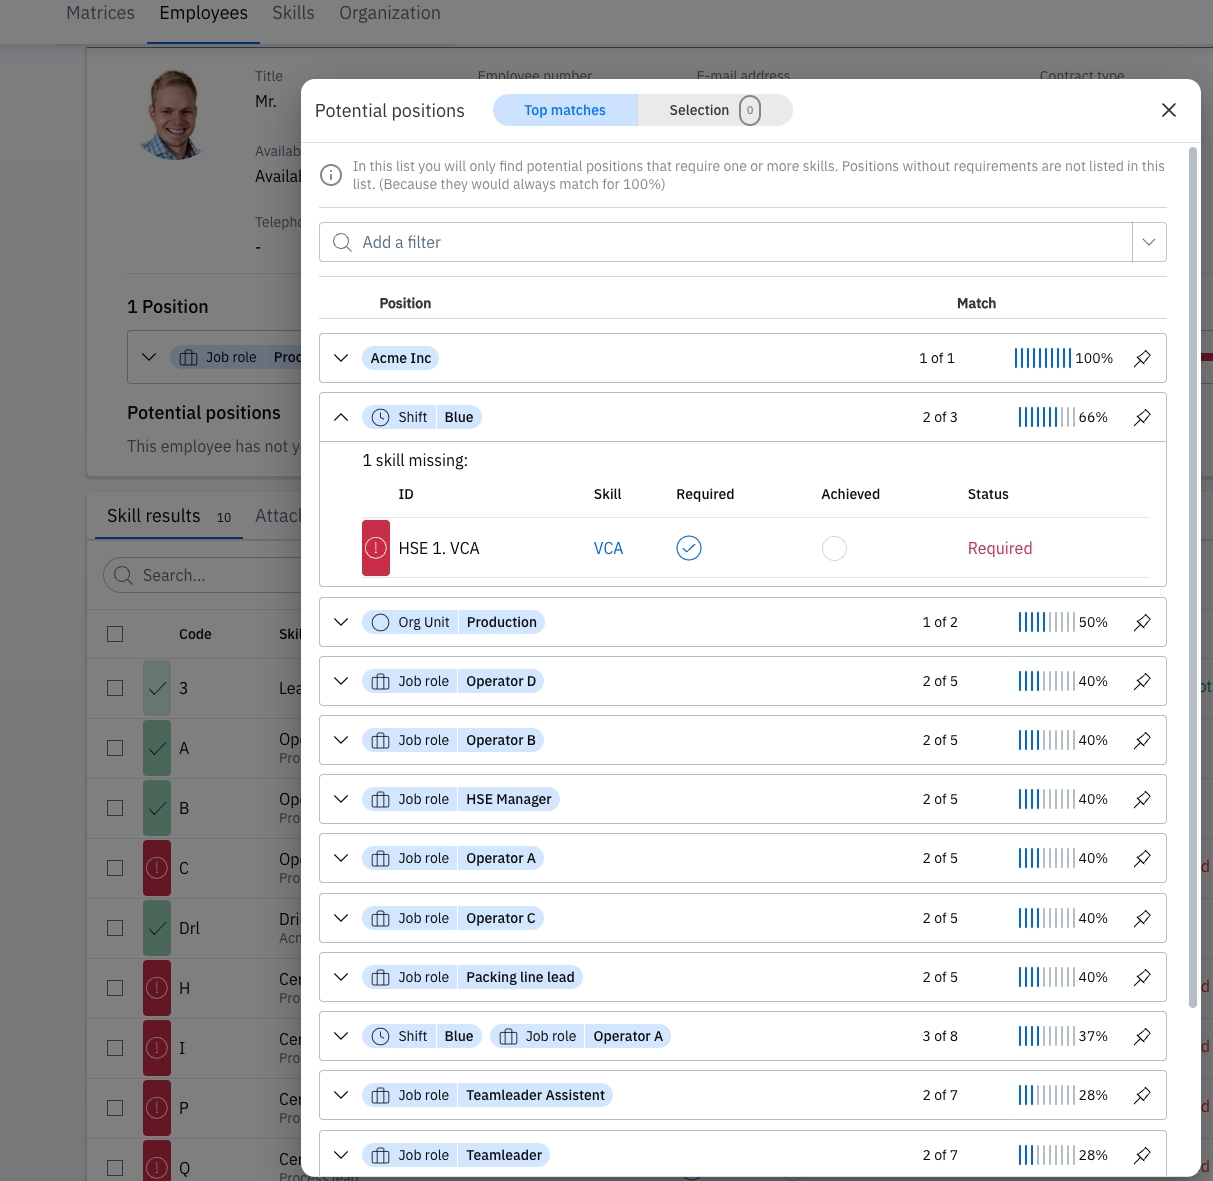
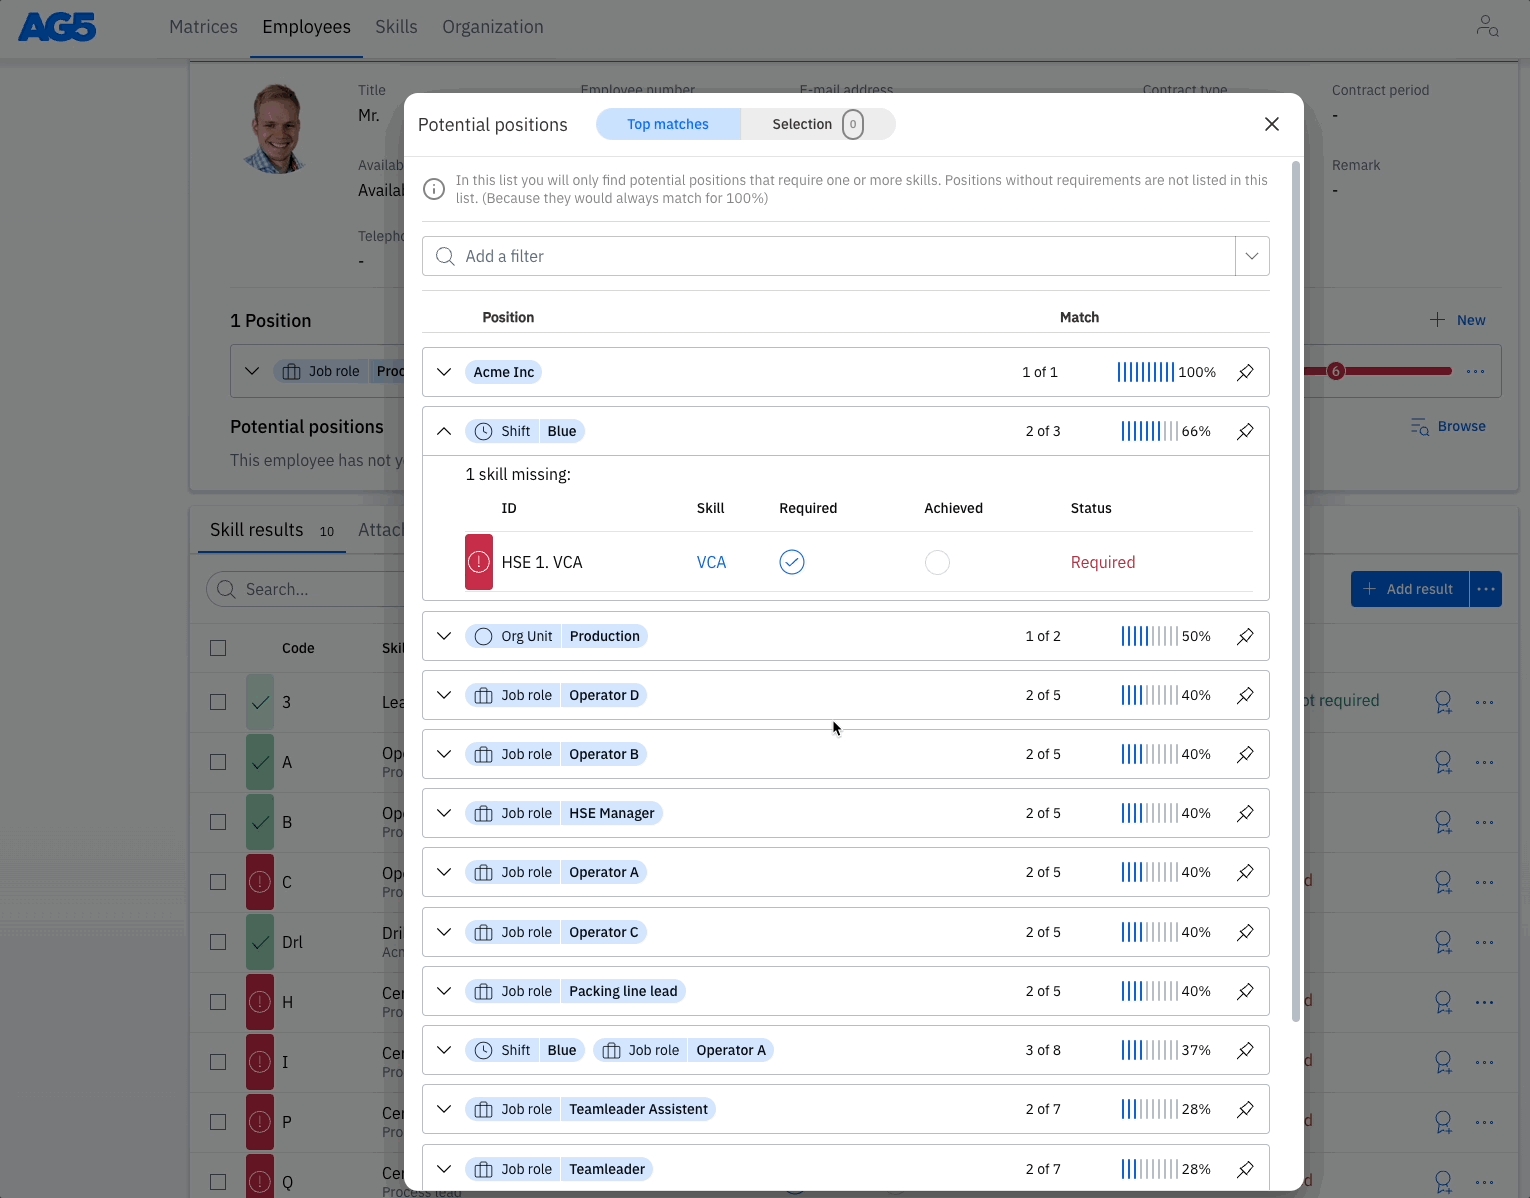
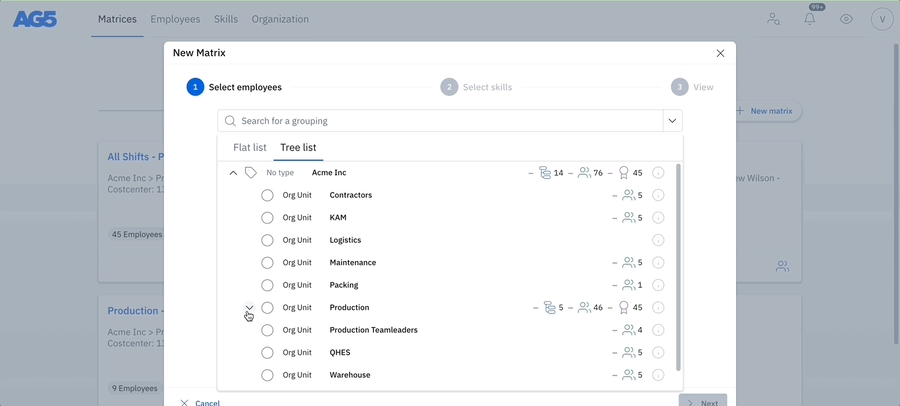

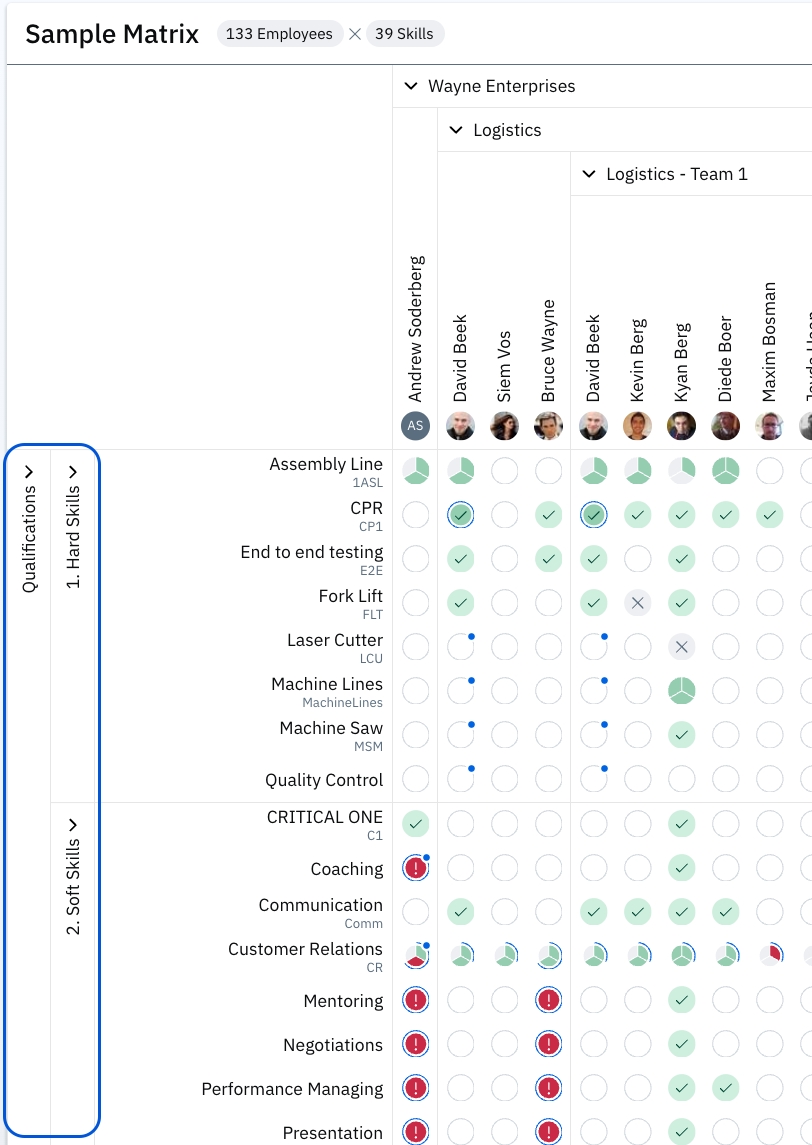
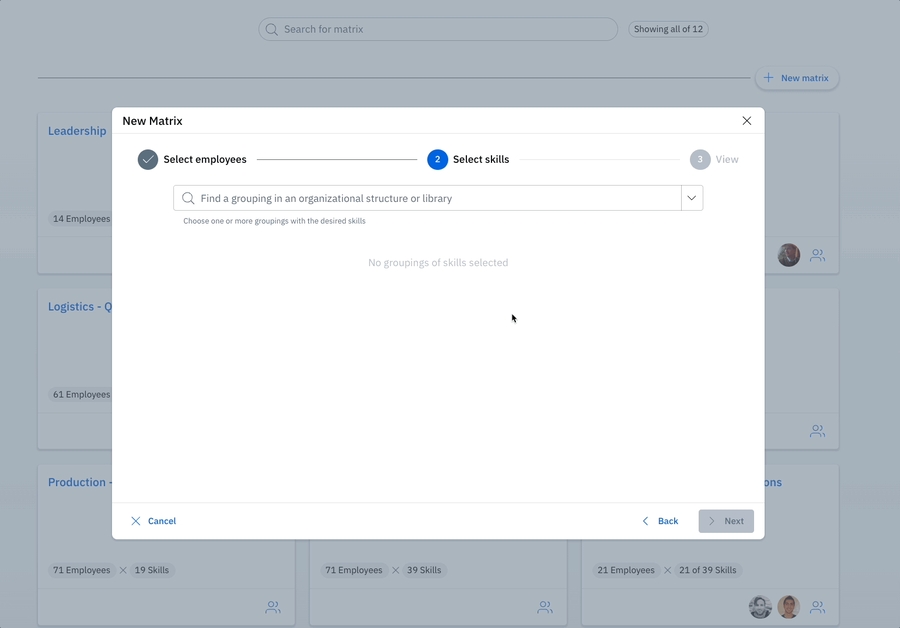

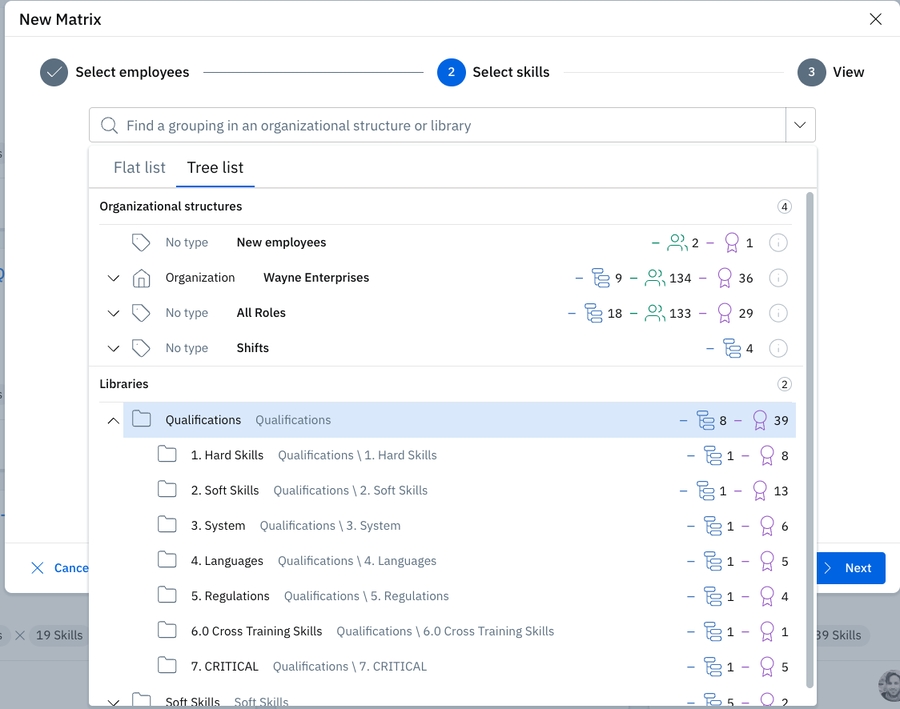


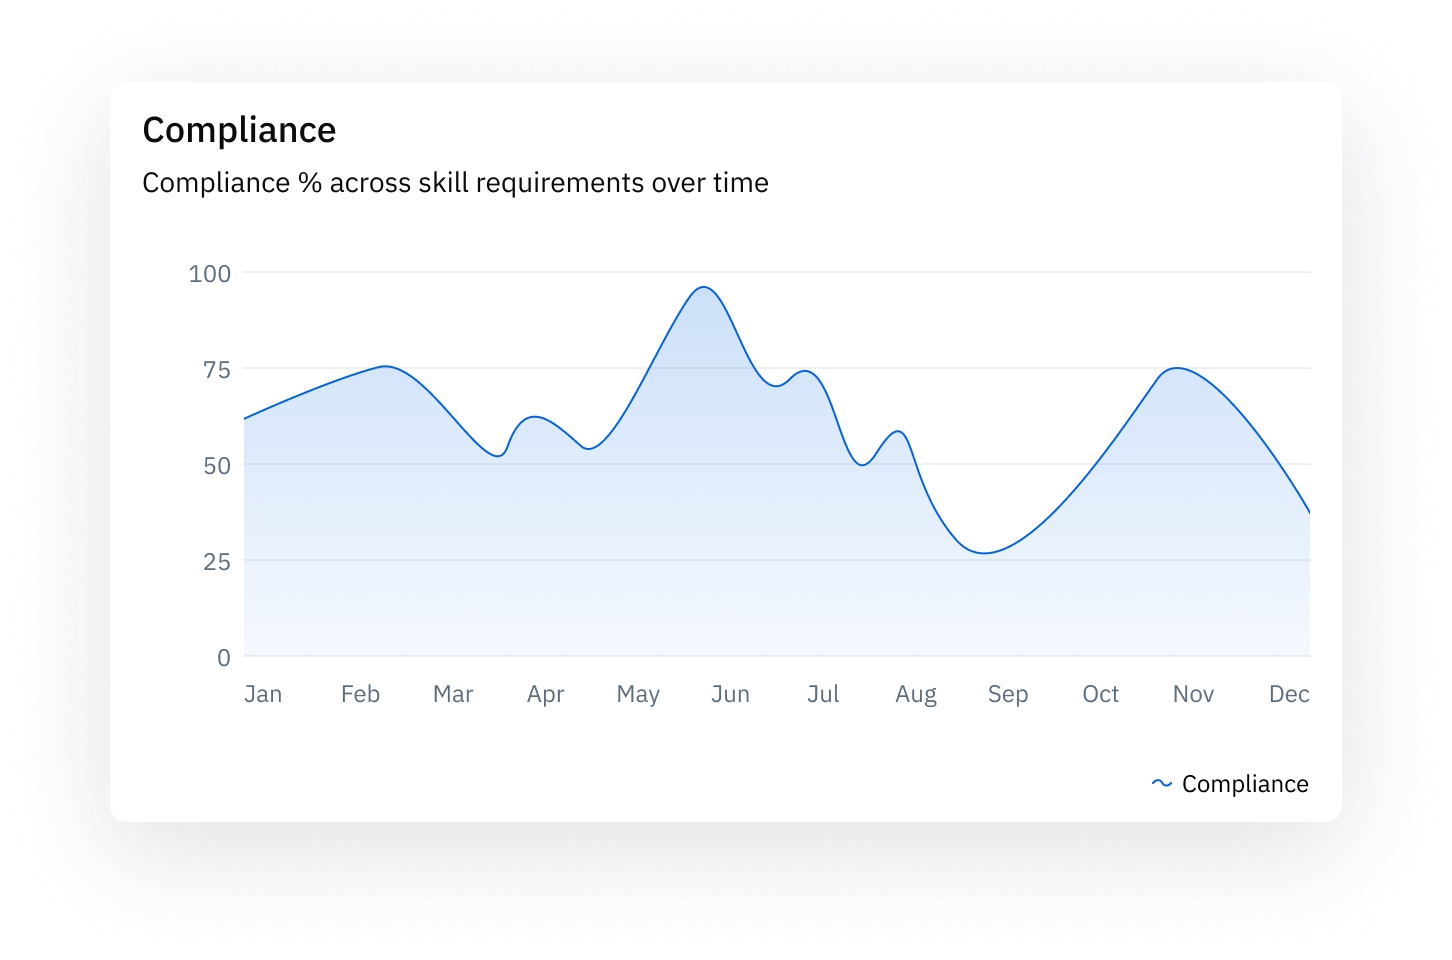
Superuser
Superuser edit rights
Senior employee
Employee
Portfolio edit rights & Matrix edit rights
If the skill has no default validity period, this field will start empty.
If the skill in question has a default validity period, then the expiration date will be automatically calculated according to that.
You can override this date if necessary.
Remark (optional)
There are no character limits for remarks.
Attachment (optional)
Select the achieved score.
Add the expiration date of the achieved skill (optional).
Add a remark (optional).
Add an attachment (optional).
Select the button.
Your skill result has been saved and the matrix is updated.
Add or override the expiration date of the achieved skill (optional).
Select the default achieved score.
Add a remark to be applied to all employees (optional).
Add an attachment to be applied to all employes (optional).
Select the default achieved score applicable for all employees.
Select the button.
Verify each result for each employee. If you have selected a default score, then you'll only have to change scores for those employees who did not meet the default score.
To enable unique remarks or attachments for only some of these employees instead of for all, click on or thesymbol (which appears after first selecting a score), to enable this.
Select the button (the number will dynamically reflect how many results you are saving).
Your skill results have been saved and the matrix is updated.
Verify the date of assessment, which defaults to the current day (AG5 stores both the date of achievement, chosen at the top, and the date of entry).
Select the achieved score.
Add or override the expiration date of the achieved skill (optional).
Add a remark (optional).
Add an attachment (optional).
Select the button.
The skill result has been saved.
Select thebutton.
Verify the date of assessment, which defaults to the current day (AG5 stores both the date of achievement, chosen at the top, and the date of entry).
Select the default achieved score.
Add or override the expiration date of the achieved skill (optional).
Add a remark to be applied to all employees (optional).
Add an attachment to be applied to all employees (optional).
Select the button.
Verify each result for each employee. If you have selected a default score, then you'll only have to change scores for those employees who did not meet the default score.
To enable unique remarks or attachments for only some of these employees instead of for all, click on or thesymbol (which appears after first selecting a score), to enable this.
Select the button (the number will dynamically reflect how many results you are saving).
Your skill results have been saved.
Select .
Search and select the skill in question.
Verify the date of assessment, which defaults to the current day (AG5 stores both the date of achievement, chosen at the top, and the date of entry).
Add an expiration date to be applied for all employees (optional).
Add a remark to be applied to all employees (optional).
Add an attachment to be applied to all employees (optional).
Select the default achieved score.
Select the button.
Verify each result for each employee. If you have selected a default score, then you'll only have to change scores for those employees who did not meet the default score.
To enable unique remarks or attachments for only some of these employees instead of for all, click on or thesymbol (which appears after first selecting a score), to enable this.
Select thebutton (the number will dynamically reflect how many results you are saving).
Your skill results have been saved.
Select the employee.
Select the skill.
Select the score.
Select the expiry date (optional).
Add a remark (optional).
Add an attachment (optional).
Select the button.
Your skill result is saved.
Example: Business role
AG5 role
AG5 Authorization
Manager
Superuser
Superuser edit rights
Employee
Employee
Portfolio edit rights
External trainer
User
Matrix edit rights
A manager from another department (option 1/2)
User
Matrix edit rights
A manager from another department (option 2/2)