> For the complete documentation index, see [llms.txt](https://docs.ag5.com/llms.txt). Markdown versions of documentation pages are available by appending `.md` to page URLs; this page is available as [Markdown](https://docs.ag5.com/skills-matrix/skills-matrix-basics.md).
# Skills matrix basics
### **1. What is a skills matrix?**
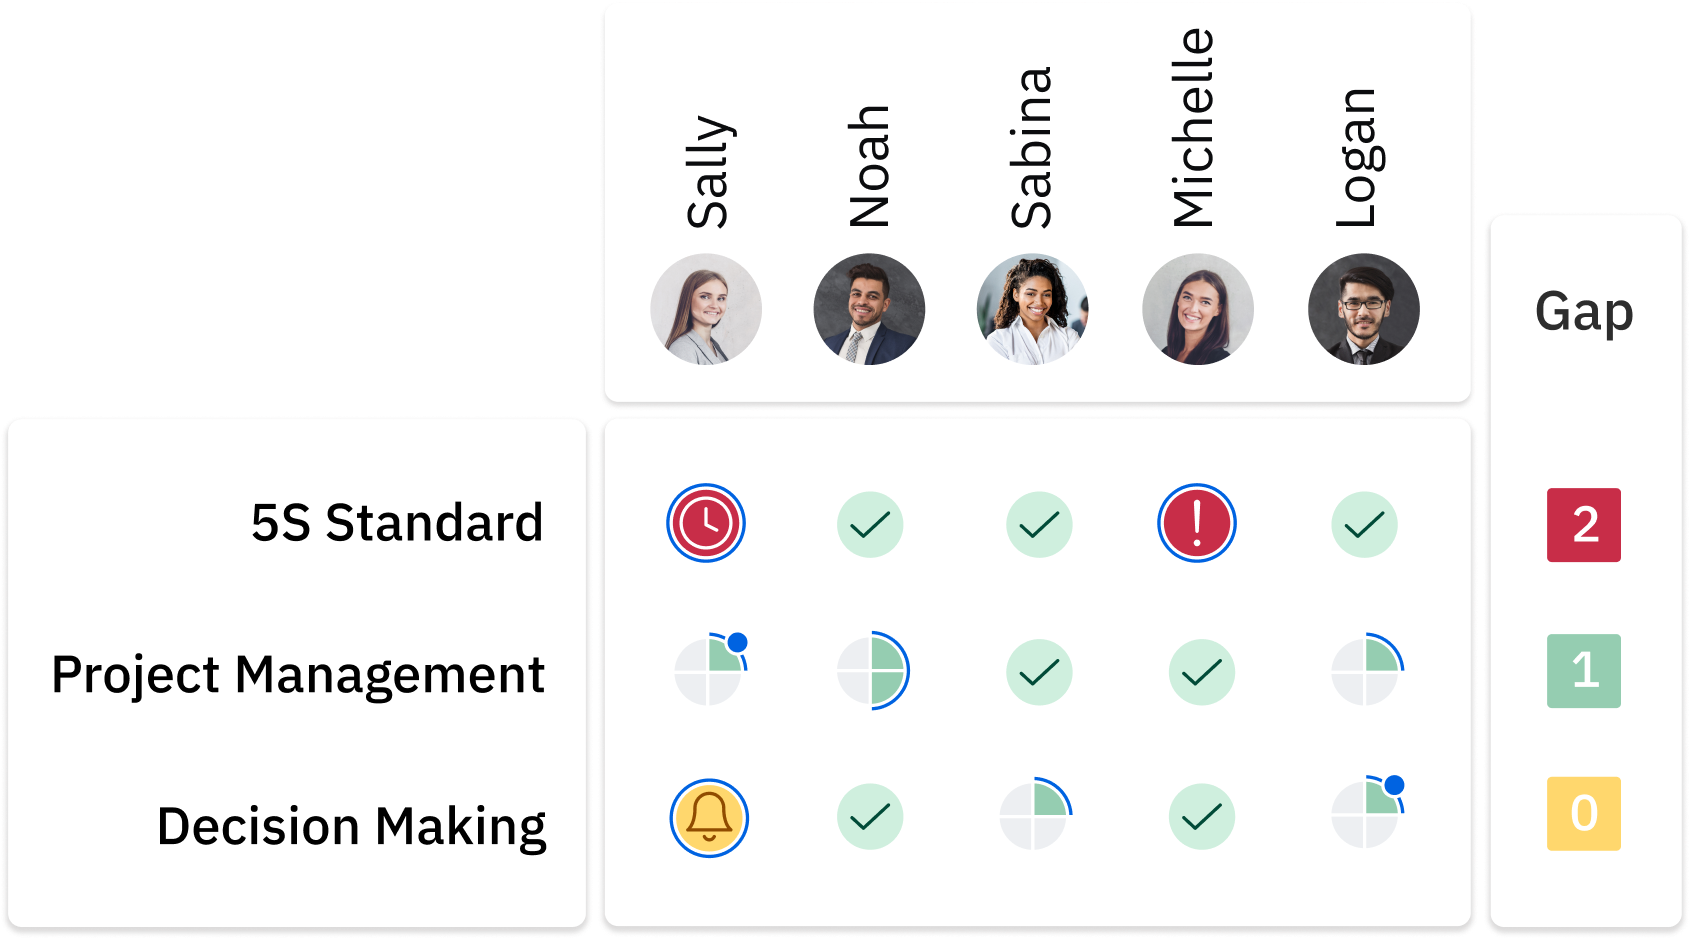
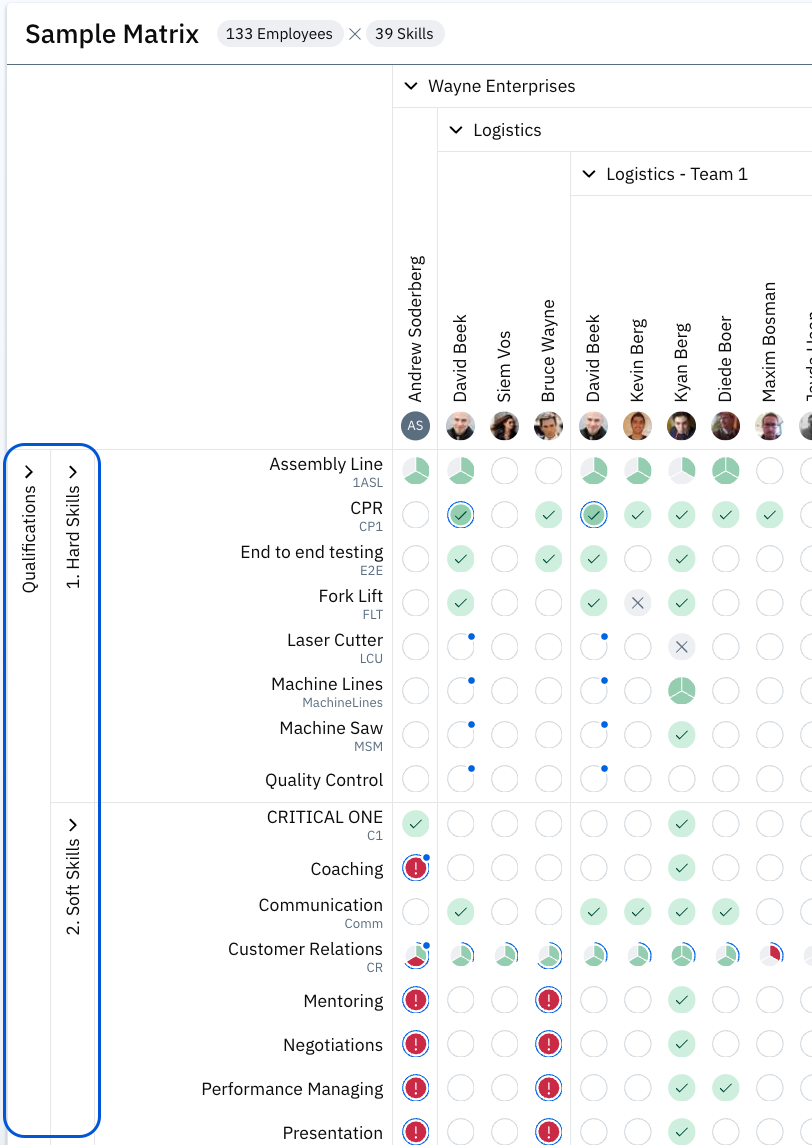
A (skills) matrix in AG5 is a table with employees on one axis and skills on the other.
Just below is a sample matrix with employees on the horizontal axis and skills on the vertical axis. The intersect shows the status of each skill as it pertains to the employee.
For example, we can see that Noah, Sabrina and Logan all have the "5S Standard" skill, while it's a gap for Sally and Michelle.
### **2. What is the purpose of a skill matrix?**
Skills matrices provide actionable insights - a clear overview of each employee's skill status, and the ability to close any skill gaps with a few clicks.
Matrices can include as many or as few employees and skills as needed. For example, you might create one matrix for an entire department, and have separate matrices for teams and team leaders.
The skills matrix answers the following questions:
* How qualified is my team?
* How qualified are my individual employees?
* Which skills are my employees lacking? (Gap analysis)
* Which skills have a surplus of skilled employees?
* Which skill results have expired?
* Which skill results are about to expire?
* Do employees meet the required skill level?
* Does the team meet the required skill level?
* And more.
### **3. How to create a matrix?**
**If you are setting up AG5 for the very first time, we suggest you begin with** [**this article**](/getting-started-with-ag5/what-is-ag5.md) **first.**
Matrices operate off the skills, employees and organizational structures you've already added to/built in AG5. If you have yet to do those things, please check out these pages first:
* [Create employees](/employees/how-to-create-a-new-employee.md)
* [Create skills](/skills/what-is-a-skill.md)
* [Add those skills to a library](/skills/skill-libraries.md)
* [Create organizational structures](/employees/organizational-structures.md)
***
When you're ready, navigate to the Matrices tab.
* **Click on 'New Matrix'** - This button is located to the right of the search bar:
**1) Select employees** - Employees are **not** selected individually. Instead, employees are added to a matrix by choosing employee groupings (or tags). All employees associated with the chosen groupings will appear on the matrix. The groupings an employee has depends on their positions. \
\
We have two different methods for finding groupings.
* *Flat list* - This is for finding groupings by search:
* *Tree list* - This presents all groupings organized exactly how they're laid out in the organizational structures.\
\
Choosing a grouping with many sub-groupings will make those sub-groupings appear on the matrix. For more information about organizational structures, [check out this article](/employees/organizational-structures.md).\
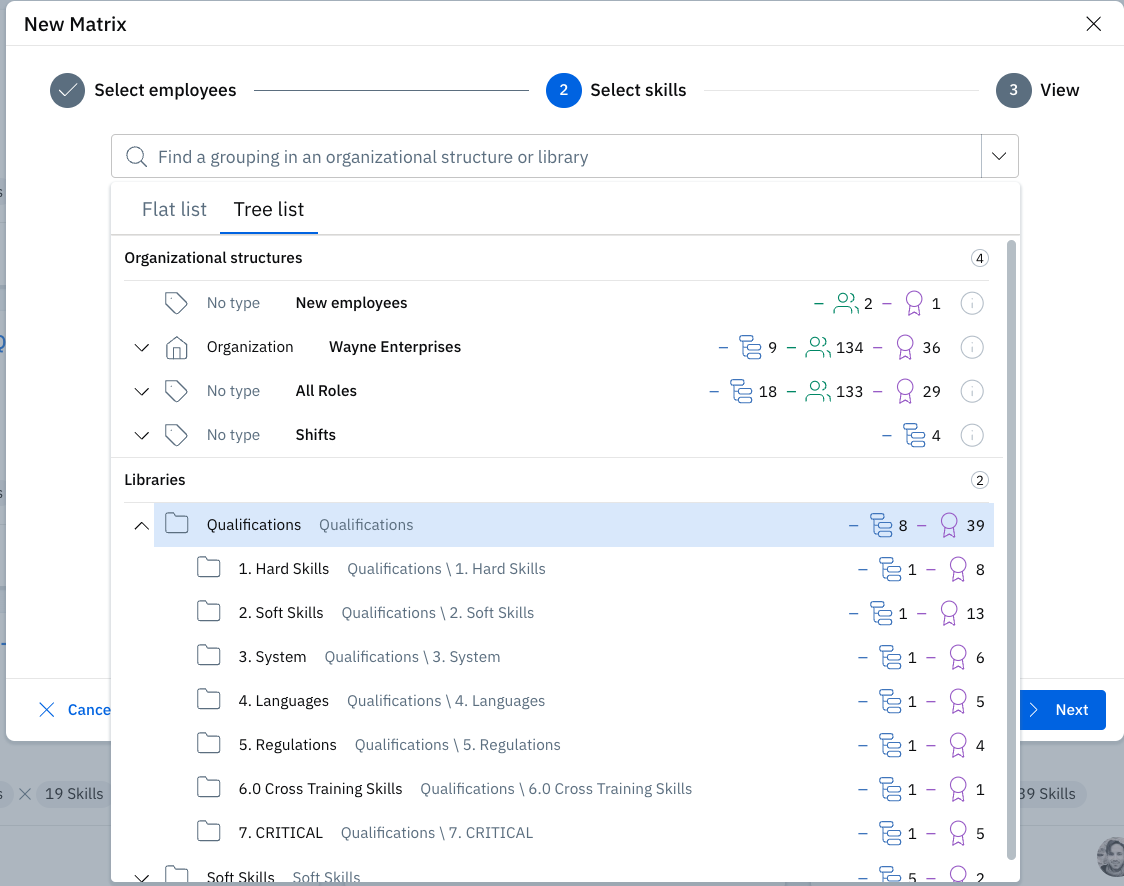
**2) Select skills** - Next, select the skills you want to see in the matrix. As above, you can use either the flat list or tree method for choosing categories or groupings. \
\
Similarly to how employees are selected, skills are **not** selected individually. Instead, skills are selected by either choosing a category from the Skills library, or by choosing a grouping from the Organizational structures.
Selection by category (Libraries): This is the most straightforward way of adding skills to a matrix. Simply pick a category (folder) from a library, and all skills from within that category will appear on your matrix.
\
If the category you choose has subcategories, then those subcategories will appear on the matrix as sub-headers. \
\
For example, here we select the top category "Qualifications", which has "1. Hard Skills", "2. Soft Skills", "3. System", etc as subcategories:
The matrix includes those as subheaders:
Selection by grouping (Organizational structures): You can also build out the skill axis by choosing groupings with skill requirements. In this case, requirements for that grouping (department, job role, team, etc) will be the skills that appear on the matrix.\
\
If built this way, the skill axis will be categorized by grouping, instead of by category.\
\
As above, you can use either the flat list or tree method for choosing categories or groupings.\
**3) View and save** - The "View" section allows you to review the employees and skills that have been selected. \
\
This is where a matrix can be given a name and any relevant remarks can be added. \
\
Also, using the "Show only if" function, it's possible to make a matrix more compact by only showing skills or employees when the following criteria are satisfied:\
\

\
To modify any of these choices, click on "Back" to go back a step. Finally, click "Save".
\
To edit a matrix after it's been created, click on 'Matrix options' (the icon with the 3 dots in the top right corner of the matrix). This takes you back to the matrix creation menu.

Display Settings are accessed by clicking on the  panel icon to the right of the options menu.\
Here, users can invert columns and rows, adjust row and column and header sizes, change the matrix view (gap \[default], required or achieved), and view the legend for the various symbols.

---
# Agent Instructions
This documentation is published with GitBook. GitBook is the documentation platform designed so that both humans and AI agents can read, navigate, and reason over technical content effectively. Learn more at gitbook.com.
## Querying This Documentation
If you need additional information that is not directly available in this page, you can query the documentation dynamically by asking a question.
Perform an HTTP GET request on the current page URL with the `ask` query parameter, and the optional `goal` query parameter:
```
GET https://docs.ag5.com/skills-matrix/skills-matrix-basics.md?ask=&goal=
```
`ask` is the immediate question: it should be specific, self-contained, and written in natural language.
`goal` is optional and describes the broader end goal you are ultimately trying to accomplish on behalf of the user. GitBook uses it to tailor the answer towards what is most useful for that goal.
The response will contain a direct answer to the question and relevant excerpts and sources from the documentation.
Use this mechanism when the answer is not explicitly present in the current page, you need clarification or additional context, or you want to retrieve related documentation sections.